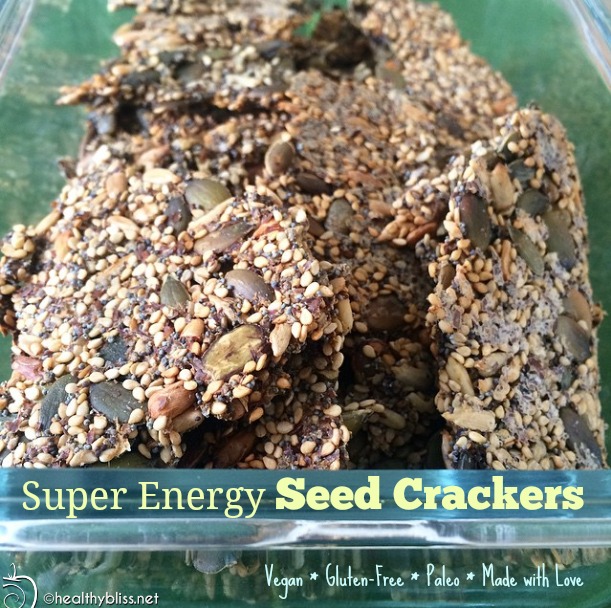
Recipe for Super Energy Seed Crackers…& without a Dehydrator!
This is one of the easiest recipes you could ever make and the results are super-amazing-delicious! And, you can share these seed crackers with your vegan, vegetarian, gluten-free, yeast-free, dairy-free, sugar-free, anti-candida AND paleo friends. Now, that IS amazing!
Check out this fast and easy recipe – you’ll be amazed!
Super Energy Seed Crackers Recipe
Ingredients:
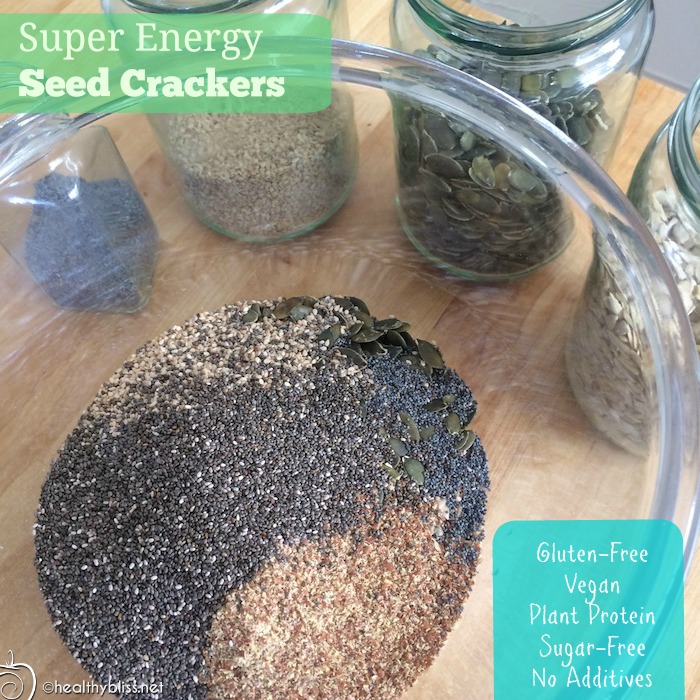
- 1 cup organic pumpkin seeds, raw and unsalted
- 1 cup organic sunflower seeds, raw and unsalted
- 1/2 cup organic ground flaxseed
- 1/2 cup organic whole flaxseed
- 1/2 cup organic chia seeds
- 1/2 cup organic sesame seeds, raw and unsalted
- 1 Tbsp. organic poppy seeds
- 1 organic medium size white onion
- 1 tsp. Himalayan salt
- 1 cup water
- 2 sheets of baking parchment paper
- Optional added spices: cayenne pepper, cumin or turmeric powder
Directions:
1. In a large bowl, combine all the dry seeds.
2. Peel the outer skin from the onion. Then, using a grater, grate the onion on the medium-size holes. Add to the mix.
3. Measure 1 cup of filtered water and add to the bowl. Stir all ingredients together, adding the salt and any additional spices (I make these without any dried spices because they are delish enough on their own!) You can also grate a few raw garlic gloves and add them is desired. Once stirred, the mix should be sticking together. If not, slowly add a few more tablespoons of water until the mixture stays together.
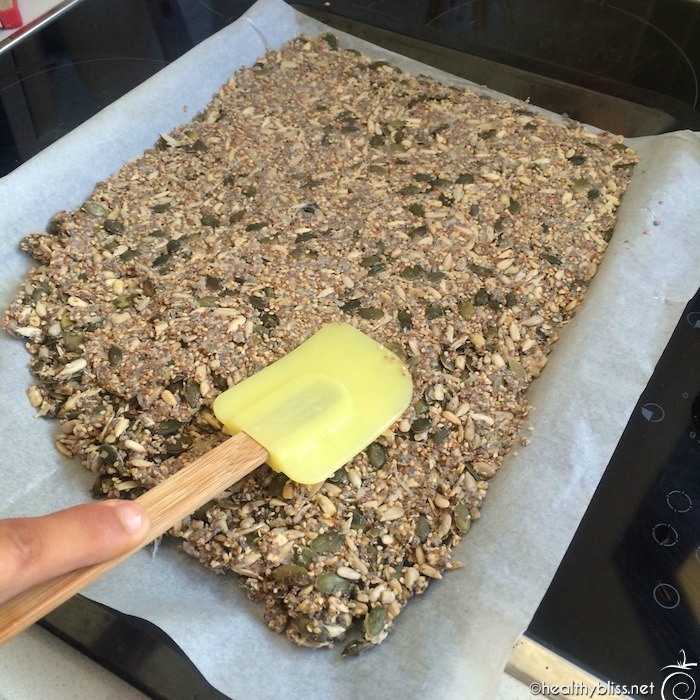
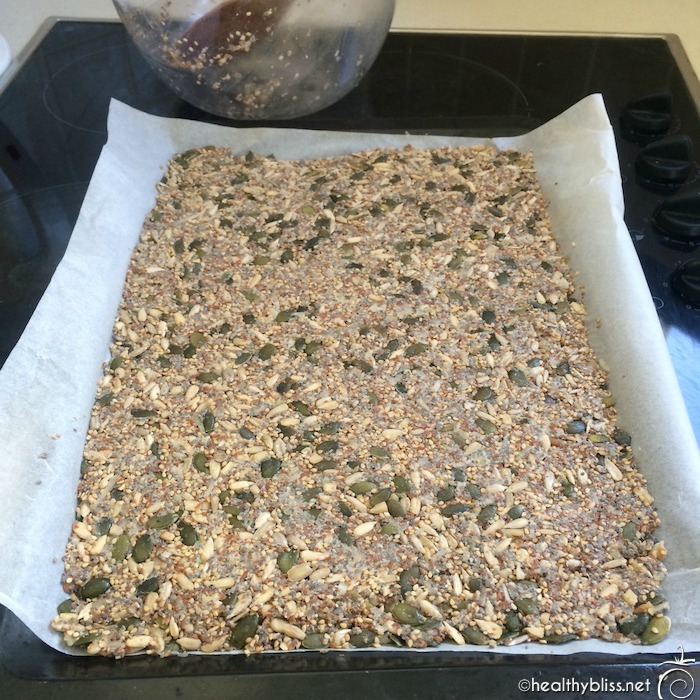
4. Prepare a baking sheet with a piece of parchment paper. Spread the mixture onto the paper, keeping the thickness uniform across the baking sheet. This is also the time to score the crackers if you want them to come out in even squares. (I never remember to do that, and they get eaten so fast that no one seems to care if they’re in uneven sizes!)
5. Place in the oven at 200C or 400F for about 15-20 minutes or until they look golden brown. (Keep scrolling down to FAQs to find out why I don’t use a dehydrator.)
6. Remove from oven to flip the crackers. To flip them easily, place the other piece of parchment paper on top of the cooked mix. Then, carefully flip onto a new baking tray. If you’re really agile, you can do a flawless flip onto the same tray. Remove the original parchment paper from the top of the now flipped crackers. Place back in the oven for another 15-20 minutes.
7. Remove from oven and break off into pieces. You can serve with some yummy pumpkin seed cheese or delicious garlic and lemon tahini.
Use organic seeds, raw and unsalted for these Paleo – Vegan – Gluten-Free crackers.
1. In a large bowl, combine all the dry seeds.

Grate 1 medium onion, add to seeds plus 1 cup water then stir into mix.
2. Peel the outer skin from the onion. Then, using a grater, grate the onion on the medium-size holes. Add to the mix.
3. Measure 1 cup of filtered water and add to the bowl. Stir all ingredients together, adding the salt and any additional spices (I make these without any dried spices because they are delish enough on their own!) You can also grate a few raw garlic gloves and add them is desired. Once stirred, the mix should be sticking together. If not, slowly add a few more tablespoons of water until the mixture stays together.
Spread cracker mix evenly on pan and be sure to use parchment paper so they don’t stick!
4. Prepare a baking sheet with a piece of parchment paper. Spread the mixture onto the paper, keeping the thickness uniform across the baking sheet. This is also the time to score the crackers if you want them to come out in even squares. (I never remember to do that, and they get eaten so fast that no one seems to care if they’re in uneven sizes!)
Ready to go into the oven at 200C or 400F for 15-20 minutes.
5. Place in the oven at 200C or 400F for about 15-20 minutes or until they look golden brown.
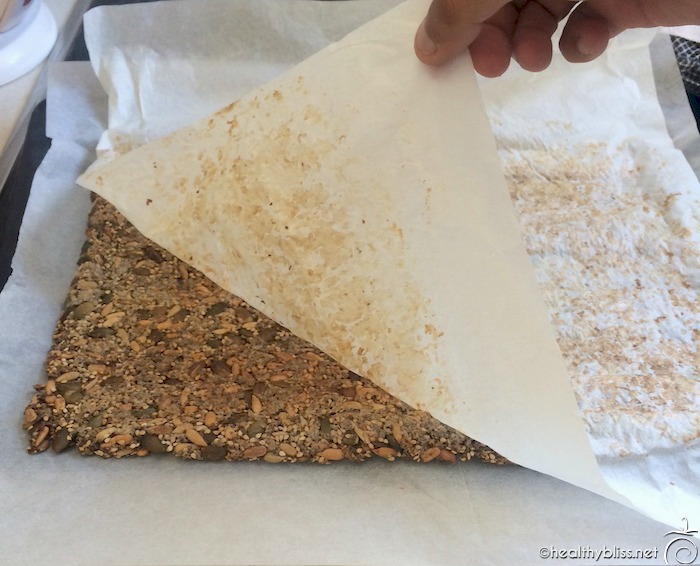
Flip crackers onto clean paper, then peel off the old one and discard. Back into oven for another 15-20 minutes.
6. Remove from oven to flip the crackers. To flip them easily, place the other piece of parchment paper on top of the cooked mix. Then, carefully flip onto a new baking tray. If you’re really agile, you can do a flawless flip onto the same tray. Remove the original parchment paper from the top of the now flipped crackers. Place back in the oven for another 15-20 minutes.
7. Remove from oven and break off into pieces. You can serve with some yummy pumpkin seed cheese or delicious garlic and lemon tahini.


These vegan crackers are GREAT to share with family and friends or at a pot luck.
How to Make Seed Crackers FAQs
1. Why don’t you use a dehydrator?
Years ago I bought a dehydrator and I got really into it for an entire summer. I was dehydrating mangos and bananas round the clock, literally. After 1 month, I noticed my electric bill had jumped more than 40% higher than normal. Jeez! They don’t tell you that in the marketing. Energetically, I also felt that something was wrong. Blowing hot air on perfectly natural bananas for 2 days just to eat them in 1 minute seemed like a huge waste. Then I learned about positive ions and I realized I was blowing them into my house continuously when running a dehydrator. After that, I sold in on ebay and never looked back.
2. What are positive ions?
The air we breathe is full of oxygen molecules. Any molecule with an electron deficiency is called a positive ion and one with an extra electron is called a negative ion. Positive ions come from damaged molecules of air, in heating/air conditioning systems and from hair dryers…and food dehydrators. They are bad for our health because they can cause irritability, anxiety, depression and fatigue. Negative ions come from ocean waves, trees, plants and running streams. They have the opposite effect, leaving us feeling energized, healthy, happy and balanced.
Ever wonder why you feel more tired and depressed in the winter months? It could have to do with the build-up of positive ions in your house, right under your very nose!
3. Are you okay with these not being a RAW FOOD?
Yes, totally. I’ve been living a high raw food diet (80%-90%) for almost 10 years now and I am comfortable with where I’m at in my journey. I also love raw seeds and I often sprinkle them on salads but these crackers fulfill my occasional desire for something crunchy. It’s so awesome to eat a huge salad with 2 of these yum crackers on the side!
4. Can I use almond pulp or other ground nuts too?
Certainly you can try whatever combo or variation you want! But, I can tell you that almond pulp will probably not stick together very well. Same goes for ground cashews and other nuts. Seeds are unique because they have a special coating called mucilage which makes them naturally sticky or gelatinous when exposed to liquids. The stickiness helps the crackers stay together and not fall apart. Grated onion and water form the perfect “glue” to keep everything together even when cooked.
5. Why don’t you soak the seeds in advance?
Soaking the seeds in advance is an option if you are shooting for a live food, but since one of the things I like most about this recipe is that the crackers get crunchy, I don’t soak the seeds in advance.
This recipe is gluten-free, vegan, non-GMO and contains NO food additives. It’s full of fiber, contains natural medicinal foods and is loaded with vegan and plant-based proteins. And best of all, everyone seems to love them! I personally bring these to dinners with friends and also during Passover for traditional chametz meals and I can honestly say that everyone LOVES them!
More on Detox and pH Health:
- Raw Food, Detox & Organic in Tel Aviv, Israel
- Aloe Vera: Nature’s Alternative to Botox!
- True Story of Faith & Healing with John of God in Brazil
- Featured Superfood – Green Powder Blend Vitamineral Greens
- My boyfriend followed my Raw Food Diet and got Anemia!
More Healthy Recipes: