Tag Archive for: colonic

How to Do a Coffee Enema at Home

And a Normal Water Enema too!
All information in this article is for educational purposes only.
It is not for the diagnosis, treatment, prescription or cure of any disease or health condition.

I’ve had a lot of requests from people asking how to do an enema at home and especially how to do a coffee enema. Even if you never do an enema at home, it’s always good to know how it’s done! Personally I always travel with an enema bag just in case…it’s a great thing to have for any unexpected constipation or even food poisoning while on the road. You can set it up in minutes as long as you have a towel rack to hang the bag from and a toilet of course!

An enema is done while laying on the floor, as opposed to a colema which is done on a colema board. Both use gravity-fed water, but with the colema board, when you feel the urge to release, you can simply ‘let go.’ With an enema, you have to first clamp the line shut, remove the tip, stand up to sit on the toilet, and then release. So there are a few extra steps involved. It seems complicated but it’s actually very easy! The key is to use the clamp and always be ready to stop the flow of water when you feel full.

How to Do a Plain Water Enema

Before doing a coffee enema, you should always do a plain water enema and wash everything out until the water runs clear. Then you are ready for the coffee. If doing a cleanse at home, you should also do at least one water enema per day during the fasting or juicing phase of your cleanse.

1. Prepare the Water.

Buy distilled water in advance and have it ready for your enema. You can heat up some of the water to body temperature. If the water seems too hot to touch, then it is too hot for the enema! In that case, add room temperature water to bring down the temperature of the water.

2. Set up Enema Bag.

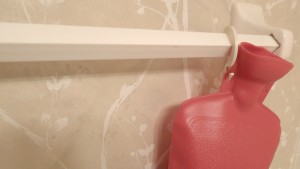
There are a few different types of enema bags out there. My favorite is the type that looks like a hot water bottle – it has a wide top to add the water easily and clean afterwards. This type of enema bag comes with 2 different tips – one is smaller and is for rectal insertion. The other is larger with several holes and it is for vaginal insertion. For an enema, you only need the smaller tip. You can screw the tip onto the end of the water line. Then, be sure the clamp is shutting the line so no water can pass through the hose. Next, hang you enema bag on a towel rack. You want to be sure that the tip can still be inserted comfortably. If the bag is hanging too high, you won’t have any extra hose line to be able to insert the tip. The towel rack is usually more stable than trying to hang on a door knob. When you have the bag clipped and hanging, you are ready to add the water. Fill up the bag with distilled water warmed to body temperature. (If the water is cold, the colon will contract and things will not flow out so easily. If the water is too warm, the colon can relax too much and may become a bit ‘floppy’ after the enema. Body temperature keeps things just right.)

3. Prepare towels for Comfort.
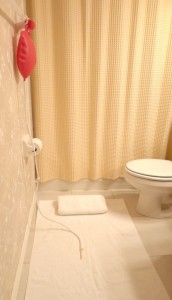
Enema at Home Set-Up

Lay one towel flat on the floor and use another for a pillow so you are comfortable during the enema.

4. Place plastic colander in toilet (optional).

This is an option for the hard-core cleansers who like to check out their mucoid plaque or look for worms during their enema. You can have a pair of plastic gloves on hand as well as a pair of chopsticks to thoroughly investigate all. It’s best to buy the colander and chopsticks at a Dollar Store, and clean with hot water and vinegar every day during your cleanse.

5. Use olive oil or coconut oil for lubricant.

Have this ready in the bathroom so when you lie down, you have everything you need.

6. Play some music, turn the phone off and take a final pee.

Before you lie down to start your enema, empty your bladder by having a pee. Having any extra pressure in the bladder can make it harder to retain the water.

7. Fill the hose with water to remove air pocket.

Before you begin, it’s a good idea to clear the enema line from air. If you forget this step, the worst thing that will happen is you will get a big air pocket in your colon and have a nice release of gas with your exit water. When the bag is full of water, take the tip and aim it over the toilet. Release the clamp, allowing the water to flow. As soon as you see the water come out, clamp the line again. Now the line is full of water instead or air and you are ready to begin!

8. Relax!

Yes, your colon is now ready to be a 2-way street.. so don’t think about it being 1-way only! The water helps rinse out old, undigested, fermented, rotting fecal matter. Once that gunk it out of your system, your whole body works better. This is a great thing, so rejoice and be grateful for all the good you are about to do for your body! Take a deep breath and relax…it’s going to be ok!

9. Ready for Insertion!
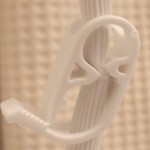
Enema Clamp

Lie down on the floor, either on your right side or your back, whatever feels more comfortable (I prefer lying on my right side). Gently add some lubricant to the plastic tip and also to the rectal area. Take a breath, and on the exhale, insert the tip just enough (about 1 inch) so it rests comfortably inside the rectum. When you feel comfortable, release the clamp on the water line and let the water start to enter. Keep one hand on the clip so you can stop the flow at any time. As soon as you feel any pressure, stop the flow by clamping the line. Take a few deeps breaths and as you feel the water move deeper inside, release the line again to let more water flow inside. Repeat this as many times as you can. As soon as you feel the urge to release, clamp the line and remove the tip. Then stand up and sit on the toilet, releasing the water into the toilet.

10. Repeat until the Water Runs Clear.

Initially you may find it very difficult to retain any water. This is completely normal. As you become more comfortable with the process and as you go further into your cleanse, you will naturally find that you are able to retain more water before releasing. It is very normal to have to repeat this process a few times before you even go through one full enema bag (between 1 and 2 liters). It is recommended to repeat the process until the water runs clear. This may take 2 or 3 times of filling the enema bag, for a total of 2 to 6 liters of water.

How to Do a Coffee Enema

Before doing a coffee enema, you should always do a plain water enema and wash everything out until the water runs clear. Then you are ready for the coffee. It is absolute imperative that you use 100% certified organic coffee. Do not use anything less! Commercial grade coffee can damage the liver.

A coffee enema is an excellent way to clean the liver, but should only be done when the colon is clear. During a normal cleanse or at the end of a cleanse is a good time to do a coffee enema. Just doing one in the middle of eating a Standard American Diet (SAD) will not have a positive effect on the body. Please do not use this as a “magic pill” to try to clean your liver quickly. You can actually draw toxins into the liver if the colon is toxic, and then you will be doing more harm than good!

1. Prepare the Coffee.

Add 3 Tablespoons of ground organic coffee to 1 quart of distilled water. Let it boil for 3 minutes, then simmer for 20 minutes. Strain and cool until the water is at body temperature.

2. Retain for 12-15 minutes.

Use the same set-up as above, insert the 1 quart (strained) coffee and retain for 12-15 minutes. Lay on the right side during this time. Breathe deeply. Dr. Max Gerson found that all of the caffeine is absorbed from the fluid within 12 minutes.

3. Release.

That’s it! The coffee enema is an easy way to get the liver to dump bile and toxins quickly. It should be done only about 2 times per week during a cleanse, and definitely not any more than that if feeling unwell after the enema. Replenish your electrolytes after a coffee enema by drinking a fresh juice. Carrot, beet and celery juice is especially good after a coffee enema.

Read more information on the liver and liver cleansing here:

Liver Flush Detox Drink – Recipe for a Daily Liver Cleanse

Gallstone Liver Flush – Recipe & Cleanse Info

How to Do a Castor Oil Pack for Liver Cleansing

How to Do Onion Socks for Healing


More on Healing Crisis:

More on pH health:

More on Health Food:

What’s the best detox retreat for raw food, yoga, juice & meditation in Thailand?

Detox is great for the body & mind!

I receive countless emails asking me this question. Choosing a detox holiday can be overwhelming when you start to see how many resorts there are. In Koh Samui, Thailand alone there are more than a dozen places to choose from. So what is the best retreat for fasting, wellness, raw foods, de-stressing, weight loss and healing?

Asking me that is like asking me what house you should buy. How can I answer that question based on only knowing that you want a house? If I don’t know what you are looking for – how many rooms, what your budget is, etc., there is simply no possible way I can help you.

When you think about your destination for cleansing, first decide on your budget. Know how much you have to spend on the program itself and your room accommodation, and then decide if you have any extra cash for yoga classes, massages and private healing sessions. Figure out how much time you have for your program – 3 days, 5 days, 7 days, 14 days, 21 days or more….that will also help to narrow your search.

One benefit of Detox: Weight Loss

It’s then very important to sit with yourself and decide what you expect to achieve from doing a detox retreat – do you want to lose weight, rest, relax, cure yourself from disease or illness, learn more about nutrition or how to manage stress, take cooking classes, eat healthy food, learn better habits for going home, have access to yoga or fitness gyms, and also work on your spiritual and emotional healing as well? Maybe the answer is Yes! to all of the above! Haha…well, please go back and remember what your budget is too. A lot of times people want it all, but they don’t want to invest the money to do it.

Be realistic with your expectations if you choose a low-budget resort. You can still benefit from any detox you do, so whatever you choose, know that it’s the right one for you at this point in your journey. If you are not comfortable with juice fasting, choose a program with a raw food menu or gently cooked foods. That can still be a great gentle detox for people, especially if they are older, sick or living very high-stress lives.

Reboot

Are you hoping to ‘reboot’ and quit smoking, drinking alcohol, doing recreational drugs or eating junk food? Do you have an existing eating disorder or have you battled with anorexia/bulimia in the past? Will you need extra emotional support and additional therapies, such as hypnotherapy, NLP or EFT to help you with your addiction? Being honest with yourself will only benefit you in the long run. Let the retreat center know what you need and ask if they offer support. Buy some inspiring books full of success stories and read them during your cleanse.

Colon Cleansing

Some detox programs offer colon hydrotherapy as part of their package and some don’t. The colon cleansing can be called colemas, colonics or enemas – they are basically different versions of the same thing, which is cleaning the guts of that old toxic filth that you used to eat in your former unhealthy days. Personally, I would highly recommend choosing a program with this option included. When you combine colon cleansing and detoxing, you can release more toxins in a shorter period of time. It’s that simple.

Raw food, cooked food or no food?

Fresh Juice rebuilds Minerals

Herbal supplements or no? Just fresh juice or coconuts or both? Candida program, parasite cleanse, heavy metal detox, gallstone liver flush?? Just remember this: you have to start somewhere, and any detox is better than none. Don’t stress out too much over the details….just pick something within your budget that has most of what you want and preferably some colon cleansing too. Check out Trip Advisor for the latest reviews of any detox resort that you choose. Sometimes that’s the best way. Go with how you feel and embrace the fact that you are making time for a healthy holiday – to improve your health, body, mind and soul. It’s the best gift you can possible give yourself. Whatever you choose, don’t forget to book your Iridology Session with me. I can help you personalize your detox and make a long-term plan for positive change when you return home. I hope to see you soon!

Detox resorts in Koh Samui, Thailand:

  • New Body and Mind – near Lipa Noi
  • Natural High Retreats – Thong Krut

Detox resorts in Phuket, Thailand:

More on Traveling Raw:

Rasayana Raw Food Vegan Restaurant in Bangkok, Thailand – Yum!

Rasayana Retreat, Bangkok

Rasayana Retreat, Bangkok

I’ve just got to tell you guys about this amazing restaurant in case you didn’t know, yes there is a 100% raw food restaurant in Bangkok – Rasayana Retreat, just off of Sukhumvit Soi 39 near the Emporium Shopping Mall. It is well worth the trip.

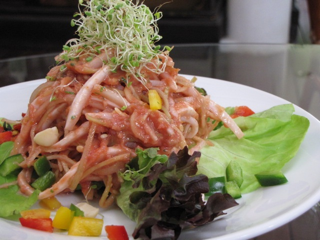
Raw Thai Pasta

Raw Thai Pasta

They have great juices, soups, salads, mains and desserts – all at very reasonable prices.

My favorites are the Hawaiian Pizza, the Thai Pasta, the Thai Lemongrass (Tom Kha) Soup and the Strawberry cake, just to name a few.

The Thai pasta noodles are made from strips of coconut flesh and zucchini; the sauce is made fresh using tomato, beet root, chili, garlic, ginger, raisins, macadamia nuts and kaffir lime leaf. It’s a must-try for raw food visitors to Thailand!

Always something new to try!

Always something new to try!

The Tom Kha soup is a blended raw soup made with coconut water, coconut flesh, lemongrass, galangal, lime, kaffir lime leaves, avocado, miso and salt to taste. Wow!

You’ve gotta taste it to experience it for yourself! They offer daily specials as well.

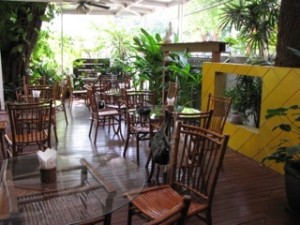
Nice healthy outdoor setting

Nice healthy outdoor setting

Best of all is they do great takeaways, so what I normally do is go there on my last night in Bangkok and order takeaways for my long flights, that way I have beautiful fresh raw food for my plane journey. They give you all the salad dressings in separate containers and I’ve never had a problem taking any of it on the plane.

Rasayana also some yummy raw snacks for sale like Macadamia Nut Bread, Raw Brownies, Raw Donuts, Beet Root Cookies and Seed Bars, so stock up while you’re there!

You can find healthy food in Bangkok 🙂 Let’s all support Rasayana so they stay around for a long time to come!

To get to Rasayana Raw Food Vegan Vegetarian Restaurant in Bangkok, Thailand, take the sky train to Phrom Prom station, and exit towards Soi 39. From Soi 39, you can take a tuk tuk taxi directly to Rasayana for 30 Baht. It’s about a 5-minute ride or a 15-minute walk.

Tell the manager, Norah Jones, that J.lo from Koh Samui sent you 🙂

More on Traveling Raw:

Day 8: Detox & Juice Fasting in Koh Samui, Thailand

I'm fasting and I'm feeling fine...

I\’m fasting and I\’m feeling fine…

Well actually I think the ‘breakthrough’ happened on Day 6 for me..but I’ve been too busy to write these last 2 days. Sunday was my 6th day on the program but technically my 7th day of fasting, and I decided to use the opportunity to treat myself for having gotten through the first week.

The first thing I did was buy a juicer. And all I can say is WOW!

My entire world has changed since then!! I am so happy to have the freedom to make whatever juice I want whenever I want! I came home with the juicer and after cleaning it out went straight for my first concoction on this nice clean virgin juicer – love the sound of a good motor – I combined fresh pineapple, apple and ginger and I honestly think it was one of the BEST juices I have ever had!! Somehow it was the perfect amount of each, all at perfect freshness, and ok after 7 days of fasting it may have tasted a bit better than normal, but it was pretty close to heaven on earth for me! I must add that I had not bought one previously because I don’t actually have a kitchen in my bungalow and that has put me off wanting to mess around with the hassle, but I can tell you it is only a hassle if you make it one – it’s really not bad, and since I’ve been making a lot of smoothies and salads at home anyway, the juicer was the next logical step.

In addition to the juicer, I bought a $3 tray table which is now officially my new kitchen. Up until now, I have been cutting up fruits and veggies on a cutting board on the floor of my bungalow and it didn’t really bother me but I knew there was room for improvement. Can I tell you how incredibly happy I was to even get 10″ off the floor?? I was absolutely THRILLED!! So there I was using my new setup cutting up everything for my new juice. You may think I am a bit simple, but keep in mind that I did cook all my meals on the ground outside in all weather conditions imaginable for 6 months when I thru-hiked the Appalachian Trail, so even preparing meals on a clean tiled floor was pretty luxurious for me. We really don’t need as much as we think we do in life!

Then I proceeded to prepare some dishes for my friends who were having a Mexican Feast at their house that night. I wasn’t too crazy about not being able to enjoy the foods, but I still wanted to be social, and really it is only one meal missed in the course of many gatherings amongst friends in life – not a big deal to let it slide. For some reason I seem to love cooking when I am fasting – I think it’s because you really take the time to smell and feel the foods and there is no urgency to throw it together because you can’t eat it anyway so you tend to take your time and actually enjoy the art of preparing. With my new ‘kitchen’ again I was thrilled…I had my music playing and my door open to the view of the sea and I just took my time chopping and mixing and loving life.

Simple moments..

Anyway I made a guacamole and fresh salsa…I don’t tend to use recipes much; I just see what feels right and I swear somehow that day the combinations were channeled to me – I was in a zone and just mixing together the perfect blends and textures, without ever even being able to taste the food.

Kind-of like Beethoven composing the Ninth Symphony when he was deaf – ha! That’s how it felt anyway!!

The guacamole was basically fresh avocado, onion, garlic, tomato, cayenne pepper, fresh chilies, fresh chives, black pepper, fresh lime, salt, yellow bell pepper, and olive oil. The salsa was a masterpiece – tomato, fresh coriander, onion, vinegar, olive oil, cayenne pepper, fresh chillies, fresh lime, fresh chives, salt, and fresh pineapple. Will definitely be attempting to re-create them again once the fast is over.

Sunset at Kamalaya...A Great End to the Day

Sunset at Kamalaya…A Great End to the Day

After all that it was time for my next ‘treat.’ I headed down to Kamalaya Spa in Koh Samui and splashed out entirely for a proper colonic hydrotherapy. Believe it or not, it was my first ever! All these years I’ve been quite happy using enemas and colemas and I didn’t really see the need in spending the money for anything else. Still I was curious…well perhaps the details are best saved for another entry but I can say that I was very happy with the results and was happy with the decision to try it and I would definitely consider doing it again while fasting.

From there I went to the Mexican night and I can report that the reviews for my creations were excellent. Even though I couldn’t indulge, it made me happy to see others enjoy.

All in all a wonderful day of fasting.

More on Healthy Living:

More on Detox and pH Health: