What is ringworm, how you get it and how to treat it naturally

In the world of rashes, ringworm is an annoying, itchy, hard to get rid of pain in the….well, skin. The name “ring worm” is a bit misleading because it has nothing to do with parasites or worms. Actually ringworm is a fungal infection. It’s called “ring worm” because of the way the fungus can grow on the skin. This contagious fungus most commonly starts as a round patch of itchy skin, then heals in the center and grow outward, creating a ring-like appearance on the skin.

All information in this article is for educational purposes only. 
It is not for the diagnosis, treatment, prescription or cure of any disease or health condition. 

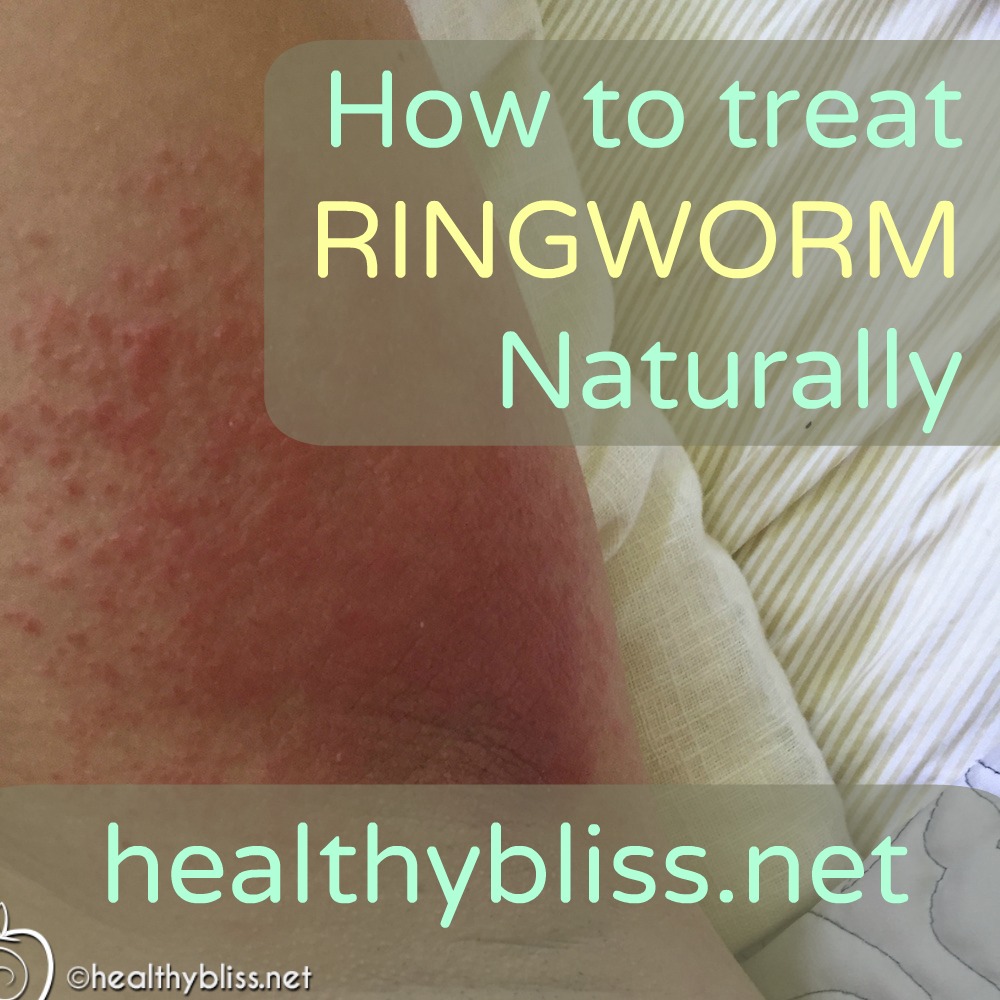
Above is an example of ringworm rash that does NOT have the classic ring-like appearance

Especially in the last few years, I’ve seen more and more cases of ringworm. Quite a few times the person complained of a fire itchy red rash on the skin with raised bumps, went to doctors and was given anti-fungal creams and/or pills. When the treatment didn’t work they naturally assumed that it wasn’t ringworm. In some cases this was actually true and when the person started working with me, I was able to determine a food additive intolerance causing the flares, inflammation and reactions on the skin. However, in a few cases it was actually ringworm and the fungus just did not respond to traditional anti-fungal medications.

What I’ve learned is this:

1. Ring worm does not always grow in a ring-like pattern, especially in small crooks like under the arms, between the legs (jock itch), behind the knees and in the scalp;

2. It doesn’t always spread from person to person in the house;

3. It can go up and down in its intensity throughout the year with heat, humidity and exposure and

4. If you don’t take the right steps at home, you can continually re-infect yourself. This can really create confusion and a delay in treatment because the person can be labeled with psoriasis, dermatitis or eczema instead.

If this sounds like something you’ve been through and you’re still trying to find the cause of your itchy and uncomfortable rash, try my easy and natural remedy for treating ringworm at home. And yes, it really works!

What is Ringworm?

Ringworm is a fungal infection. The technical name for it is “tinea.” Althete’s foot is tinea pedis. Jock itch is tinea cruris. Ringworm on the skin of the body is called tinea corporis. All of these are the same thing – a contagious fungal infection. Symptoms of ringworm include red bumps or scales on the skin, itching, rashes and on the scalp there can sometimes be patches of hair loss.

How do you get Ringworm?

Since ringworm is a fungus, it loves warm, moist environments. Yep, a real reason to wear shoes when walking through a locker room or outside a public swimming pool. Children can easily pass it to each other through hair or skin contact. Sharing combs, razors or clothing can pass ringworm between people. I’ve seen people get ringworm on their skin from their partner who has toenail fungus. Wearing the same gym clothes more than once is another way to get ringworm. Shaving legs and underarms is a sure way to spread ringworm further on the body.

Most commonly, I’ve seen people get ringworm from their pets – both dogs and cats – and more commonly when they adopt the pet from an animal shelter. Usually the person in the house who will get ringworm from a pet is the person who cuddles and pets the animal the most. Dogs and cats will usually have ringworm under their legs in the “armpit” area or on the feet. If you see your dog licking its paws a lot and if there are some patches of hair loss on the paws with red skin underneath, it may be ringworm. The dog licks its paws and then licks you…and presto, a new host for the fungus is born.

Once a person has ringworm, it can live in their clothing, towels and sheets and continually re-infect the person. Ringworm on the scalp can get on the pillow sheet and re-infect the skin night after night. On the torso, it can re-infect someone is they wear the same shirt or bra without washing it in between each use. And bath towels, especially if they don’t dry entirely between use, are a warm wet haven for ringworm. In some cases, the anti-fungal creams may actually work temporarily, but because the ringworm fungus is still in the house, the rash never fully goes away.

Ringworm can grow more on a person who is more over acid in pH. Staying alkaline in your diet by eating more fresh fruits and veggies helps create an environment that ringworm will naturally avoid. If one person in the house is going through more stress for any reason, that can create an acidic pH in the blood. That person will be the one who gets a ringworm infection, while the other household members are fine. Reducing stress and eating an alkaline diet help greatly to prevent and avoid ringworm.

The Secret to Treating Ringworm

The most important things to have for successfully treating ringworm are: consistency and patience. You must be consistent in applying treatment every single day and keep your skin free from potential sources of re-infection. Then, be patient. Ringworm should slowly get better, but the key word is “slowly,” because it does take a bit of time to get rid of it entirely. In spring/summer months or in warmer climates, it can take a few months to see the rash fully cleared, although it should be getting consistently better day by day. In the last few months you may just have a one or two red bumps left….but this is the most important time to remain consistent in treatment so you get rid of it ALL once and for all.

How to Treat Ringworm

In my experience, the most successful naturally remedy for treating ringworm is a 3-step daily regimen:

  1. Shower daily (yes this step is very important). Do NOT go 2 days or more without showering, whenever possible. Shower every single day.
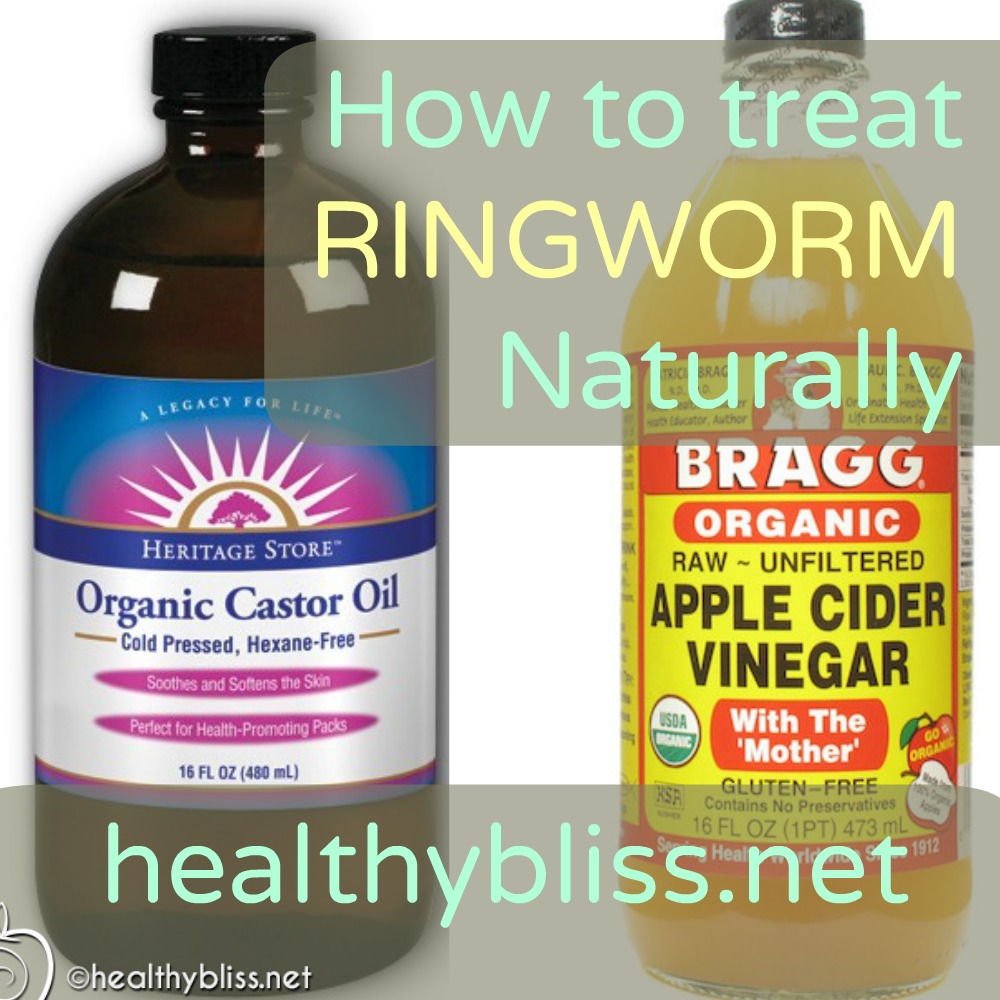
  2. After showering and drying with a clean/dry towel, use a cotton ball to apply organic raw apple cider vinegar (acv) topically to the skin. Only apply where you have a rash, NOT to the whole body. Note: Do NOT apply acv to the genital area. Discard the cotton ball after each use.
  3. After the acv has dried, apply organic castor oil topically to the area where you have the rash. If you have a fungal infection in the genital area, you may apply the castor oil there after showering, but skip Step #2 and do NOT apply the raw apple cider vinegar. Wash and dry your hands after applying the castor oil.

If you are feeling itchy later in the day or before bed, you can apply another round of organic raw apple cider vinegar then organic castor oil to the affected areas before bed. You do not need to take another shower at that time.

Remember: Consistency and Patience

Raw apple cider vinegar is naturally anti-fungal and anti-bacterial. White vinegar does NOT have the same effect. Do NOT use white vinegar as a replacement to organic raw apple cider vinegar.

Castor oil has amazing anti-fungal and anti-bacterial properties as well and is known to be an “old-school cure” for treating ringworm and fungal infections. Neither olive oil, coconut oil, avocado oil, hemp oil or flax oil have the same effect as castor oil for eliminating ringworm. Do NOT use another oil as a replacement to organic castor oil for this treatment.

Very Important to Also Follow These Steps

While applying your daily natural treatment for ringworm, you should also adhere to the following to avoid re-infection at home:

  1. Wherever you have the ringworm rash, be sure to only wear clothing on that area one time before washing. If you have Althete’s foot, wear you socks only once before washing and do not wear dirty socks. If you have a rash under your arms, then wear your bra and/or shirt only once and wash your shirt and/or bra after every use. Same for nightgowns, robes, shirts, pants and gym clothes for wherever you have the rash.
  2. You don’t have to wash your clothes in hot water, at least in my experience. Warm water seems to work fine. Ideally, you should hang your wet clothes outside on a washing line in the sun to dry. If you are using a clothes dryer, then make sure the clothes are totally dry, in other words don’t let them sit half dry or wet in the dryer overnight.
  3. As much as possible, choose natural fibers in your clothes – such as cotton – and avoid artificial fibers that don’t breathe like polyester and nylon.
  4. Wash and dry your bath towel after every use. Especially if the rash is really active and alive. Over time, as the fungus heals, you can go 2 days with the same towel but only if the towel is dried fully after each use. Do NOT use a wet towel hanging on a towel rack from the day before.
  5. If you have a rash on your scalp, then place a clean towel on your pillow every night and replace the towel with a clean one in the morning. You could also put a clean pillowcase on the pillow every morning.
  6. Wash your bed sheets regularly. Aim for 2 times per week during this time. If you have a duvet cover on your duvet, then you also need to replace that with a clean one twice per week.
  7. Wash your hands with soap after petting animals in the house, every. single. time.
  8. If your pets have pet beds, then you want to wash the covers on their beds once a week during this time.
  9. If possible (and especially if it’s summer), try to expose the rash to 20-25 minutes of sunlight every day. The UV rays in the sun are great for killing fungus. Avoid the times of direct sun between 11am – 1pm. This is especially helpful if your rash is under the arms or under the scalp, in areas that are not normally or easily exposed to sunlight. Usually these areas are most difficult in treating ringworm for that reason!
  10. Finally, an important point if your rash is under the arms or on the legs – either 1) do not shave while the rash is active and alive or 2) if you do shave, use a new razor or razor blade every single time and discard after use. Do NOT share razors with anyone during this time. Also, keep your finger nails cut short to prevent any fungus from harboring under the nails after scratching.

Follow up to Treating Ringworm

After you’ve successfully treated your ringworm (yeah!!), it’s always good to follow up with some natural immune boosting remedies. In my experience, going an an anti-candida diet or herbal anti-fungal program does NOT help to cure ringworm. Your skin is just one of 5 elimination organs, and when one of the organs is weak, all the other ones have to do more work. You may need some liver detox or colon cleanse to get your body and elimination organs back into a healthy alkaline balance. Additionally, you may have some mineral deficiencies that need to be addressed with the right foods in your diet. For that, I recommend that you book a Skype health & nutrition consult. I can then give you more personalized professional advice to get you back to an excellent state of health. I’m in EST/GMT-4 for any time difference, but not to worry as I currently see clients all over the world.

Good luck and many blessing to your health!


For more on how to achieve your health goals and actually start feeling great, book a private health consult with me via Skype.

How to Book Your Health & Nutritional Coaching Session:

1. Take photos of your eyes with a smart phone or digital camera.
2. Email the photos to me for approval for Iridology Analysis.
3. We schedule a time to meet via phone or Skype!


More on Detox:

More on Skin Cleansing:

More on Liver Cleansing:

What are the symptoms of Heavy Metal toxicity?

In the last few years, I’ve been working with clients with heavy metal toxicity more than ever before. The soil, air and water are more contaminated all over the world, and it’s only getting worse. Even certified organic fruit and vegetables can contain high levels of heavy metals, because the soil (and water) does not need to be tested in order to obtain organic status (crazy but true). There are several other reasons why heavy metal levels are increasing in our food supply, but I would have to go down the rabbit hole a bit in order to explain and you may or may not be ready to hear that story. In short, the health of our soil will always determine and affect the health of our bodies.

All information in this article is for educational purposes only. 
It is not for the diagnosis, treatment, prescription or cure of any disease or health condition. 

Heavy metals such as lead and arsenic can occur naturally in the soil, even in organic farms

Here’s what’s happening: many healthy eaters and detox/cleansing folks are getting sicker and feeling worse and can’t figure out why. Does that sound familiar to you? It seems to be especially true for that subset of people because once you eliminate the old mucoid plaque from your stomach, small intestine and colon you will absorb everything much more efficiently. That’s a good thing, unless what you are absorbing contains high levels of lead, arsenic, mercury, aluminum, cadmium or thallium..in which case you absorb much more of it than everyone else. Combine that with a diet higher in vegetables grown in toxic soil (unbeknownst to you of course). The person eating more fruit and vegetables will have more toxic exposure than the person not eating a lot of fruit and vegetables, even if they are all organic, that is unless you are growing them yourself at home (and not adding anything bad to the soil. More on this in a future post for those of you already growing your own, like me).

Check out the list of symptoms below and see if maybe you need to look at doing some heavy metal detox as part of your healing journey. It’s an easy thing to miss because many of the symptoms of heavy metal toxicity can mimic other chronic conditions, such as chronic fatigue, fibromyalgia, chronic anxiety, depression, insomnia, hormonal imbalance, adrenal fatigue, histamine intolerance, infertility, foggy brain, weight gain, itchy rashes, hives, urticaria, peripheral neuropathy, thyroid disease, Alzheimer’s disease, Parkinson’s disease, Multiple Sclerosis (MS), auto-immune disease, kidney disease and even certain types of cancer. And if you are eating such a good diet compared to everyone else, you would never think that your food, water or nutritional supplements could be the source of your illness.

Symptoms of Heavy Metal Toxicity

  • Foggy Brain – arsenic, lead
  • Fatigue (extreme and/or chronic) – arsenic, lead
  • Hair loss – thallium
  • Memory loss – lead, aluminum
  • Chronically bloodshot eyes – arsenic
  • Mee’s lines (deep ridges on fingernails and/or toenails) – arsenic
  • Impaired concentration – thallium, lead, aluminum
  • Impaired motor function, sensory function, and cognitive function – aluminum
  • Increased nervousness – thallium, lead
  • Irritability – thallium, lead
  • Dizziness – lead
  • Depression/mood changes, headache – lead
  • Skin discoloration – darkening (hyper pigmentation) – arsenic
  • Hyperkeratosis (most frequently on the palms and soles) – arsenic
  • Throat irritation / difficultly swallowing / chronic sore throat – arsenic
  • Impaired immune system – lead, arsenic
  • Generalized muscle aches, weakness and body pains – lead
  • Muscle cramps or muscle tenderness – arsenic
  • Numbness, tingling and pain (sensory) – arsenic
  • Spontaneous pain – arsenic
  • Localized edema – arsenic
  • Inflammation or pain in the gastrointestinal (GI) tract – thallium, arsenic
  • Decreased libido – lead, arsenic
  • Decreased sperm count – lead, arsenic
  • Infertility – lead, arsenic
  • Peripheral neuropathy (hot or burning feeling in hands and feet) – arsenic
  • Attention deficit hyperactivity disorder (ADHD) – lead
  • Enlarged liver (hepatomegaly) – arsenic
  • Hemolytic anemia – lead
  • Nausea or diarrhea – arsenic
  • Low Vitamin D levels (inability to convert Vitamin D) – lead
  • Severe osteoporosis and osteomalacia – cadmium
  • Proteinuria (too much protein in the urine) – arsenic
  • Cardiac Arrhythmias (abnormal heart rhythms) – arsenic
  • Skin cancer – arsenic
  • Impaired lung function / fibrosis – aluminum
  • Lung cancer – cadmium, arsenic
  • Kidney (renal) failure – arsenic, cadmium, lead
  • Gout – lead
  • Kidney cancer – arsenic
  • Bladder cancer – arsenic
  • Liver cancer – arsenic
  • Prostate cancer – arsenic

-from the Agency for Toxic Substances & Diseases Registry
and the Centers for Disease Control and Prevention (CDC)

How do you know if you have heavy metal toxicity? Heavy metals are not so easy to test for since, upon exposure, your body will push them into 3 “safe” places as fast as possible – your bone, tissue and fat. That keeps the heavy metals from causing too much free radical damage in the essential organs. You can have a buildup of arsenic in the bone, for example, and the blood test can come up clean. In Iridology, I can determine very quickly if someone has a higher likelihood for heavy metal accumulation. Then, I will ask a series of questions about your symptoms vs. the highest potential sources of heavy metals. We then eliminate the suspect sources and re-assess your symptoms. If you are feeling better, then we continue on that track and add in herbal and natural forms of heavy metal detoxification. Getting on a low or no heavy metal diet is essential. You can get hair testing or a 24-hour urine test if you want, or you can put your time and money straight into chelation therapy or detoxification of heavy metals.

Heavy metals can also be added to fruits and vegetables through pesticide use

Three things need to be done in order to remove heavy metals from the body:
1) Eliminate the source (easier said than done, believe me…but possible) then
2) Detox the body from heavy metals in a safe and effective way (also easier said than done but possible) and
3) Support/strengthen the essential organs and immune system with a clean heavy metal-free diet and high anti-oxidants to protect organs from any degeneration

What is the best type of heavy metal detox? This is something that needs to be more individualized, based on the strength and weakness of all the other organs, including the skin, lungs, liver, colon and kidneys. Bio-individuality is the best approach to achieve maximum results. Taking additional zinc, selenium and Vitamin C is important for anyone with high heavy metals. Remember though, the first step is to eliminate the source. If you don’t do that, there is no amount of heavy metal detox that will help.


For more on how to achieve your health goals and actually start feeling great, book a private health consult with me via Skype.

How to Book Your Health & Nutritional Coaching Session:

1. Take photos of your eyes with a smart phone or digital camera.
2. Email the photos to me for approval for Iridology Analysis.
3. We schedule a time to meet via phone or Skype!


More on Detox:

More on Skin Cleansing:

More on Liver Cleansing:

Our Farmhouse Kitchen for under $3K!! Before and After DIY Makeover

If you’re like me, then you spend a lot of time in your kitchen. Chopping, grating, slicing, juicing, fermenting, harvesting, cleaning….the list goes on and on! The kitchen should be a room you love, otherwise you won’t want to spend any time there at all. If you can’t find the knife or cutting board you need, it becomes a hassle. Organized cupboards, dried foods and easy access to appliances make a whole world of difference. A nice vibe and a personal touch in the decor always give a good positive energy flow to the space. Changes to your diet and lifestyle have to start in the kitchen!

We recently did a DIY kitchen makeover, from a bad 80’s sitcom feel to a cool and funky farmhouse kitchen…and now our kitchen is a space I love! It’s a fun and organic feel. And for those of you on a budget, you’ll be excited to know that we did everything for under $3000! Now that IS amazing. You don’t have to spend a lot of money to put a new spin and fresh look on your old dark and dated kitchen. Trust me! Here I’m going to share the results!

Farm Kitchen DIY – Before and After pics

The 80’s Kitchen Before

We definitely did not choose our house for the kitchen, to say the least. It’s small and a bit strange in its layout, with the sink by itself against a wall and not under the windows facing outside. The dark oak cabinets were screaming 1981 and my dreams of having a fresh clean modern kitchen were not reflecting reality at all. But, we fell in love with the land (for starting an organic farm) and the area (an all farming area in the mountains of North Carolina) and the rest of the house was nice too so it’s all good.

Farmhouse Kitchen Makeover BEFORE

The Farmhouse Kitchen After

Since we may rehab the entire kitchen in a few years, we didn’t want to waste money on new cabinets or counter-tops or even a new layout yet. Our goal was to give the kitchen we have a decent enough facelift to actually enjoy the space and start having fun preparing lots of healthy food, straight from our veggie garden. Because I was working with existing cabinets and counter-tops, I decided to go for a farmhouse look because a modern design wasn’t possible with what we had. Initially I figured the rehab would take 2 months. In the end, it took 6 months to complete. Well, everyone says these DIY’s take longer than you expect (without a full crew working on it like in those 30-minute HGTV shows that make everything look far, far too easy!).

Farmhouse Kitchen Makeover AFTER

Farmhouse DIY Makeover List of What we Did

1. Popcorn ceiling removal – we did this ourselves and it all crumbled off with wet rags, no scraping or spraying at all. Took 2 days in total to complete. (Then we went to Vegas for the weekend, true!)

2. Painted old light fixtures. No idea why but the previous owners had painted the discs red/orange so I painted them white. 1 day.

3. Walls and trim sanded, primed and painted. The old kitchen had a strange greenish paint that had a slight texture which has to be sanded and the trim was a bright orange/red. Yes, time to GO! This was a BIG job. We moved everything to one side and painted 1/2 the kitchen then moved everything to the other side and painted the other half. The paint we used for the walls is Pratt & Lambert “Winchester” in semi-gloss and for the trim, a semi-gloss white.  I also added beadboard wallpaper to the kitchen peninsula and painted it too. Beadboard wallpaper is amazing! 1 week.

Bye bye green walls! What a difference a coat of paint makes.

4. Cabinets primed and painted white, with beadboard wallpaper added and painted, then installed oil rubbed bronze hardware. I got the cabinet pulls/knobs and cabinet handles from amazon and drilled all the holes myself. Definitely buy the cabinet hardware drilling template if you are going to do this step yourself. This was a huge job that I hope to never have to do again! 1 week.

Kitchen Oak Cabinets BEFORE painting – Kitchen Makeover


Painted Kitchen Cabinets – AFTER with new hardware – Kitchen Makeover

5. Also painted a pull out cart next to the stove which was originally purple (yes purple). I painted it gray to match the counter tops. Later we realized that the shelf on this cart was too high for the magnetic knife strips on the wall, so my husband cut off one shelf. I then put wood filler in the gaps, then sand prime and paint again. 2 days.

Note the purple pull out cart next to the oven (it holds baking trays and drying racks inside)


The pull out cart next to the oven now painted in grey (and notice the new barn house style pocket door)

6. Finally we were ready to put up the farmhouse shelves! I forgot to mention that my husband pulled down the wall cabinets before we painted the walls. It was a bit of a spontaneous decision. We were both working in the kitchen preparing the walls one day and all of a sudden he said, “I’m taking these down!” And that was that. We had looked at photos or farmhouse wood shelves before that but hadn’t decided to do it or not. Well, in that moment we pretty much decided to go for it! After painting the walls, we measured the space and went to Lowes to buy wood. I had done A LOT of research checking blogs for farm style kitchen shelves, and wasn’t able to find exactly what I wanted which was a thick wood floating shelf without having to make a hollow wood shelf and without spending a lot of money on expensive wood. In the end, we bought simple pine 2 -inch thick shelves (that’s 2x12x12) and here’s a tip: Lowes will even cut the wood for you, just bring the measurements!

7. Farmhouse shelves phase 1: Sanding and staining. We decided on 3 shelves on one wall and 2 on the wall with the stove. Also we took out the old cabinet above the fridge and measure out space for shelves there too. I sanded and stained everything myself (phew!). The stain we used was Minwax Early American, left on the wood for 10 minutes. But, I used a pre-stain wood conditioner first which I think is an important step! Then I left to dry overnight and applied butcher block oil. I didn’t want to use any varnish because of the nasty chemical smells. This took 3 long days.

Sanding and staining the farm house style shelves

8. Farmhouse shelves Phase 2: Hanging the shelves. Prepare yourself for lots of measuring, and checking the level many times. We marked all the studs before painting because I knew with shelves like this, we had to hang them in the studs. Almost all the brackets got in studs with the exception of one, so I’d say we did ok! For the brackets, I found nice 8″L x 6″ H hand-made steel metal brackets on amazon. It comes in different sizes for different widths of shelves. We chose wood for a 12-inch width shelf after I measured our dinner plates and largest bowls. 2 days.

Measuring and installing the brackets for farmhouse kitchen shelves

The wood farm style shelves are up – yay!!

9. Hanging new lights – We installed a new ceiling light above the kitchen table and also put up a few battery-operated under the cabinet lights which went under the bottom kitchen shelf. We have very dated and 80’s style track lighting as well, but we weren’t up to the task of changing that just yet, so instead just installed Edison style LED light bulbs. 1 day.

10. Farmhouse doors – how could I forget my favorite part of the kitchen – our farmhouse style doors! We installed one to the pantry (where previously there was a bright red/orange door). Then we installed a new pocket door from the kitchen to the wood stove room, so we could close the kitchen if need be (if a guest is sleeping in the other room for example). The doors were a special order from Home Depot, then were stained in the same way as the shelves. I love these doors! 1 week (it took time for our carpenter to make the pocket door frame and we had to drywall, prime paint, etc after).

DIY Kitchen Makeover BEFORE – the old red/orange pantry door

DIY Kitchen Makeover AFTER – the new barn style pantry door LOVE!

11. New oven – By this point of the makeover it was the end of December (we had started in September), and I said to my husband, “Would it be great if we could get a new oven..like a Viking industrial oven?”  We started reading reviews and were going “wow” then looking at the price and saying “hmmm..” Literally a few days later we went to Habitat for Humanity and found a Dacor brand convection bake oven, already set for propane gas, for $500. It was unreal. And it fit into the space like a glove. Totally manifested it! This oven new sells for over $5K!! We were over the moon. 1 day.

12. Oven installation – had to get an electrician to install the 240V line for the oven, cost about $200. As you can see all of this was almost 1/3 of the $3000 we spent…and in that budget we still landed a $5K oven! This was over xmas/new year and it took some time to book the electrician.  2 weeks.

Oven envy! LOVE our Dacor convection oven, bought used

13. New farmhouse wood kitchen table from IKEA – and yes this is a big deal because it’s a 2-hour drive to IKEA where we live and I had been looking at this table for months. Then when we were ready to go to IKEA, the table was suddenly on sale for $80 less. Total score!! I wanted this particular table with the drop leaf on either side because our kitchen is so small, however we could have guests with this if need be and also, it’s not easy to find a thick farm style kitchen table with a drop leaf on either side. 1 day.

14. Chalkboard wall painted – Up until now, I thought we were going to have a small section of the wall painted in black chalkboard paint, mostly for my husband because it was his request. (He’s a graphic designer and wanted some room to draw.) Actually he wanted an entire wall for a chalkboard, and I kept saying, “No way. You can have this small space here!” I thought the black color would make the room look too small. Fast forward a few months into the project and all of a sudden I said, “Ok let’s do the whole wall.” He was like, “Really?!” I have no idea what happened, but now that the wall is done, I love it. It actually adds depth to the room and it’s so much fun to have guests over and let them draw whatever they want on the walls. Yes, a lot of our guests will ask if they can draw something! It’s really a lot of fun. I love having a real, genuine feel to the kitchen and the ever-changing chalkboard wall adds that for sure. 2 days.

The chalkboard wall and the farmhouse kitchen drop leaf table

15. Kitchen sink backsplash using grey wood-like floor tiles. Yes, we used floor tiles for our backsplash around the sink! I wanted something to go with the grey formica counter tops and not too much white because the cabinets above and below were now white. The grey colored wood tile was a perfect match to go with the counters and add something nice on all that white. We bought the tiles at Lowes and my husband did the tiles himself, first time ever doing tiling and what a great job! 3 days.

Kitchen sink backsplash with grey wood tile

16. Stove and farmhouse shelf backsplash – for this wall, we chose a large subway tile, much larger than normal because 1) it was less work to use bigger tiles 2) the price was actually better than buying small subway tiles and 3) the classic subway look is getting a bit old and we wanted to put a bit of a spin on it. We chose the 16″ x 4″ white tiles from Lowes. 3 days.

Large white subway tile backsplash – DIY kitchen makeover

17. Cutting board wall – this is one of my favorite changes to the kitchen! I bought a few hanging racks and S hooks and hung them on the wall to make the perfect cutting board station. I have to say that this cutting board rack is the most convenient things ever especially for someone who is often chopping up fruits and veggies several times a day!

Cutting boards hanging on S hooks – LOVE this!

18. Finally, the last touches! I added hooks for towels on either side of the sink, hung pictures on the walls, another 2 shelves on the chalkboard wall, two walnut wood magnetic knife holders that look amazing (one knife strip is never enough if you do a lot of food prep like me!), also shelves for spices and supplements which I installed over the tile after staining the shelves to match everything else, and a few bars and hooks from IKEA for a bit of organizing towels and hanging stuff. 2 weeks.

Magnetic knife holders wood farmhouse style kitchen

I hope you like the end result as much as we do, and if not…well maybe you got a few good ideas for your own DIY kitchen makeover. Looking back at all the steps, I have no idea how we did all of that! Now the fun part…is using the new kitchen!

Farm Kitchen DIY – Before and After pics