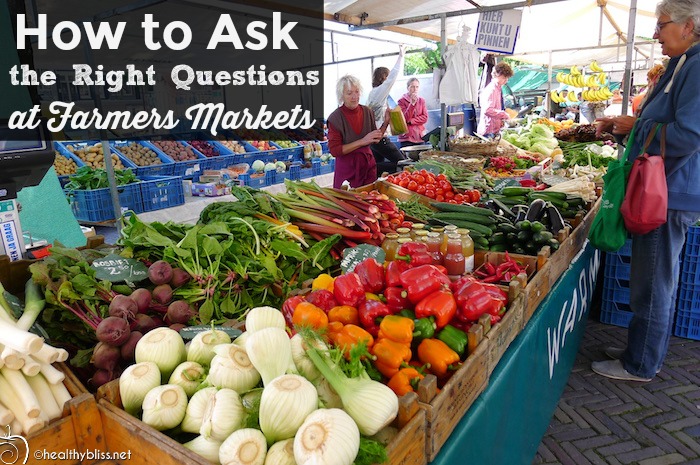
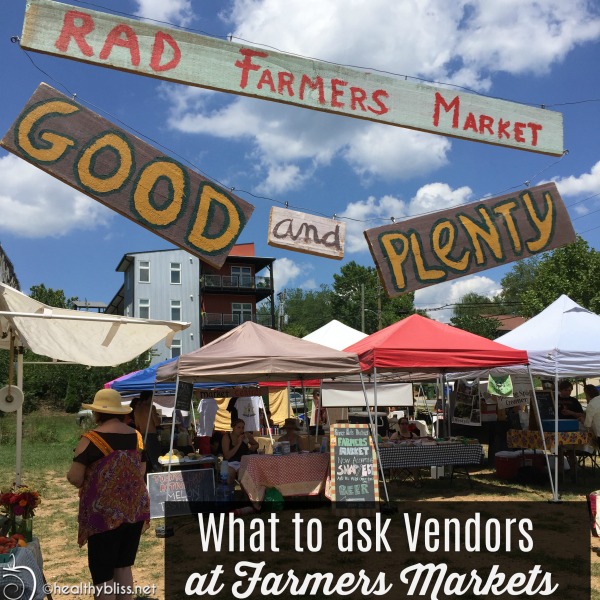
How to Ask the Right Questions at a Farmers Market

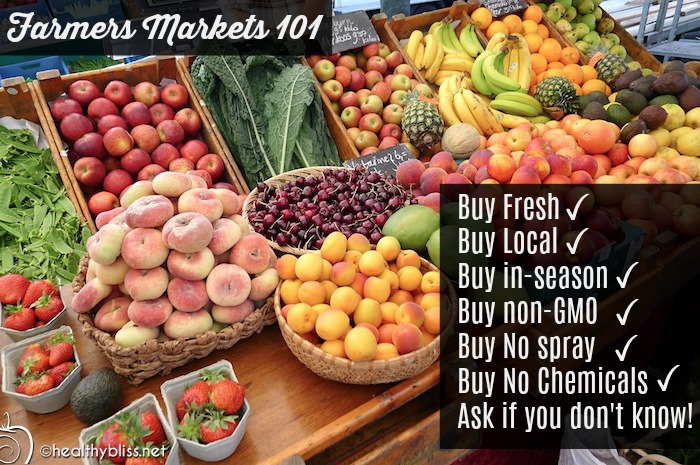
Buying fresh, organic and locally grown is more popular than ever before, and that means farmers’ markets are more in demand and they’re big money makers too. That’s a good thing! Local farmers have an easy way to sell their fresh produce and connect directly with the community and local folks can access locally grown freshly harvested food.

But, is it all that it seems?  How do you know what you are getting is really a “clean food”? Is it really fresh, local, organic, and/or grown without chemicals? Unfortunately, “greenwashing” is more common than you may think, with sellers buying industrial produce at wholesale prices and passing off as homegrown. The other major problem that I find at the local markets is that there is a huge disparity in how each farmer decides to grow their food. Some use no chemicals, some use several chemicals and some use certain soil amendments which can make an otherwise locally grown food more likely to contain heavy metals or toxins. I’ve seen it all far too often, and I now understand that you have to ask the right questions in order to know what you’re really getting.

All information in this article is for educational purposes only. 
It is not for the diagnosis, treatment, prescription or cure of any disease or health condition. 

Is it organic, locally grown, non-GMO…or other?

By knowing what to ask, you can quickly decipher what’s worth buying and when to simply keep walking. You absolutely cannot trust the look of a stall filled with baskets of produce or the “Support Local” t-shirts worn by staff. They are often banking on your perception of what appears freshly harvested and organic. That said, there are often several vendors doing things right from start to finish and those are the ones you want!

To make things easy for you, I’ve created a list of key questions to ask vendors about their farming philosophies and daily practices. The questions fall into three main categories: Where the food came from, how it was grown, and how it was raised. I’ve divided the subject areas into produce, eggs and cheese since those are the main things people tend to buy at markets. But you can also apply these principals to fresh baked goods, meat and fresh fish too.

Farmer’s Market Guide: How to Approach Vendors

Checking for fraudulent produce at the farmers market is important, but needs to de done correctly for good results.

How can you be sure what you are getting is locally grown? ASK!

How to approach vendors and what to look for:

  1.  Approach the vendor in between customers, and preferably when the stall is empty. Do not barge into a booth with a long line of customers and start rolling off questions. You don’t want to cause panic or ruin someone’s business.
  2. Be polite. Your goal is to get information, not to prove someone wrong. Do not assume the worst and don’t approach a vendor with a negative or accusatory tone. If you are gentle, polite, quietly inquisitive and smile, you’re much more likely to get the answers you need.
  3. Get to the point and ask your questions quickly. Vendors are busy and they’re working! They don’t have time for an hour-long discourse on the subject of organic and sustainable food practices. Just from a few questions, you will know whether you should buy there or not.
  4. Have a quick peek behind the booth and under the tables. If you see new supermarket boxes of produce, you should be suspicious. I’ve seen this at farmer’s markets in Australia where the vendors for sure were selling greenwashed produce (and customers were buying!). I’ve also seen it here in North Carolina.
  5. Know your local seasons for produce. It’s your job to get informed if you want to know your food. Alarm bells should already be ringing if you see strawberries sold in late spring or cucumbers sold in winter, for example.

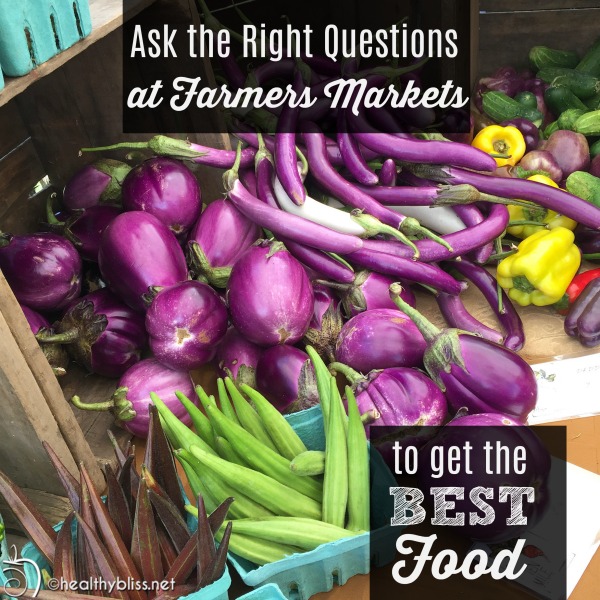
Fruit & Veggies at Markets: What to Ask

Not all vendors at farmer’s markets are selling certified organic goods, and that’s actually ok (or at least not always a bad thing). Many small farms simply cannot afford to go through the lengthy and expensive process of getting an organic certification. Selling non-certified produce means that you are not allowed to market your goods as “certified organic,” but you are permitted to use terms like “grown without pesticides” or “grown using sustainable permaculture practices.” Don’t be scared of those phrases. Whether it’s certified organic or not, you still need to do more detective work.

It’s all a good practice to ask these questions before signing up for any local Community Supported Agriculture (CSA) delivery service.

Don’t be afraid to ask questions, just remember to be polite and respectful

Questions for Produce Vendors

  1. Where was this grown?
    Hopefully the answer is: at our XYZ farm just down the road. Obviously if the answer is “Mexico” or elsewhere, you’re ready to go to the next stall (unless you’re actually in Mexico, of course!).
  2. Do you use anything for pests or disease?
    A good answer to this is: We let nature run its course and occasionally hand-pick pests like squash vine borers or cabbage worms. Another ok answer is: We use vinegar, water and baking soda to minimize blight. Or: We use traditional companion planting techniques. What you don’t want to hear is a bunch of chemical names that you never heard of. Even certified organic farming allows the use of certain pesticides, however many of those are widely known to destroy local honey bee populations. Not everything organic is better, as you can see.
  3. What type of fertilizer do you use?
    You want to hear something like: We use compost from rabbits fed certified organic feed OR we make our own compost on-site using organic veggie scraps and un-sprayed leaves OR we add XYZ brand of certified organic compost OR we plant cover crops in the fall and practice plant rotation. What you don’t want to hear is: I collect garbage bags of leaves from all over town when it’s time for leaf pick up and I use those. You can imagine that many of those leaves would come from lawns heavily sprayed with chemicals (and yes, I had someone give me that exact answer before!).
  4. Do you add Diatomaceous earth (DE) to the soil?
    To this, you want to hear a clear and definite NO. If the answer is yes, or even yes we add it to the chicken coop and spread chicken manure on the soil, then politely walk away! This stuff is an absolute disaster of a product, sold as a miracle cure to amend soil with nutrients and ward off disease. It’s touted on every online farming forum there is (most likely advocated by industry trolls). While DE may be naturally occurring and is permitted for use in certified organic farming, it is also high in arsenic. Arsenic is a heavy metal; it’s deadly and causes cancer. Plants pull arsenic from the soil through their roots and into the roots, leaves, stem and fruit. This is just one of many reasons why even organic fruits and vegetables are becoming more contaminated with heavy metals than ever before. I’ve personally seen several clients get very sick from taking DE capsules as a “so-called” detox supplement, and they were absolutely not having a detox reaction; rather a toxicity reaction.

A sense of reluctance or hesitation in providing you an answer to any of the above questions should be yet another warning that you may have tapped into something that the vendor does not want to disclose (or doesn’t know, which is also not a good sign).

By asking these questions, I’ve been able to find clean and reliable organic produce vendors, but on average it’s about 2 in 10 that are ok in my book.

Local Eggs at Markets: What to Ask

Questions for Local Egg Vendors

  1. Are these from your chickens, and where is your farm?
    I would hate to think that someone would buy supermarket eggs and try to flog them at a farmer’s market! I’ve never seen this happen myself, however I’m sure there’s always a first. Still, it’s definitely worth it to ask and can be a gentle way to open the conversation.
  2. What kind of feed do you use?
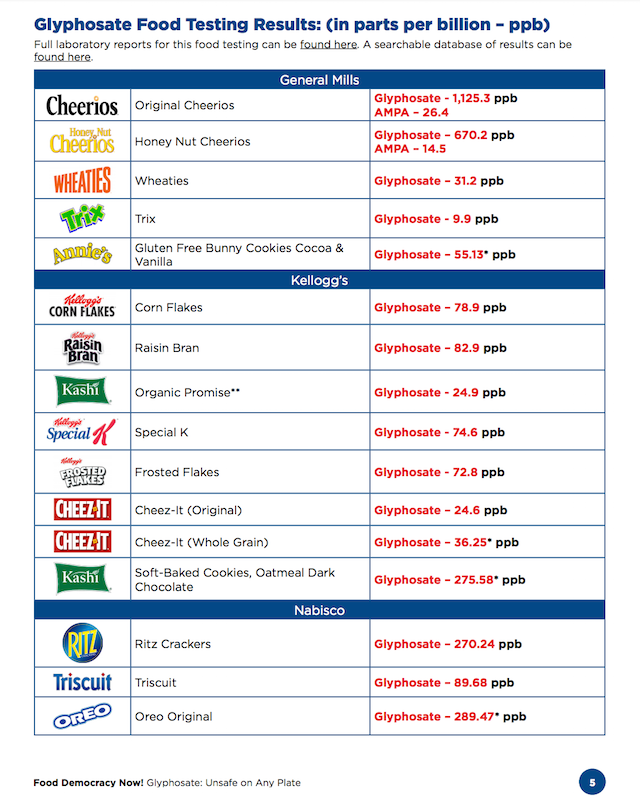
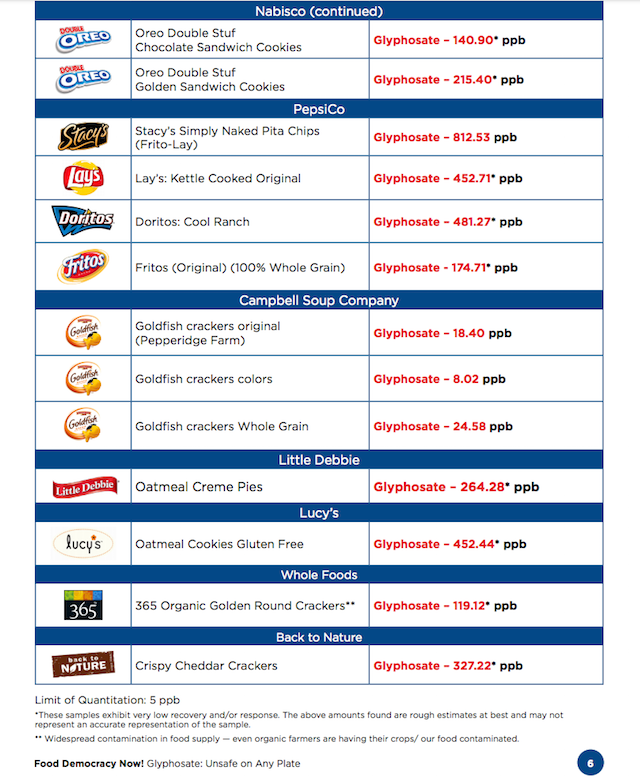
    A good answer to this is: We use only non-GMO organic feed and supplement it with our own organic veggie scraps. If their answer is more vague, such as: We feed them alfalfa, barley, corn and other whole grains, then you must ask: Are they all non-GMO? If the answer is no, then definitely walk away! Genetically Modified (GMO) grains can be high in pesticides such as glyphosate and they can also be high in certain heavy metals, such as arsenic, lead and cadmium. The feed doesn’t necessarily have to be certified organic, but at a minimum it should be non-GMO.
  3. Do you add Diatomaceous earth (DE) to the chicken coop or to the feed?
    Again, you most definitely want the answer to this to be: NO! Many uninformed farmers are adding DE to their coop as a so-called “natural” pest control to kill mites and fleas. However, DE is a known carcinogen when inhaled. Yes, it’s true. Why anyone would ever want to add this junk to anything knowing that is beyond me. However, they are “told” that it’s ok and to just wear a mask when you are applying it. (But don’t worry about eating eggs from chicken with cancer? Ummm….really?) DE is also often added to the feed and it’s totally legal to do this with 100% certified organic eggs. The problem in both cases is that the chickens will ingest the DE. While proponents of DE claim that the arsenic is in its “organic” and therefore not harmful to humans, the reality is that chickens are able to convert organic arsenic into the more dangerous non-organic form of arsenic in their digestive track. I don’t know about you, but I don’t want any concentrated forms of arsenic in any of my food!

Often times, you’ll be surprised to find that the non-organic local egg producer is actually selling better quality eggs with less contaminants than the certified organic egg farmer. This is why it’s so important to ask the right questions!

Local Cheese at Markets: What to Ask

Questions for Local or Artisanal Cheese Vendors

  1. Are these from your cows, goats or sheep, and where is your farm?
    Hopefully you’re starting to get the gist of this by now! Some FYI though: it is not uncommon for local cheese producers to buy their milk from a separate dairy farm. Especially if the cheese artisan is making small batches of cheese. So, don’t freak out if you are told – no, we buy the milk from XYZ farm down the road and we make the cheese on-site at our production facility. If you hear that, then go to #2 and continue with your next question. What you definitely do not want to hear is: We buy pasteurized non-organic milk from the supermarket or we buy this cheese in bulk from Costco (as an example) and just package it down for sale.
  2. What kind of feed do you use?
    A good answer to this is: We use only non-GMO certified organic feed OR we use only non-GMO feed. If their answer is more vague, such as: We feed them alfalfa, barley, corn and other whole grains, then you must ask: Are they all non-GMO? If the answer is no, then definitely walk away! GMO grains can be high in pesticides such as glyphosate and they can also be high in certain heavy metals, such as arsenic, lead and cadmium. The feed doesn’t necessarily have to be certified organic, but at a minimum it should be non-GMO. Pretty much same as eggs.
  3. What are the ingredients? (Also, if yellow or orange cheese: How did you get this color?)
    I was absolutely shocked to find SULFITES as an added ingredient in some cheeses in Holland. Especially since The Netherlands is supposed to have the “best” cheese in the world! Sulfites are a chemical preservative that can cause headaches, wheezing, coughing or asthma in people who are sensitive. For the color of the cheese, if it’s yellow or orange in color – you should ask: How did you make the color? I’ve had people tell me that the “natural color” is made from carrots, only to look on the label and see ANNATTO added for coloring. People who are sensitive to Monosodium Glutamate (MSG) or glutamates can also get an inflammatory reaction from Annatto. You also want to make sure there is NO garlic salt, garlic powder or onion powder added to any cheese as these ingredients can contain hidden MSG. Basically, the answer you want to hear is some version of: Rennet, milk, salt, fresh organic herbs such as dill or parsley and NO added coloring.

Using the questions above, I’ve identified two very popular local artisanal cheese outlets/vendors in the Asheville NC area selling seasonal cheese made from milk whose cows or goats are fed 100% genetically modified (GMO) feed.

Now, I’m not here to name and shame and I’m definitely not here to put the small local farmer out of business. But, does it bother me that they are selling a small piece of GMO cheese for $14.99 or more? Heck, yeah! Crowds of customers are wooing over their products, and no one has a clue that the stuff is neither organic nor GMO-free. Not to mention that they are supporting GMO dairy farming, which is a total disaster for the local honey bee population and also contaminates local groundwater. Since most people where I live rely on untreated well water for drinking and on honey bees for pollination of their crops, these things become very important very quickly.

Shop Smart and You’ll be Fine!

Hopefully you now feel more secure in knowing the right questions to ask at your local fruit & veggie market. It’s definitely worth your time and effort to ask – after all, you pay good money for farmer’s market items. As long as you have a bit of  a “Buyer Beware” mindset, you can still find good fresh locally grown food that’s healthy and enjoyable for you and your family.

You CAN find GREAT healthy local food at your local markets!

At our local markets here in Western North Carolina, I’m known as the “you asked me that last week” shopper. Oops, sorry! After several passes through my regular markets and asking everyone questions, I now know who I can trust. Over time, it becomes easier because you can go straight to the stalls you know are ok.

Once you get home, you may be wondering: What’s the best way clean my fresh veggies? Not to worry, I’ve got it covered here: How to Clean Fresh Fruits and Vegetables.

Do you have any questions that you like to ask at your local farmer’s market? If so, please share in the comments below. Good luck and happy shopping!


How to Book Your Health & Nutritional Coaching Session:

1. Take photos of your eyes with a digital camera.
2. Email the photos to me for approval.
3. We schedule a time to meet via phone or Skype!


More on Organic Farming:

More on Fermented Foods:

SaveSave

DIY Indoor Grow Light Stands for under $100

Early spring is the time of year to start working on your summer organic veggie garden. In most climates, the actual growing season isn’t as long as you may like due to late frost in the spring and cool weather in the fall. So, how do you maximize your season to get more veggies growing outside once the warm weather finally hits? The secret to to start your seedling indoors, about 6-8 weeks before you transplant them in the ground.

Grow organic food affordably and easily at home

Starting seedlings indoors is relatively easy once you have a shelf, trays and a grow light. However, you would be amazed how much these systems cost. One 3-tier LED grow light stand will set you back a whopping $699 USD! And that doesn’t include any seeds, drip trays, planting trays or a timer!! A one shelf base unit for a standard stack-n-grow system is $199 USD. It’s insane money if you ask me. I knew I could do it myself way cheaper. And I did! For under $100 USD, I have almost the same setup that would cost you $400 retail. Keep reading, I’m going to show you how you can do it too.

All information in this article is for educational purposes only. 
It is not for the diagnosis, treatment, prescription or cure of any disease or health condition. 
There are affiliate links in this post. 

It’s easy to start growing indoors, and you can do it on a budget too

Background: Our Organic Veggie Garden

I should explain that my husband and I are complete amateurs in organic gardening. Between us, we have less than zero gardening experience. But, we are both committed to a healthy lifestyle. Our goal in moving to western North Carolina was to grow our own organic food. We’ve been at it for just 2 years now, and this is the first year that we are actually starting seedlings indoors. Why did it take 2 years? Between work, renovating our house, and working on the land, we’ve just been really busy and are still getting our bearings with living in a totally new place to boot.

The first year, my husband built 8 raised beds. Last year, he built another 7 for a total of 15 raised beds for veggies. We also planted fruit trees, raspberries, blueberries, goji berries, grapes, many herbs and lots of pollinating plants for our future bees. Believe me, that was more than enough to keep us busy from morning ’til night. We barely had time to start seedlings outside! That first year, we had beginner’s luck. The spring was mild, so the outdoor seedlings survived.

Last year, however, was a different situation and a few late frosts killed most of our outdoor seedlings. Then, we had to start all over which wasted valuable time. I had to buy a lot of veggie starts to just get things growing, and that was definitely more expensive. I knew that I had to start collecting parts and equipment to make our indoor seedling grow system so that this year, we could finally start our seeds indoors. Hopefully you will learn from a few of our mistakes there and just start your spring seedlings inside!

Get Started: DIY Indoor Grow Light Stands Materials

You’ve got 2 options in sourcing your materials for making your own indoor seedling station:

  1. Buy everything new and assemble yourself, or
  2. Look for sales, bargains and thrift store/yard sale finds to create a budget masterpiece.

If you know me, then you already know what I did. Yep, confessions of a thrift store shopper..But, I managed to find everything I needed, and it wasn’t that hard! I’ll give you both the yard sale list and buy new list so you can combine from both to make what suits you.  Since the end of last summer, I’ve been keeping my eyes out for anything that might be useful and putting it aside. In total, it took me about 6 months to put together my super bargain setup.

Shelves for your indoor seedlings

How many shelves do you need? You can buy the 3-shelf systems with lights already set up. I’ve also seen homemade versions with 3 shelves which seem to work fine. But, if you have any curious cats in your house (like we do), then I would not recommend a 3-tier or even a 2-tier system. Can you hear the whole unit crashing? I can! With one particularly curious rescue cat, aka Captain Sneakypuss, we knew that we needed to have one-shelf units to prevent feline adventure accidents.

The first thing I found at a local thrift store was three separate one-shelf units with wheels, each for only $5. I really wanted shelves with wheels in case I had to move them, so I was beyond excited to find such a good deal! Each shelf measures 24″ long x 20″ high x 15″ wide. At the time, I didn’t even know that these shelves are for hanging file folders. I just thought, wow…I can hang a grow light on the top frame of this and put a seedling tray on the shelf – perfect! These 3 shelves went straight to the attic where they sat all winter. But they planted the seed (pun intended) for my vision of our indoor grow station. It doesn’t really matter what type of shelf you use, but a 24″ long shelf is pretty ideal for hanging a grow light in terms of the light being able to cover the planting area.

You can find a similar shelf to what I bought with the same dimensions for $39.99 on amazon here.

If you’re patient, you can score a good deal. I found 3 of these shelves for $5 each!

Heating Pad for warming seed trays

Certain seeds, like tomato and eggplant, require extra warmth to get started. Most people recommend a grow light AND a heating pad for these. You can buy a fancy seedling heating mat for $40 – $90 USD, depending on the size. Or you can just buy a standard heating pad from CVS. Better yet, check your thrift stores and yard sales. Just make sure that the heating pad has an option for continuous heat, that is, it doesn’t force a automatic shut-off after 1 or 2 hours.

Not all seedlings need heating pads. If you only have 2 shelf units, you probably only need 1 heating pad.

I found a like-new CVS heating pad at Goodwill for $3. Woot woot!

You can find something similar on amazon for under $20 here.

You’ll need a warming or heating pad for tomato and eggplant seedlings

Dual-Outlet Timer

Your heating pad will need to be connected to a timer so you can control the amount of hours of heat applied. You’ll also need a timer for your grow lights (see more on the grow lights below).

I bought a new timer because I wanted a digital one with 2 outlets, and this is not something easy to find used. You’re going to need one outlet for the heating pad and one for the grow light. The beauty of a dual-outlet timer is that you can connect both to one timer with the same on/off program. The model I bought is called the Century 7 Day Heavy Duty Digital Programmable Timer – Dual Outlet (Single Control), available on amazon for $12.99.

There’s an outlet on each side of the timer so you can program 2 things at the same time, like a light and a warming pad

Boot Trays make the perfect drip trays

Even with a brand new 3-tier seedling setup, you won’t get any drip trays. It won’t take long to realize that you need something to catch any water that leaks through your seedling trays. With hardwood floors, I definitely did not want water dripping! Measure the size of your shelves, that way you’ll know if boot trays will work. In my case, they fit perfectly under each shelf and turned out to be the perfect drip trays. I found 2 brand-new boot trays at Goodwill for $2 each, for a total of $4. I had another one at home that I bought at IKEA (and was actually using it as a boot tray). I added the IKEA tray to my setup and had everything I needed to secure any water from my seedling trays.

You can get 2 boot trays for $22 online here. That’s not a bad deal at all! Remember to check the measurements of your shelf to make sure they will fit.

I found these boot trays at Goodwill for 2 bucks each!

LED Grow Light

A grow light is probably the most important part of your indoor setup, because without it, your seedlings are not likely to survive. A window is just not enough light in early spring for seeds to get growing.  They need at least 12 hours per day under grow lights to create the right conditions for sprouting. (And the soil needs to be moist, so don’t forget to check the seedlings twice a day and water accordingly.)

I found an affordable grow light on amazon, and so far it’s working great. I decided to buy one at first and try it, before buying another one for my other shelf. Once I started to see little sprouts pushing out of the soil (yay!), I knew the light was ok so I bought another one. This was the most expensive part of my system, but also the most essential and still very affordable. The one I bought was the Newforshop 30W LED Grow Light for $29.99.

The LED grow light looks like a 70’s dance floor, but it works great and uses less energy

Chains, S Hooks, Zip Ties to attach your light

You’ll also need a few items to help hang your grow light on the shelf. One thing that makes the expensive systems more costly is that they have pully systems to easily move the light up and down as your seedlings grow. But, you can easily move your light up and down manually too. Especially if you want to save a couple hundred bucks. Simple materials like zip ties, S hooks and metal chains are all super useful to hang your grow light at the height you want. Check your grow light for its manufacturer recommendations, but as a general rule, you want to start with your grow light about 6 inches higher than the soil. Having chains makes it easy to adjust the height of your light once your seedlings start to grow.

Last summer, I found a big bag of various chains for $1 at a yard sale, and happily added it to my seedling station materials box. At another yard sale, I bought a jar full of screw and other bits for $1; inside of that were a few metal S hooks. I usually buy my zip ties at the Dollar Store but you can sometimes find those at yard sales too.

You can also buy short pieces of hanging chain with S hooks online here for $5.50.

Honey I bought a bag of chains! Huh? It’s for our seedlings! OH!

Chains and Zip ties or S hooks make it super easy to adjust the height of your light

Shopping List: DIY indoor seedling Grow Light Stand

It’s easy to start growing indoors, and you can do it on a budget too

Organic good grown at home is the ultimate in health

Cost – Buying New vs. Used

Buying all new materials, you can create ONE grow light shelf unit for $129.01 or TWO shelf units for $198.99.

Even if you buy everything NEW, you can get TWO grow light shelf units for the price of one ($199) at a comparable online garden supply store. That’s 50% less!!

Buying some used materials (like I did), you can create ONE shelf unit for $54.98 or TWO shelf units for $91.97.

Either way, you save money! Simply by starting your own plants from seed, you can save hundreds of dollars EVERY YEAR from not having to buy starter plants. (1 organic start plant costs $4-6, whereas 1 packet of 100 organic seeds costs $3 or $0.03 per plant.) Your investment in starting from seed will quickly pay off after only one season!

Additional Stuff you’ll need

Once you get your grow light shelves set up, you’ll need a few more things to actually start your seedlings:

  • Starter soil (I recommend 3 parts Peat Moss to 1/2 part Perlite 10 1/2 part Vermiculite)
  • Planting trays (I got mine for free on Craigslist; also check gardening stores at the end of the season for freebies)
  • Spray bottle for watering
  • Popsicle sticks for labeling your trays (I scored a huge bag at a yard sale for 50c)
  • And of course….some quality non-GMO organic seeds (I recommend Sow True Seed brand)
  • Fertilizer (use this once the seedlings are growing so they don’t stall in growth)

Have any personal tips on starting seeds indoors to share? Please leave a comment below!

Organic gardening for health, joy and happiness

For more on how to achieve your health goals and actually start feeling great, book a private health consult with me via Skype.

How to Book Your Health & Nutritional Coaching Session:

1. Take photos of your eyes with a digital camera.
2. Email the photos to me for approval.
3. We schedule a time to meet via phone or Skype!

More on Organic Farming:

More on Immune System:

Are farmers getting CANCER from pesticides sold at Home Depot?

Friends, your health matters, at least to me!  This is something you need to know. Poisons are being marketed and sold to us to use freely on our gardens, fruit, vegetables, flowers, lawns and precious earth. This one particular pesticide is used everywhere, from huge agricultural farms to your neighbor next door, who can easily buy it at Lowes and Home Depot just down the road from you. In July 2017, the State of California added this pesticide under Proposition 65 as “known to the state to cause cancer.” In the EU, it’s currently under discussion for vote on a ban of the chemical by 2020.

All information in this article is for educational purposes only. 
It is not for the diagnosis, treatment, prescription or cure of any disease or health condition. 

If someone offered you a salad dressing that was known to cause cancer, would you add it to your plate? Of course not! Well, unfortunately…this pesticide is already in the salad! Even in some “organic” foods too!! (You can understand why we moved to the mountains to start growing our own food. Scroll down below to find out what you can do NOW to improve your food at home.)

The world today is currently undergoing a slow and painful death and there is no smoking gun since this pesticide has very sneakily been added to our food supply for the last 4 decades and wrongly labeled as “safe” for the sake of profit. It’s in everything from corn, barley, sugar beets, oats, potatoes, sunflower, soy and canola oil, and the list goes on and on. Of course it’s in the feed given to cows and chickens, so that means it’s even more concentrated in meat, eggs and dairy. Recently, this pesticide was even detected in (non-GMO) Ben and Jerry’s ice cream. In fact, it’s so heavily used that it’s been detected in the water and air. (Do you think the average organic farm is really free from this stuff, and especially considering that most “organic” produce sold in the USA comes from Mexico?) While this pesticide is most commonly used on Genetically Modified (GMO) crops, it can also be used and found in conventional crops as well.

It’s not only in the United States

In Europe, where it’s widely thought to be “better than the United States” for all things related to what’s allowed in foods, you will find this pesticide all over the place. In fact, it’s so pervasive that its residues were recently found in 45% of Europe’s topsoil – and in the urine of three quarters of Germans tested, at five times the legal limit for drinking water. Its residues have been found in biscuits, crackers, crisps, breakfast cereals and in 60% of breads sold in the UK. (Can you imagine how much worse it must be in the US then?!)

I see normal everyday people buying this pesticide at Lowes and Home Depot, actually bragging about how great it works to kill things like poison oak, invasive multi flora rose, or bamboo (without realizing that it’s killing them too!).

Could the dramatic decline in honey bee populations all over the world in recent years be linked to this pesticide as well?

Link to non-Hodgkin’s lymphoma

This particular pesticide has been heavily linked to non-Hodgkin’s lymphoma (NHL). With NHL, the cancer starts in the white blood cells of the lymphatic system, all of which are part of the body’s immune system. In non-Hodgkin’s lymphoma, tumors develop from lymphocytes – a type of white blood cell.

Symptoms of non-Hodgkin’s lymphoma include:

  • Painless, swollen lymph nodes in the neck, armpits or groin.
  • Abdominal pain or swelling.
  • Chest pain, coughing or trouble breathing.
  • Persistent fatigue, lethargy, feeling of tiredness.
  • Fever.
  • Night sweats.
  • Loss of appetite, nausea, vomiting, weight loss.
  • Skin rash or itchy skin (pruritus).
  • Difficulty moving parts of the body.
  • Pain in the chest, abdomen or bones for no known reason.

Are you ready to know the name of this pesticide?  Since I don’t want to get trolled or harassed by the company who manufactures this chemical, I’ll write it in this way:

R..O..U..N..D..U..P  also known as  G..l..y..p..h..o..s..a..t..e  made by  M..o..n..s..a..n..t..o

Farmers using this pesticide who got NHL cancer

March 2016 – The family of Cambria, California farmer Jack McCall, filed a wrongful death lawsuit against M.o.n.s.a.n.t.o, claiming that McCall’s cancer was caused by R.o.u.n.d.u.p exposure. McCall was diagnosed with a rare form of non-Hodgkin lymphoma after using R.o.u.n.d.u.p for nearly 30 years on his 20-acre fruit and vegetable farm. He died in December of 2015 after suffering a massive stroke due to complications from cancer.

February 2016 – California couple James and Brenda Huerta filed a R.o.u.n.d.u.p cancer lawsuit against M.o.n.s.a.n.t.o claiming exposure to g.l.y.p.h.o.s.a.t.e caused Brenda to develop non-Hodgkin lymphoma. The R.o.u.n.d.u.p cancer lawsuit claims that both were exposed to the herbicide while living on a sod farm where g.l.y.p.h.o.s.a.t.e was sprayed between 2004 and 2008.

November 2015 – Christine Sheppard owned and worked on a coffee farm in Hawaii between 1995 and 2004. For around eight years, she relied on M.o.n.s.a.n.t.o R.o.u.n.d.u.p [g.l.y.p.h.o.s.a.t.e] to kill weeds on her farm. Sheppard alleges her exposure to R.o.u.n.d.u.p is the cause of her non-Hodgkin lymphoma. In her R.o.u.n.d.u.p cancer lawsuit, she claims that M.o.n.s.a.n.t.o failed to warn the public about the dangers of g.l.y.p.h.o.s.a.t.e.

(The above info resource link here.) 

The list goes on and on. In 2015, 200 people filed a class action lawsuit in California against the maker of this pesticide.

People just don’t know and that’s the problem

Here’s a big part of the problem: the public perception of risk is low. Would you really think your Kona coffee grown on the hills of the Big Island of Hawaii could be loaded with a cancer-causing pesticide? Or you hippie-loving Ben and Jerry’s ice cream? It’s really hard to convince people that these seemingly healthy products could be contaminated.

Last year I was at a weekend farmer’s market her in Western North Carolina. There was a nice man selling “farm fresh artisanal” goat cheese. We got to talking, and I casually asked him about what he feeds the goats. He explained to me that he doesn’t have his own goats. Instead, he buys the milk from 2 different local goat farmers. I asked if the farmers used non-GMO feed. He exclaimed, “No way! They can’t afford that, and I couldn’t afford to buy their milk if they did!.” I was in shock. I think it took half a minute for me to say something! What’s even more shocking is that his cheese sells for $12-15 per piece! And for that, you’re getting a GMO product (along with the cancer-causing pesticides)!! Every time I’ve been to that market since, his booth is packed with customers. Sadly, I’m sure they have no idea what they are really getting. (In his defense, I can only say that perhaps he, like many others, just doesn’t know or understand the problem.)

The numbers say it all

Look at the charts below to get a better understanding of what we are really dealing with. To understand the severity of these findings, remember, research shows that probable harm to human health begins at really low levels of exposure – only 0.1 ppb. And yes, the manufacturer of that chemical is trying desperately hide that number for the general public! Below, you can see for yourself that many foods were found to have over 1,000 times this amount!  Also note that you see organic foods on the list too. This should be on the front page of every newspaper!!

What You can do: 5 Easy Steps

Hopefully by now, you are wondering, what can I do to improve my health and stay away from this chemical?! This is something that I will go into more and more in future posts, to help you navigate through this maze and find better ways to detoxify your body so you don’t have too much accumulation of any chemical or heavy metal. In the meantime, some things you can do now:

  1. Avoid buying organic produce from Mexico. Since we have no idea what’s it the soil, water or otherwise…it’s just a risk not worth taking. Organic produce from USA may not be much better, but at least there is a chance! (And when you see the difference in price between organic from Mexico vs. organic from California, doesn’t it make you wonder??)
  2. Avoid bottled water, unless it’s distilled water. Don’t waste your money on anything other than distilled water…and at least the distilled water can help bind and transport heavy metals out of the body. We drink freshly collected mountain spring water and distilled water in our home.
  3. DON’T BUY or USE R.O.U.N.D.U.P !!! Not for any reason! I cannot emphasize this enough. If people stop buying this crap, the company will suffer. Let your lawn and flowers and bamboo do want they want…which is grow! If you don’t like a particular weed, pull it out of the ground. Would you rather have no weeds and cancer, or no cancer and weeds? It’s a no brainer!
  4. Avoid foods from China. This is easier said than done and takes a bit of learning to figure out what common foods are imported from China. Garlic is a good example. Nearly all conventional fresh garlic sold in supermarkets today comes from China.  An easy upgrade for you and your family is to buy locally grown certified organic garlic (or grow your own, like we do!).
  5. Avoid packaged snack foods. Use only certified organic spices. Use whole organic ingredients (preferably locally grown) and make meals from from scratch whenever possible.

Ready to do even more? Start planting more pollinating flowers outside your home or apartment. And don’t use any chemicals on them! Give the honey bees a chance to survive with some decent clean food. I’ve found that the bees in our area really love organic catnip, lavender, sage and delphinium – all of which are pretty easy to grow.

How to Eat Clean: Start with Green Smoothies!

Green Smoothie for DummiesCheck out my book Green Smoothies for Dummies – I’ve got loads of recipes using dark leafy greens and many delicious combos without any chemical additives, flavorings or refined sugar. It’s so easy!

Clean your body from the inside out and watch your skin improve, your hair and nails get stronger, your eyes look brighter and your waistline slim down….all naturally and effortlessly! It’s simply amazing and your only regret will be that you didn’t start drinking green smoothies sooner.

When you take care of your whole body, you get whole body health.

When you let your food be your medicine, you are always moving towards better health.

Find the book Green Smoothies for Dummies on iTunes or amazon.com!


For more on how to achieve your health goals and actually start feeling great, book a private health consult with me via Skype.

How to Book Your Health & Nutritional Coaching Session:

1. Take photos of your eyes with a smart phone or digital camera.
2. Email the photos to me for approval for Iridology Analysis.
3. We schedule a time to meet via phone or Skype!


More on Food Labels:

More on Food Additives and Food Allergies:

More on Genetically Engineering Foods: