How to Do a Coffee Enema at Home
And a Normal Water Enema too!

All information in this article is for educational purposes only.
It is not for the diagnosis, treatment, prescription or cure of any disease or health condition.
I’ve had a lot of requests from people asking how to do an enema at home and especially how to do a coffee enema. Even if you never do an enema at home, it’s always good to know how it’s done! Personally I always travel with an enema bag just in case…it’s a great thing to have for any unexpected constipation or even food poisoning while on the road. You can set it up in minutes as long as you have a towel rack to hang the bag from and a toilet of course!
An enema is done while laying on the floor, as opposed to a colema which is done on a colema board. Both use gravity-fed water, but with the colema board, when you feel the urge to release, you can simply ‘let go.’ With an enema, you have to first clamp the line shut, remove the tip, stand up to sit on the toilet, and then release. So there are a few extra steps involved. It seems complicated but it’s actually very easy! The key is to use the clamp and always be ready to stop the flow of water when you feel full.
How to Do a Plain Water Enema
Before doing a coffee enema, you should always do a plain water enema and wash everything out until the water runs clear. Then you are ready for the coffee. If doing a cleanse at home, you should also do at least one water enema per day during the fasting or juicing phase of your cleanse.
1. Prepare the Water.
Buy distilled water in advance and have it ready for your enema. You can heat up some of the water to body temperature. If the water seems too hot to touch, then it is too hot for the enema! In that case, add room temperature water to bring down the temperature of the water.
2. Set up Enema Bag.
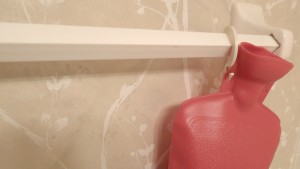
There are a few different types of enema bags out there. My favorite is the type that looks like a hot water bottle – it has a wide top to add the water easily and clean afterwards. This type of enema bag comes with 2 different tips – one is smaller and is for rectal insertion. The other is larger with several holes and it is for vaginal insertion. For an enema, you only need the smaller tip. You can screw the tip onto the end of the water line. Then, be sure the clamp is shutting the line so no water can pass through the hose. Next, hang you enema bag on a towel rack. You want to be sure that the tip can still be inserted comfortably. If the bag is hanging too high, you won’t have any extra hose line to be able to insert the tip. The towel rack is usually more stable than trying to hang on a door knob. When you have the bag clipped and hanging, you are ready to add the water. Fill up the bag with distilled water warmed to body temperature. (If the water is cold, the colon will contract and things will not flow out so easily. If the water is too warm, the colon can relax too much and may become a bit ‘floppy’ after the enema. Body temperature keeps things just right.)
3. Prepare towels for Comfort.

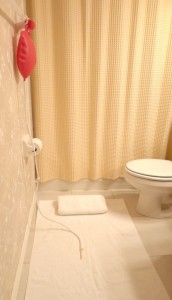
Enema at Home Set-Up
Lay one towel flat on the floor and use another for a pillow so you are comfortable during the enema.
4. Place plastic colander in toilet (optional).
This is an option for the hard-core cleansers who like to check out their mucoid plaque or look for worms during their enema. You can have a pair of plastic gloves on hand as well as a pair of chopsticks to thoroughly investigate all. It’s best to buy the colander and chopsticks at a Dollar Store, and clean with hot water and vinegar every day during your cleanse.
5. Use olive oil or coconut oil for lubricant.
Have this ready in the bathroom so when you lie down, you have everything you need.
6. Play some music, turn the phone off and take a final pee.
Before you lie down to start your enema, empty your bladder by having a pee. Having any extra pressure in the bladder can make it harder to retain the water.
7. Fill the hose with water to remove air pocket.
Before you begin, it’s a good idea to clear the enema line from air. If you forget this step, the worst thing that will happen is you will get a big air pocket in your colon and have a nice release of gas with your exit water. When the bag is full of water, take the tip and aim it over the toilet. Release the clamp, allowing the water to flow. As soon as you see the water come out, clamp the line again. Now the line is full of water instead or air and you are ready to begin!
8. Relax!
Yes, your colon is now ready to be a 2-way street.. so don’t think about it being 1-way only! The water helps rinse out old, undigested, fermented, rotting fecal matter. Once that gunk it out of your system, your whole body works better. This is a great thing, so rejoice and be grateful for all the good you are about to do for your body! Take a deep breath and relax…it’s going to be ok!
9. Ready for Insertion!

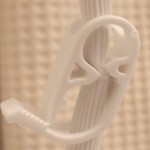
Enema Clamp
Lie down on the floor, either on your right side or your back, whatever feels more comfortable (I prefer lying on my right side). Gently add some lubricant to the plastic tip and also to the rectal area. Take a breath, and on the exhale, insert the tip just enough (about 1 inch) so it rests comfortably inside the rectum. When you feel comfortable, release the clamp on the water line and let the water start to enter. Keep one hand on the clip so you can stop the flow at any time. As soon as you feel any pressure, stop the flow by clamping the line. Take a few deeps breaths and as you feel the water move deeper inside, release the line again to let more water flow inside. Repeat this as many times as you can. As soon as you feel the urge to release, clamp the line and remove the tip. Then stand up and sit on the toilet, releasing the water into the toilet.
10. Repeat until the Water Runs Clear.
Initially you may find it very difficult to retain any water. This is completely normal. As you become more comfortable with the process and as you go further into your cleanse, you will naturally find that you are able to retain more water before releasing. It is very normal to have to repeat this process a few times before you even go through one full enema bag (between 1 and 2 liters). It is recommended to repeat the process until the water runs clear. This may take 2 or 3 times of filling the enema bag, for a total of 2 to 6 liters of water.
How to Do a Coffee Enema
Before doing a coffee enema, you should always do a plain water enema and wash everything out until the water runs clear. Then you are ready for the coffee. It is absolute imperative that you use 100% certified organic coffee. Do not use anything less! Commercial grade coffee can damage the liver.
A coffee enema is an excellent way to clean the liver, but should only be done when the colon is clear. During a normal cleanse or at the end of a cleanse is a good time to do a coffee enema. Just doing one in the middle of eating a Standard American Diet (SAD) will not have a positive effect on the body. Please do not use this as a “magic pill” to try to clean your liver quickly. You can actually draw toxins into the liver if the colon is toxic, and then you will be doing more harm than good!
1. Prepare the Coffee.
Add 3 Tablespoons of ground organic coffee to 1 quart of distilled water. Let it boil for 3 minutes, then simmer for 20 minutes. Strain and cool until the water is at body temperature.
2. Retain for 12-15 minutes.
Use the same set-up as above, insert the 1 quart (strained) coffee and retain for 12-15 minutes. Lay on the right side during this time. Breathe deeply. Dr. Max Gerson found that all of the caffeine is absorbed from the fluid within 12 minutes.
3. Release.
That’s it! The coffee enema is an easy way to get the liver to dump bile and toxins quickly. It should be done only about 2 times per week during a cleanse, and definitely not any more than that if feeling unwell after the enema. Replenish your electrolytes after a coffee enema by drinking a fresh juice. Carrot, beet and celery juice is especially good after a coffee enema.
Read more information on the liver and liver cleansing here:
Liver Flush Detox Drink – Recipe for a Daily Liver Cleanse
Gallstone Liver Flush – Recipe & Cleanse Info
How to Do a Castor Oil Pack for Liver Cleansing
How to Do Onion Socks for Healing

More on Healing Crisis:
- 3 BEST Detox Bath Recipes to help release toxins
- What are the symptoms of a Herxheimer (Detox) Reaction?
- How to Pre-Cleanse for Detox or Juice Fast
- Warnings when doing a Water Fast & Managing Hunger
- Detox Reaction vs. Allergic Reaction or Intolerance – Which one is it?
More on pH health:
- Featured Superfood – Green Powder Blend Vitamineral Greens
- Aloe Vera: Nature’s Alternative to Botox!
- Detox Juice Recipe
- Featured Superfood: Acai Powder
- Top 10 New Year’s Resolutions
More on Health Food:
- Hollywood Celebrities and Supermodels are Drinking Green Smoothies!
- What’s the best detox retreat for raw food, yoga, juice & meditation in Thailand?
- Raw Spirit Festival Sedona, Arizona – Raw Food Lectures, Speakers & Inspiration!
- Win a FREE Nutri NINJA Blender DUO + Green Smoothie Book Giveaway!
- Raw Food and Green Smoothie Classes in Seoul, Korea


Follow Jennifer