Tag Archive for: enema

How to Do a Coffee Enema at Home

And a Normal Water Enema too!
All information in this article is for educational purposes only.
It is not for the diagnosis, treatment, prescription or cure of any disease or health condition.

I’ve had a lot of requests from people asking how to do an enema at home and especially how to do a coffee enema. Even if you never do an enema at home, it’s always good to know how it’s done! Personally I always travel with an enema bag just in case…it’s a great thing to have for any unexpected constipation or even food poisoning while on the road. You can set it up in minutes as long as you have a towel rack to hang the bag from and a toilet of course!

An enema is done while laying on the floor, as opposed to a colema which is done on a colema board. Both use gravity-fed water, but with the colema board, when you feel the urge to release, you can simply ‘let go.’ With an enema, you have to first clamp the line shut, remove the tip, stand up to sit on the toilet, and then release. So there are a few extra steps involved. It seems complicated but it’s actually very easy! The key is to use the clamp and always be ready to stop the flow of water when you feel full.

How to Do a Plain Water Enema

Before doing a coffee enema, you should always do a plain water enema and wash everything out until the water runs clear. Then you are ready for the coffee. If doing a cleanse at home, you should also do at least one water enema per day during the fasting or juicing phase of your cleanse.

1. Prepare the Water.

Buy distilled water in advance and have it ready for your enema. You can heat up some of the water to body temperature. If the water seems too hot to touch, then it is too hot for the enema! In that case, add room temperature water to bring down the temperature of the water.

2. Set up Enema Bag.

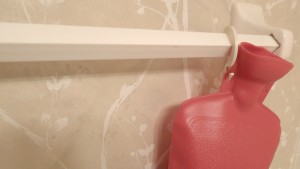
There are a few different types of enema bags out there. My favorite is the type that looks like a hot water bottle – it has a wide top to add the water easily and clean afterwards. This type of enema bag comes with 2 different tips – one is smaller and is for rectal insertion. The other is larger with several holes and it is for vaginal insertion. For an enema, you only need the smaller tip. You can screw the tip onto the end of the water line. Then, be sure the clamp is shutting the line so no water can pass through the hose. Next, hang you enema bag on a towel rack. You want to be sure that the tip can still be inserted comfortably. If the bag is hanging too high, you won’t have any extra hose line to be able to insert the tip. The towel rack is usually more stable than trying to hang on a door knob. When you have the bag clipped and hanging, you are ready to add the water. Fill up the bag with distilled water warmed to body temperature. (If the water is cold, the colon will contract and things will not flow out so easily. If the water is too warm, the colon can relax too much and may become a bit ‘floppy’ after the enema. Body temperature keeps things just right.)

3. Prepare towels for Comfort.
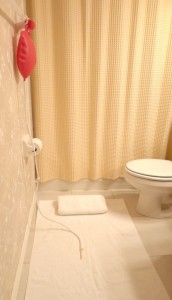
Enema at Home Set-Up

Lay one towel flat on the floor and use another for a pillow so you are comfortable during the enema.

4. Place plastic colander in toilet (optional).

This is an option for the hard-core cleansers who like to check out their mucoid plaque or look for worms during their enema. You can have a pair of plastic gloves on hand as well as a pair of chopsticks to thoroughly investigate all. It’s best to buy the colander and chopsticks at a Dollar Store, and clean with hot water and vinegar every day during your cleanse.

5. Use olive oil or coconut oil for lubricant.

Have this ready in the bathroom so when you lie down, you have everything you need.

6. Play some music, turn the phone off and take a final pee.

Before you lie down to start your enema, empty your bladder by having a pee. Having any extra pressure in the bladder can make it harder to retain the water.

7. Fill the hose with water to remove air pocket.

Before you begin, it’s a good idea to clear the enema line from air. If you forget this step, the worst thing that will happen is you will get a big air pocket in your colon and have a nice release of gas with your exit water. When the bag is full of water, take the tip and aim it over the toilet. Release the clamp, allowing the water to flow. As soon as you see the water come out, clamp the line again. Now the line is full of water instead or air and you are ready to begin!

8. Relax!

Yes, your colon is now ready to be a 2-way street.. so don’t think about it being 1-way only! The water helps rinse out old, undigested, fermented, rotting fecal matter. Once that gunk it out of your system, your whole body works better. This is a great thing, so rejoice and be grateful for all the good you are about to do for your body! Take a deep breath and relax…it’s going to be ok!

9. Ready for Insertion!
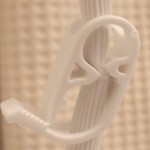
Enema Clamp

Lie down on the floor, either on your right side or your back, whatever feels more comfortable (I prefer lying on my right side). Gently add some lubricant to the plastic tip and also to the rectal area. Take a breath, and on the exhale, insert the tip just enough (about 1 inch) so it rests comfortably inside the rectum. When you feel comfortable, release the clamp on the water line and let the water start to enter. Keep one hand on the clip so you can stop the flow at any time. As soon as you feel any pressure, stop the flow by clamping the line. Take a few deeps breaths and as you feel the water move deeper inside, release the line again to let more water flow inside. Repeat this as many times as you can. As soon as you feel the urge to release, clamp the line and remove the tip. Then stand up and sit on the toilet, releasing the water into the toilet.

10. Repeat until the Water Runs Clear.

Initially you may find it very difficult to retain any water. This is completely normal. As you become more comfortable with the process and as you go further into your cleanse, you will naturally find that you are able to retain more water before releasing. It is very normal to have to repeat this process a few times before you even go through one full enema bag (between 1 and 2 liters). It is recommended to repeat the process until the water runs clear. This may take 2 or 3 times of filling the enema bag, for a total of 2 to 6 liters of water.

How to Do a Coffee Enema

Before doing a coffee enema, you should always do a plain water enema and wash everything out until the water runs clear. Then you are ready for the coffee. It is absolute imperative that you use 100% certified organic coffee. Do not use anything less! Commercial grade coffee can damage the liver.

A coffee enema is an excellent way to clean the liver, but should only be done when the colon is clear. During a normal cleanse or at the end of a cleanse is a good time to do a coffee enema. Just doing one in the middle of eating a Standard American Diet (SAD) will not have a positive effect on the body. Please do not use this as a “magic pill” to try to clean your liver quickly. You can actually draw toxins into the liver if the colon is toxic, and then you will be doing more harm than good!

1. Prepare the Coffee.

Add 3 Tablespoons of ground organic coffee to 1 quart of distilled water. Let it boil for 3 minutes, then simmer for 20 minutes. Strain and cool until the water is at body temperature.

2. Retain for 12-15 minutes.

Use the same set-up as above, insert the 1 quart (strained) coffee and retain for 12-15 minutes. Lay on the right side during this time. Breathe deeply. Dr. Max Gerson found that all of the caffeine is absorbed from the fluid within 12 minutes.

3. Release.

That’s it! The coffee enema is an easy way to get the liver to dump bile and toxins quickly. It should be done only about 2 times per week during a cleanse, and definitely not any more than that if feeling unwell after the enema. Replenish your electrolytes after a coffee enema by drinking a fresh juice. Carrot, beet and celery juice is especially good after a coffee enema.

Read more information on the liver and liver cleansing here:

Liver Flush Detox Drink – Recipe for a Daily Liver Cleanse

Gallstone Liver Flush – Recipe & Cleanse Info

How to Do a Castor Oil Pack for Liver Cleansing

How to Do Onion Socks for Healing


More on Healing Crisis:

More on pH health:

More on Health Food:

Total Reset Detox: A Women Only Retreat at the Dead Sea in Israel

Join me for this fantastic event! From 13 – 20 November, 2011, a Women’s Only Juice Fast Retreat and Detox in Israel. What better place for healing than at the magical Dead Sea, in the ancient Holy Land itself!

Dead Sea Detox, Israel

During this program, you will have access to nature walks, detox yoga, guided meditation, swimming, sun, mud bathing, enemas and of course rest and recovery for your body’s healing.

Jennifer Thompson

Inspirational and informative talks on natural nutrition and your ‘food life’ post detox will be offered by me. Every day we will cover a different topic, building on the information learned from the day before, and focusing strongly on how to continue making positive change after your cleanse. Whether your goal is to lose weight, quit smoking, de-stress, eat better foods, increase raw foods, balance lifestyle, handle social and family pressures or simply to learn more about nutrition, you will benefit from each of the daily nutrition talks.

I will also be available for private consults and individual Iridology Analyses.

This is a special event and a wonderful opportunity to ‘reset’ and ‘reboot.’ After a cleanse, when your body is pure, it’s much easier to continue with positive change in every aspect of your life.

A fast is the best gift you can give yourself. And you deserve the very best in life, so why not start now?

We are coming together to create something special just for you – A Total Reset Detox! With guided expert support, you are sure to experience your maximum potential. Press the ‘Reset Button’ on your life, feel the energy of the ancient Holy Land and give your body the gift of natural healing.

The entire program is conducted in English. For more information, please contact me.

I look forward to seeing you from 13 – 20 November 2011!

More on Traveling Raw:

40-Day Water Fast: Comprehensive Guide & Personal Journal

Recently I completed a 40-day pure water fast. It had been one of my goals for many years now, and yet I never seemed to have the time to set aside 40 days. Like everyone, I am very busy and just could not fathom cutting myself off from the world for so long. In the last few years, I’ve done a 3-day water fast and a 10-day water fast and I had very good results, feeling clearer in the mind and spirit and more balanced and peaceful after each fast. This year I planned to do another 10-day water fast and possibly 14 days depending on how I felt. When I saw the results on Day 8 which I will explain below, I decided that I had to continue no matter what. And that’s what led me to do 40 days.

All information in this article is for educational purposes only.
It is not for the diagnosis, treatment, prescription or cure of any disease or health condition.

Water fasting means to drink only water, in the same way that juice fasting means to drink only fresh juice. Only water is consumed during the fast and no food. Natural Hygienists agree that having small amounts of fresh lemon or lime in the water is ok; however in this water fast, I did not do that.

One week after the fast, enjoying fresh, delicious food!

Water fasting is not for the weak-minded. It takes a lot of mental strength, trust and faith to live on only water for an extended period of time. If one has prepared for the fast well and has a full reserve of minerals and vitamins, this type of detox is totally safe. It is important to prepare the body well in advance, cleaning the colon with some intestinal cleansing and then moving gently into pure water by drinking only juices for a number of days.

If someone is extremely toxic from a typical Standard American Diet and they have never done any type of detox before, then they are NOT a safe candidate for water fasting. They would need to do a lot of gentle cleansing first, build up their mineral and vitamin reserve and ensure an alkaline pH at the very least.

Water fasting is certainly not a new concept or some type of ‘fad’ diet. Almost all the great spiritual leaders including Jesus, Buddha, Mohammed and Gandhi practiced fasting.

This is the only type of cleanse where the body is not getting any food at all. For that reason, it can go deeper and is more powerful for healing.

I believe that a water cleanse is the best way to release toxins from the mind, body and spirit. It’s that simple. The body knows how to heal itself, it just needs a chance to do it. When you fast, you are directing the body to takes it’s energy inward. It can then start cleansing and healing itself.

40-Day Water Fast – The How & Why of this Pure Detox on Day 40

There are many different cleansing reactions that can occur during a water fast as the body releases toxins into the blood. Based on my experience, I recommend a daily water enema during the cleanse to help the body minimize cleansing reactions. Dry skin brushing also helps. It’s good to be in an environment where the body can have some exposure to sunlight and fresh air every day. Being close to nature is best.

An example of how you don’t want to feel from breaking a fast incorrectly…

In addition to taking care during the fast, having a plan for breaking the fast is absolutely essential. So many people make the mistake of bingeing on comfort foods after a long fast, and in the case of drinking only water, this can actually be dangerous. It is very important to gently ease back into solids foods and only 100% raw juices and foods to allow the organs to ‘wake up’ gently. In my eBook, I discuss in detail how to break a water fast safely.

As the saying goes, ‘Any fool can fast, but only a wise man can break it properly.’

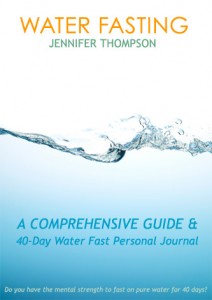
My new book, A Comprehensive Guide to Water Fasting, is a complete guide detailing every aspect of water fasting. This book is currently for sale in ebook format and is immediately downloadable in either .pdf or .epub format. (To view this ebook on your iPhone or iPad, simply choose the .epub version and install the free iBook app on your device before downloading your ebook file.)

In my water fasting book, you will learn:

  • What is Water Fasting
  • Benefits of Water Fasting
  • Water Fasting vs. Starvation
  • How Long to Fast
  • Hunger
  • Preparation for a Water Fast
  • Pre-fast Cleansing
  • Finding the Right Location
  • Preparing the Body Nutritionally
  • Water – What Kind, How Much
  • Enemas
  • Warnings when Water Fasting
  • Emotional Cleansing Reactions
  • Weight Loss – What to Expect
  • How to Break a Water Fast
  • Information on Parasites
  • Follow-Up Cleansing
  • Affirmations
  • Energy Devices to Energize the Water

Water Fasting by Jennifer Thompson

In addition to that, I documented my 40-day experience and the entire journal is included in the book. The big surprise for me came on Day 8 of my cleanse. I saw an ascaris intestinal roundworm (parasite) released in my enema and it was a huge wake-up call that I had a possible worm infestation. Looking back, this actually made sense because I had been experiencing a lot of strange symptoms in the last 4 years, all of which is explained in the book. When I saw this worm on Day 8, I just knew I had to continue. And the amazing thing is, that they just kept on coming! I had worms and worms, all roundworms, released almost daily during the entire fast. There was no choice but to keep going!

I learned many things about the ascaris round worm during my fast, including the symptoms of having intestinal round worms. Do you think you may have intestinal worms?

Symptoms of parasites or intestinal worms may include:

  • Fever
  • Nausea
  • Gas and Bloating
  • Abdominal Pain
  • Digestive Problems
  • Weakness/Fatigue
  • Allergic Reactions to Food
  • Crawling Sensation Under the Skin
  • Eczema
  • Chronic Cough
  • Weight Gain
  • Inability to Gain or Lose Weight
  • Anemia
  • Numbness of the Hands and/or Feet
  • Fast Heartbeat

You can imagine how having so many parasites could affect your overall health and well-being! Even I was surprised and amazed to see the results, something I was never able to achieve with juice fasting, colon cleansing or parasite programs alone.

It is likely that countless individuals are suffering from ascaris round worms, other parasites and/or candida in their bodies and that their symptoms are being misdiagnosed as other medical conditions instead.

The book also includes a detailed section on follow-up cleansing and nutritional support to keep the body clean and free of parasites after a long fast or detox program.

My experience was so powerful that my neighbor became inspired, and she started a water fast too, about 18 days after I started. Throughout the book, I also detail her experience. In the end, it was great to have someone to share my stories with daily and certainly, we both benefited from the mutual support.

Breaking a 40 Day Water Fast – Eating on Day 41

Of course, in only drinking water for 40 days, I lost a lot of weight. In total, my weight loss was about 15 kg or 33 pounds. During the first 2 weeks, I lost most of the weight; after that, my weight seemed to stabilize and that was quite comforting actually, because my goal was to heal myself, not to waste away!

After the fast, I gained 5kg back rather quickly and I was very happy because I had really gotten too thin. Since then, my weight has remained stable. I crave less food in general and less high-sugar content fruits. For certain, with over 21 feet (6.6 meters) of worms out of my body, my metabolism has changed for the better and I am happy to say that my food is now only feeding me! Yes, 21 feet!!! It is an amazing story of healing.

The path to good health is so simple – trust that the body knows. Feed it well, think positive thoughts, bring love into your heart, and cleanse and detoxify your body and you will begin to feel superior states of consciousness and well-being that you never even knew existed!

Disclaimer: The information provided on this site is for informational purposes only and is not intended as a substitute for advice from your physician or other health care professional or any information contained on or in any product label or packaging. You should not use the information on this site for diagnosis or treatment of any health problem or for prescription of any medication or other treatment. You should consult with a healthcare professional before starting any diet, exercise or supplementation program, before taking any medication, or if you have or suspect you might have a health problem. You should not stop taking any medication without first consulting your physician. Read full disclaimer here.

New and improved edition! This eBook is now available with the parasite photos or without parasite photos, with the same text in each version.


Water Fasting eBook: A Comprehensive Guide & 40-Day Personal Journal (.pdf)
$19.95


eBook: Water Fasting (No Worm Photos) – A Comprehensive Guide & 40-Day Personal Journal (.pdf)
$18.95


Water Fasting eBook: A Comprehensive Guide & 40-Day Personal Journal (.epub)
$19.95


eBook: Water Fasting (No Worm Photos) – A Comprehensive Guide & 40-Day Personal Journal (.epub)
$18.95


More on Spiritual Health: