Tag Archive for: organic food

DIY Indoor Grow Light Stands for under $100

Early spring is the time of year to start working on your summer organic veggie garden. In most climates, the actual growing season isn’t as long as you may like due to late frost in the spring and cool weather in the fall. So, how do you maximize your season to get more veggies growing outside once the warm weather finally hits? The secret to to start your seedling indoors, about 6-8 weeks before you transplant them in the ground.

Grow organic food affordably and easily at home

Starting seedlings indoors is relatively easy once you have a shelf, trays and a grow light. However, you would be amazed how much these systems cost. One 3-tier LED grow light stand will set you back a whopping $699 USD! And that doesn’t include any seeds, drip trays, planting trays or a timer!! A one shelf base unit for a standard stack-n-grow system is $199 USD. It’s insane money if you ask me. I knew I could do it myself way cheaper. And I did! For under $100 USD, I have almost the same setup that would cost you $400 retail. Keep reading, I’m going to show you how you can do it too.

All information in this article is for educational purposes only. 
It is not for the diagnosis, treatment, prescription or cure of any disease or health condition. 
There are affiliate links in this post. 
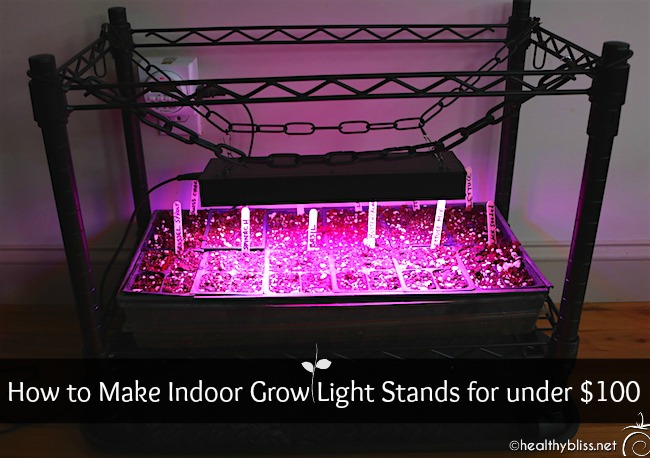
It’s easy to start growing indoors, and you can do it on a budget too

Background: Our Organic Veggie Garden

I should explain that my husband and I are complete amateurs in organic gardening. Between us, we have less than zero gardening experience. But, we are both committed to a healthy lifestyle. Our goal in moving to western North Carolina was to grow our own organic food. We’ve been at it for just 2 years now, and this is the first year that we are actually starting seedlings indoors. Why did it take 2 years? Between work, renovating our house, and working on the land, we’ve just been really busy and are still getting our bearings with living in a totally new place to boot.

The first year, my husband built 8 raised beds. Last year, he built another 7 for a total of 15 raised beds for veggies. We also planted fruit trees, raspberries, blueberries, goji berries, grapes, many herbs and lots of pollinating plants for our future bees. Believe me, that was more than enough to keep us busy from morning ’til night. We barely had time to start seedlings outside! That first year, we had beginner’s luck. The spring was mild, so the outdoor seedlings survived.

Last year, however, was a different situation and a few late frosts killed most of our outdoor seedlings. Then, we had to start all over which wasted valuable time. I had to buy a lot of veggie starts to just get things growing, and that was definitely more expensive. I knew that I had to start collecting parts and equipment to make our indoor seedling grow system so that this year, we could finally start our seeds indoors. Hopefully you will learn from a few of our mistakes there and just start your spring seedlings inside!

Get Started: DIY Indoor Grow Light Stands Materials

You’ve got 2 options in sourcing your materials for making your own indoor seedling station:

  1. Buy everything new and assemble yourself, or
  2. Look for sales, bargains and thrift store/yard sale finds to create a budget masterpiece.

If you know me, then you already know what I did. Yep, confessions of a thrift store shopper..But, I managed to find everything I needed, and it wasn’t that hard! I’ll give you both the yard sale list and buy new list so you can combine from both to make what suits you.  Since the end of last summer, I’ve been keeping my eyes out for anything that might be useful and putting it aside. In total, it took me about 6 months to put together my super bargain setup.

Shelves for your indoor seedlings

How many shelves do you need? You can buy the 3-shelf systems with lights already set up. I’ve also seen homemade versions with 3 shelves which seem to work fine. But, if you have any curious cats in your house (like we do), then I would not recommend a 3-tier or even a 2-tier system. Can you hear the whole unit crashing? I can! With one particularly curious rescue cat, aka Captain Sneakypuss, we knew that we needed to have one-shelf units to prevent feline adventure accidents.

The first thing I found at a local thrift store was three separate one-shelf units with wheels, each for only $5. I really wanted shelves with wheels in case I had to move them, so I was beyond excited to find such a good deal! Each shelf measures 24″ long x 20″ high x 15″ wide. At the time, I didn’t even know that these shelves are for hanging file folders. I just thought, wow…I can hang a grow light on the top frame of this and put a seedling tray on the shelf – perfect! These 3 shelves went straight to the attic where they sat all winter. But they planted the seed (pun intended) for my vision of our indoor grow station. It doesn’t really matter what type of shelf you use, but a 24″ long shelf is pretty ideal for hanging a grow light in terms of the light being able to cover the planting area.

You can find a similar shelf to what I bought with the same dimensions for $39.99 on amazon here.
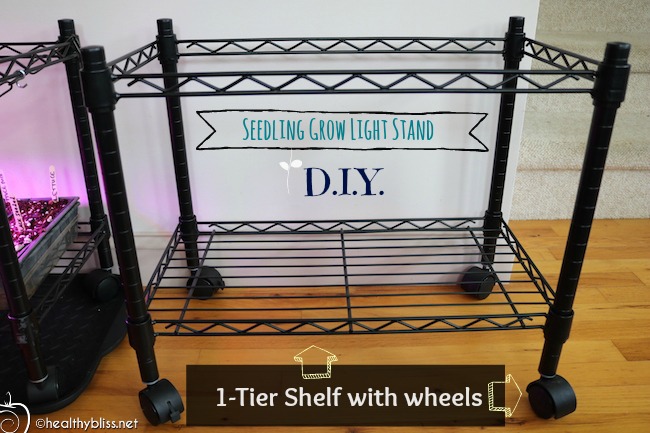
If you’re patient, you can score a good deal. I found 3 of these shelves for $5 each!

Heating Pad for warming seed trays

Certain seeds, like tomato and eggplant, require extra warmth to get started. Most people recommend a grow light AND a heating pad for these. You can buy a fancy seedling heating mat for $40 – $90 USD, depending on the size. Or you can just buy a standard heating pad from CVS. Better yet, check your thrift stores and yard sales. Just make sure that the heating pad has an option for continuous heat, that is, it doesn’t force a automatic shut-off after 1 or 2 hours.

Not all seedlings need heating pads. If you only have 2 shelf units, you probably only need 1 heating pad.

I found a like-new CVS heating pad at Goodwill for $3. Woot woot!

You can find something similar on amazon for under $20 here.

You’ll need a warming or heating pad for tomato and eggplant seedlings

Dual-Outlet Timer

Your heating pad will need to be connected to a timer so you can control the amount of hours of heat applied. You’ll also need a timer for your grow lights (see more on the grow lights below).

I bought a new timer because I wanted a digital one with 2 outlets, and this is not something easy to find used. You’re going to need one outlet for the heating pad and one for the grow light. The beauty of a dual-outlet timer is that you can connect both to one timer with the same on/off program. The model I bought is called the Century 7 Day Heavy Duty Digital Programmable Timer – Dual Outlet (Single Control), available on amazon for $12.99.
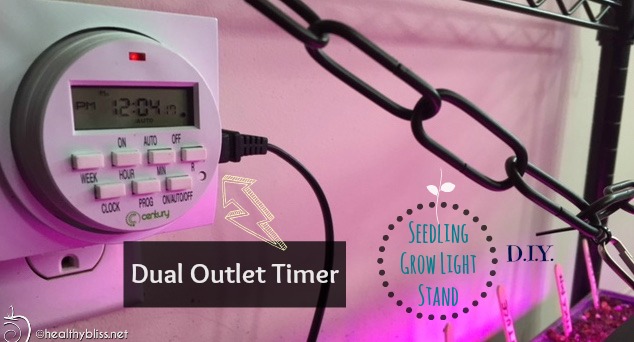
There’s an outlet on each side of the timer so you can program 2 things at the same time, like a light and a warming pad

Boot Trays make the perfect drip trays

Even with a brand new 3-tier seedling setup, you won’t get any drip trays. It won’t take long to realize that you need something to catch any water that leaks through your seedling trays. With hardwood floors, I definitely did not want water dripping! Measure the size of your shelves, that way you’ll know if boot trays will work. In my case, they fit perfectly under each shelf and turned out to be the perfect drip trays. I found 2 brand-new boot trays at Goodwill for $2 each, for a total of $4. I had another one at home that I bought at IKEA (and was actually using it as a boot tray). I added the IKEA tray to my setup and had everything I needed to secure any water from my seedling trays.

You can get 2 boot trays for $22 online here. That’s not a bad deal at all! Remember to check the measurements of your shelf to make sure they will fit.
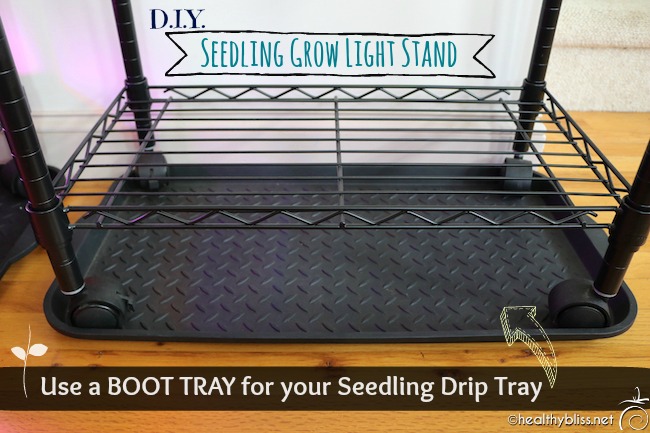
I found these boot trays at Goodwill for 2 bucks each!

LED Grow Light

A grow light is probably the most important part of your indoor setup, because without it, your seedlings are not likely to survive. A window is just not enough light in early spring for seeds to get growing.  They need at least 12 hours per day under grow lights to create the right conditions for sprouting. (And the soil needs to be moist, so don’t forget to check the seedlings twice a day and water accordingly.)

I found an affordable grow light on amazon, and so far it’s working great. I decided to buy one at first and try it, before buying another one for my other shelf. Once I started to see little sprouts pushing out of the soil (yay!), I knew the light was ok so I bought another one. This was the most expensive part of my system, but also the most essential and still very affordable. The one I bought was the Newforshop 30W LED Grow Light for $29.99.
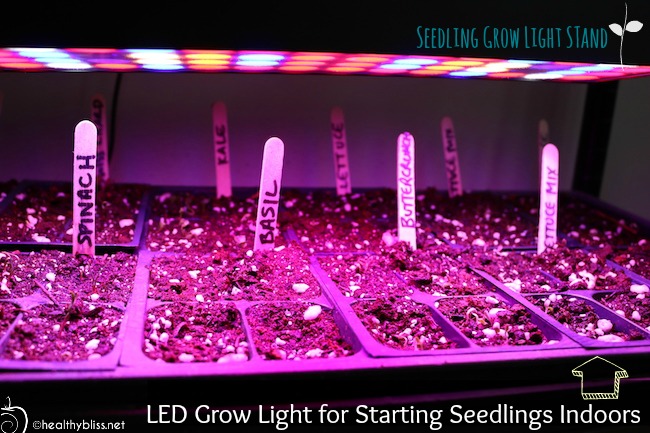
The LED grow light looks like a 70’s dance floor, but it works great and uses less energy

Chains, S Hooks, Zip Ties to attach your light

You’ll also need a few items to help hang your grow light on the shelf. One thing that makes the expensive systems more costly is that they have pully systems to easily move the light up and down as your seedlings grow. But, you can easily move your light up and down manually too. Especially if you want to save a couple hundred bucks. Simple materials like zip ties, S hooks and metal chains are all super useful to hang your grow light at the height you want. Check your grow light for its manufacturer recommendations, but as a general rule, you want to start with your grow light about 6 inches higher than the soil. Having chains makes it easy to adjust the height of your light once your seedlings start to grow.

Last summer, I found a big bag of various chains for $1 at a yard sale, and happily added it to my seedling station materials box. At another yard sale, I bought a jar full of screw and other bits for $1; inside of that were a few metal S hooks. I usually buy my zip ties at the Dollar Store but you can sometimes find those at yard sales too.

You can also buy short pieces of hanging chain with S hooks online here for $5.50.
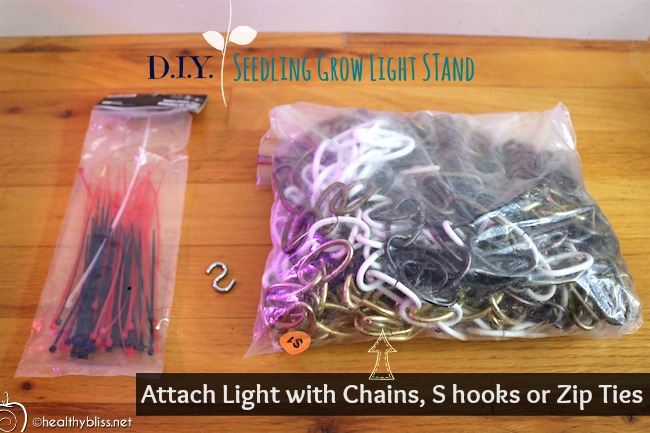
Honey I bought a bag of chains! Huh? It’s for our seedlings! OH!
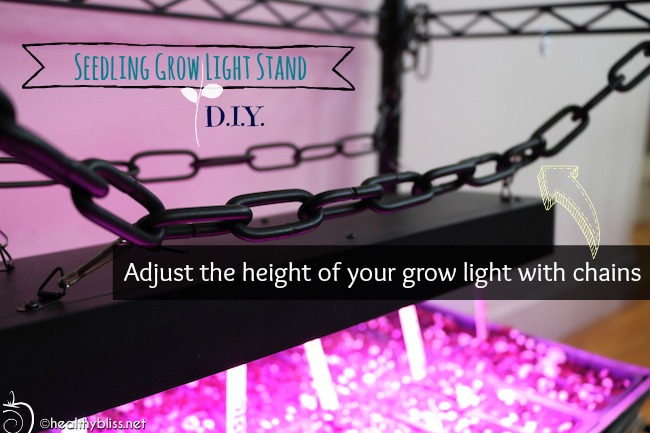
Chains and Zip ties or S hooks make it super easy to adjust the height of your light

Shopping List: DIY indoor seedling Grow Light Stand

It’s easy to start growing indoors, and you can do it on a budget too

Organic good grown at home is the ultimate in health

Cost – Buying New vs. Used

Buying all new materials, you can create ONE grow light shelf unit for $129.01 or TWO shelf units for $198.99.

Even if you buy everything NEW, you can get TWO grow light shelf units for the price of one ($199) at a comparable online garden supply store. That’s 50% less!!

Buying some used materials (like I did), you can create ONE shelf unit for $54.98 or TWO shelf units for $91.97.

Either way, you save money! Simply by starting your own plants from seed, you can save hundreds of dollars EVERY YEAR from not having to buy starter plants. (1 organic start plant costs $4-6, whereas 1 packet of 100 organic seeds costs $3 or $0.03 per plant.) Your investment in starting from seed will quickly pay off after only one season!

Additional Stuff you’ll need

Once you get your grow light shelves set up, you’ll need a few more things to actually start your seedlings:

  • Starter soil (I recommend 3 parts Peat Moss to 1/2 part Perlite 10 1/2 part Vermiculite)
  • Planting trays (I got mine for free on Craigslist; also check gardening stores at the end of the season for freebies)
  • Spray bottle for watering
  • Popsicle sticks for labeling your trays (I scored a huge bag at a yard sale for 50c)
  • And of course….some quality non-GMO organic seeds (I recommend Sow True Seed brand)
  • Fertilizer (use this once the seedlings are growing so they don’t stall in growth)

Have any personal tips on starting seeds indoors to share? Please leave a comment below!

Organic gardening for health, joy and happiness

For more on how to achieve your health goals and actually start feeling great, book a private health consult with me via Skype.

How to Book Your Health & Nutritional Coaching Session:

1. Take photos of your eyes with a digital camera.
2. Email the photos to me for approval.
3. We schedule a time to meet via phone or Skype!

More on Organic Farming:

More on Immune System:

DIY Indoor Grow Light Stands for under $100

Early spring is the time of year to start working on your summer organic veggie garden. In most climates, the actual growing season isn’t as long as you may like due to late frost in the spring and cool weather in the fall. So, how do you maximize your season to get more veggies growing outside once the warm weather finally hits? The secret to to start your seedling indoors, about 6-8 weeks before you transplant them in the ground.

Grow organic food affordably and easily at home

Starting seedlings indoors is relatively easy once you have a shelf, trays and a grow light. However, you would be amazed how much these systems cost. One 3-tier LED grow light stand will set you back a whopping $699 USD! And that doesn’t include any seeds, drip trays, planting trays or a timer!! A one shelf base unit for a standard stack-n-grow system is $199 USD. It’s insane money if you ask me. I knew I could do it myself way cheaper. And I did! For under $100 USD, I have almost the same setup that would cost you $400 retail. Keep reading, I’m going to show you how you can do it too.

All information in this article is for educational purposes only. 
It is not for the diagnosis, treatment, prescription or cure of any disease or health condition. 
There are affiliate links in this post. 

It’s easy to start growing indoors, and you can do it on a budget too

Background: Our Organic Veggie Garden

I should explain that my husband and I are complete amateurs in organic gardening. Between us, we have less than zero gardening experience. But, we are both committed to a healthy lifestyle. Our goal in moving to western North Carolina was to grow our own organic food. We’ve been at it for just 2 years now, and this is the first year that we are actually starting seedlings indoors. Why did it take 2 years? Between work, renovating our house, and working on the land, we’ve just been really busy and are still getting our bearings with living in a totally new place to boot.

The first year, my husband built 8 raised beds. Last year, he built another 7 for a total of 15 raised beds for veggies. We also planted fruit trees, raspberries, blueberries, goji berries, grapes, many herbs and lots of pollinating plants for our future bees. Believe me, that was more than enough to keep us busy from morning ’til night. We barely had time to start seedlings outside! That first year, we had beginner’s luck. The spring was mild, so the outdoor seedlings survived.

Last year, however, was a different situation and a few late frosts killed most of our outdoor seedlings. Then, we had to start all over which wasted valuable time. I had to buy a lot of veggie starts to just get things growing, and that was definitely more expensive. I knew that I had to start collecting parts and equipment to make our indoor seedling grow system so that this year, we could finally start our seeds indoors. Hopefully you will learn from a few of our mistakes there and just start your spring seedlings inside!

Get Started: DIY Indoor Grow Light Stands Materials

You’ve got 2 options in sourcing your materials for making your own indoor seedling station:

  1. Buy everything new and assemble yourself, or
  2. Look for sales, bargains and thrift store/yard sale finds to create a budget masterpiece.

If you know me, then you already know what I did. Yep, confessions of a thrift store shopper..But, I managed to find everything I needed, and it wasn’t that hard! I’ll give you both the yard sale list and buy new list so you can combine from both to make what suits you.  Since the end of last summer, I’ve been keeping my eyes out for anything that might be useful and putting it aside. In total, it took me about 6 months to put together my super bargain setup.

Shelves for your indoor seedlings

How many shelves do you need? You can buy the 3-shelf systems with lights already set up. I’ve also seen homemade versions with 3 shelves which seem to work fine. But, if you have any curious cats in your house (like we do), then I would not recommend a 3-tier or even a 2-tier system. Can you hear the whole unit crashing? I can! With one particularly curious rescue cat, aka Captain Sneakypuss, we knew that we needed to have one-shelf units to prevent feline adventure accidents.

The first thing I found at a local thrift store was three separate one-shelf units with wheels, each for only $5. I really wanted shelves with wheels in case I had to move them, so I was beyond excited to find such a good deal! Each shelf measures 24″ long x 20″ high x 15″ wide. At the time, I didn’t even know that these shelves are for hanging file folders. I just thought, wow…I can hang a grow light on the top frame of this and put a seedling tray on the shelf – perfect! These 3 shelves went straight to the attic where they sat all winter. But they planted the seed (pun intended) for my vision of our indoor grow station. It doesn’t really matter what type of shelf you use, but a 24″ long shelf is pretty ideal for hanging a grow light in terms of the light being able to cover the planting area.

You can find a similar shelf to what I bought with the same dimensions for $39.99 on amazon here.

If you’re patient, you can score a good deal. I found 3 of these shelves for $5 each!

Heating Pad for warming seed trays

Certain seeds, like tomato and eggplant, require extra warmth to get started. Most people recommend a grow light AND a heating pad for these. You can buy a fancy seedling heating mat for $40 – $90 USD, depending on the size. Or you can just buy a standard heating pad from CVS. Better yet, check your thrift stores and yard sales. Just make sure that the heating pad has an option for continuous heat, that is, it doesn’t force a automatic shut-off after 1 or 2 hours.

Not all seedlings need heating pads. If you only have 2 shelf units, you probably only need 1 heating pad.

I found a like-new CVS heating pad at Goodwill for $3. Woot woot!

You can find something similar on amazon for under $20 here.

You’ll need a warming or heating pad for tomato and eggplant seedlings

Dual-Outlet Timer

Your heating pad will need to be connected to a timer so you can control the amount of hours of heat applied. You’ll also need a timer for your grow lights (see more on the grow lights below).

I bought a new timer because I wanted a digital one with 2 outlets, and this is not something easy to find used. You’re going to need one outlet for the heating pad and one for the grow light. The beauty of a dual-outlet timer is that you can connect both to one timer with the same on/off program. The model I bought is called the Century 7 Day Heavy Duty Digital Programmable Timer – Dual Outlet (Single Control), available on amazon for $12.99.

There’s an outlet on each side of the timer so you can program 2 things at the same time, like a light and a warming pad

Boot Trays make the perfect drip trays

Even with a brand new 3-tier seedling setup, you won’t get any drip trays. It won’t take long to realize that you need something to catch any water that leaks through your seedling trays. With hardwood floors, I definitely did not want water dripping! Measure the size of your shelves, that way you’ll know if boot trays will work. In my case, they fit perfectly under each shelf and turned out to be the perfect drip trays. I found 2 brand-new boot trays at Goodwill for $2 each, for a total of $4. I had another one at home that I bought at IKEA (and was actually using it as a boot tray). I added the IKEA tray to my setup and had everything I needed to secure any water from my seedling trays.

You can get 2 boot trays for $22 online here. That’s not a bad deal at all! Remember to check the measurements of your shelf to make sure they will fit.

I found these boot trays at Goodwill for 2 bucks each!

LED Grow Light

A grow light is probably the most important part of your indoor setup, because without it, your seedlings are not likely to survive. A window is just not enough light in early spring for seeds to get growing.  They need at least 12 hours per day under grow lights to create the right conditions for sprouting. (And the soil needs to be moist, so don’t forget to check the seedlings twice a day and water accordingly.)

I found an affordable grow light on amazon, and so far it’s working great. I decided to buy one at first and try it, before buying another one for my other shelf. Once I started to see little sprouts pushing out of the soil (yay!), I knew the light was ok so I bought another one. This was the most expensive part of my system, but also the most essential and still very affordable. The one I bought was the Newforshop 30W LED Grow Light for $29.99.

The LED grow light looks like a 70’s dance floor, but it works great and uses less energy

Chains, S Hooks, Zip Ties to attach your light

You’ll also need a few items to help hang your grow light on the shelf. One thing that makes the expensive systems more costly is that they have pully systems to easily move the light up and down as your seedlings grow. But, you can easily move your light up and down manually too. Especially if you want to save a couple hundred bucks. Simple materials like zip ties, S hooks and metal chains are all super useful to hang your grow light at the height you want. Check your grow light for its manufacturer recommendations, but as a general rule, you want to start with your grow light about 6 inches higher than the soil. Having chains makes it easy to adjust the height of your light once your seedlings start to grow.

Last summer, I found a big bag of various chains for $1 at a yard sale, and happily added it to my seedling station materials box. At another yard sale, I bought a jar full of screw and other bits for $1; inside of that were a few metal S hooks. I usually buy my zip ties at the Dollar Store but you can sometimes find those at yard sales too.

You can also buy short pieces of hanging chain with S hooks online here for $5.50.

Honey I bought a bag of chains! Huh? It’s for our seedlings! OH!

Chains and Zip ties or S hooks make it super easy to adjust the height of your light

Shopping List: DIY indoor seedling Grow Light Stand

It’s easy to start growing indoors, and you can do it on a budget too

Organic good grown at home is the ultimate in health

Cost – Buying New vs. Used

Buying all new materials, you can create ONE grow light shelf unit for $129.01 or TWO shelf units for $198.99.

Even if you buy everything NEW, you can get TWO grow light shelf units for the price of one ($199) at a comparable online garden supply store. That’s 50% less!!

Buying some used materials (like I did), you can create ONE shelf unit for $54.98 or TWO shelf units for $91.97.

Either way, you save money! Simply by starting your own plants from seed, you can save hundreds of dollars EVERY YEAR from not having to buy starter plants. (1 organic start plant costs $4-6, whereas 1 packet of 100 organic seeds costs $3 or $0.03 per plant.) Your investment in starting from seed will quickly pay off after only one season!

Additional Stuff you’ll need

Once you get your grow light shelves set up, you’ll need a few more things to actually start your seedlings:

  • Starter soil (I recommend 3 parts Peat Moss to 1/2 part Perlite 10 1/2 part Vermiculite)
  • Planting trays (I got mine for free on Craigslist; also check gardening stores at the end of the season for freebies)
  • Spray bottle for watering
  • Popsicle sticks for labeling your trays (I scored a huge bag at a yard sale for 50c)
  • And of course….some quality non-GMO organic seeds (I recommend Sow True Seed brand)
  • Fertilizer (use this once the seedlings are growing so they don’t stall in growth)

Have any personal tips on starting seeds indoors to share? Please leave a comment below!
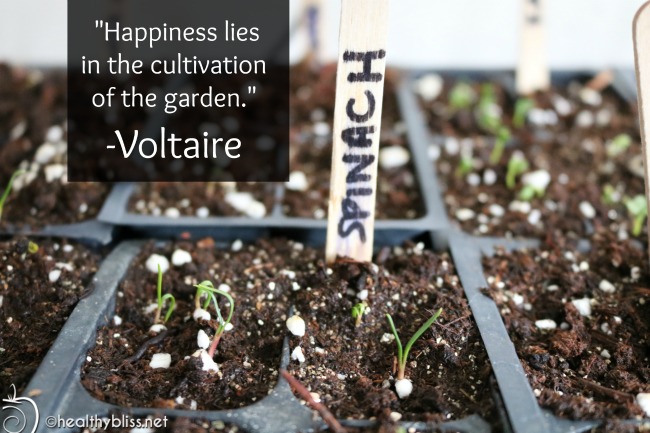
Organic gardening for health, joy and happiness

For more on how to achieve your health goals and actually start feeling great, book a private health consult with me via Skype.

How to Book Your Health & Nutritional Coaching Session:

1. Take photos of your eyes with a digital camera.
2. Email the photos to me for approval.
3. We schedule a time to meet via phone or Skype!

More on Organic Farming:

More on Immune System:

Are farmers getting CANCER from pesticides sold at Home Depot?

Friends, your health matters, at least to me!  This is something you need to know. Poisons are being marketed and sold to us to use freely on our gardens, fruit, vegetables, flowers, lawns and precious earth. This one particular pesticide is used everywhere, from huge agricultural farms to your neighbor next door, who can easily buy it at Lowes and Home Depot just down the road from you. In July 2017, the State of California added this pesticide under Proposition 65 as “known to the state to cause cancer.” In the EU, it’s currently under discussion for vote on a ban of the chemical by 2020.

All information in this article is for educational purposes only. 
It is not for the diagnosis, treatment, prescription or cure of any disease or health condition. 

If someone offered you a salad dressing that was known to cause cancer, would you add it to your plate? Of course not! Well, unfortunately…this pesticide is already in the salad! Even in some “organic” foods too!! (You can understand why we moved to the mountains to start growing our own food. Scroll down below to find out what you can do NOW to improve your food at home.)

The world today is currently undergoing a slow and painful death and there is no smoking gun since this pesticide has very sneakily been added to our food supply for the last 4 decades and wrongly labeled as “safe” for the sake of profit. It’s in everything from corn, barley, sugar beets, oats, potatoes, sunflower, soy and canola oil, and the list goes on and on. Of course it’s in the feed given to cows and chickens, so that means it’s even more concentrated in meat, eggs and dairy. Recently, this pesticide was even detected in (non-GMO) Ben and Jerry’s ice cream. In fact, it’s so heavily used that it’s been detected in the water and air. (Do you think the average organic farm is really free from this stuff, and especially considering that most “organic” produce sold in the USA comes from Mexico?) While this pesticide is most commonly used on Genetically Modified (GMO) crops, it can also be used and found in conventional crops as well.

It’s not only in the United States

In Europe, where it’s widely thought to be “better than the United States” for all things related to what’s allowed in foods, you will find this pesticide all over the place. In fact, it’s so pervasive that its residues were recently found in 45% of Europe’s topsoil – and in the urine of three quarters of Germans tested, at five times the legal limit for drinking water. Its residues have been found in biscuits, crackers, crisps, breakfast cereals and in 60% of breads sold in the UK. (Can you imagine how much worse it must be in the US then?!)

I see normal everyday people buying this pesticide at Lowes and Home Depot, actually bragging about how great it works to kill things like poison oak, invasive multi flora rose, or bamboo (without realizing that it’s killing them too!).

Could the dramatic decline in honey bee populations all over the world in recent years be linked to this pesticide as well?

Link to non-Hodgkin’s lymphoma

This particular pesticide has been heavily linked to non-Hodgkin’s lymphoma (NHL). With NHL, the cancer starts in the white blood cells of the lymphatic system, all of which are part of the body’s immune system. In non-Hodgkin’s lymphoma, tumors develop from lymphocytes – a type of white blood cell.

Symptoms of non-Hodgkin’s lymphoma include:

  • Painless, swollen lymph nodes in the neck, armpits or groin.
  • Abdominal pain or swelling.
  • Chest pain, coughing or trouble breathing.
  • Persistent fatigue, lethargy, feeling of tiredness.
  • Fever.
  • Night sweats.
  • Loss of appetite, nausea, vomiting, weight loss.
  • Skin rash or itchy skin (pruritus).
  • Difficulty moving parts of the body.
  • Pain in the chest, abdomen or bones for no known reason.

Are you ready to know the name of this pesticide?  Since I don’t want to get trolled or harassed by the company who manufactures this chemical, I’ll write it in this way:

R..O..U..N..D..U..P  also known as  G..l..y..p..h..o..s..a..t..e  made by  M..o..n..s..a..n..t..o

Farmers using this pesticide who got NHL cancer

March 2016 – The family of Cambria, California farmer Jack McCall, filed a wrongful death lawsuit against M.o.n.s.a.n.t.o, claiming that McCall’s cancer was caused by R.o.u.n.d.u.p exposure. McCall was diagnosed with a rare form of non-Hodgkin lymphoma after using R.o.u.n.d.u.p for nearly 30 years on his 20-acre fruit and vegetable farm. He died in December of 2015 after suffering a massive stroke due to complications from cancer.

February 2016 – California couple James and Brenda Huerta filed a R.o.u.n.d.u.p cancer lawsuit against M.o.n.s.a.n.t.o claiming exposure to g.l.y.p.h.o.s.a.t.e caused Brenda to develop non-Hodgkin lymphoma. The R.o.u.n.d.u.p cancer lawsuit claims that both were exposed to the herbicide while living on a sod farm where g.l.y.p.h.o.s.a.t.e was sprayed between 2004 and 2008.

November 2015 – Christine Sheppard owned and worked on a coffee farm in Hawaii between 1995 and 2004. For around eight years, she relied on M.o.n.s.a.n.t.o R.o.u.n.d.u.p [g.l.y.p.h.o.s.a.t.e] to kill weeds on her farm. Sheppard alleges her exposure to R.o.u.n.d.u.p is the cause of her non-Hodgkin lymphoma. In her R.o.u.n.d.u.p cancer lawsuit, she claims that M.o.n.s.a.n.t.o failed to warn the public about the dangers of g.l.y.p.h.o.s.a.t.e.

(The above info resource link here.) 

The list goes on and on. In 2015, 200 people filed a class action lawsuit in California against the maker of this pesticide.

People just don’t know and that’s the problem

Here’s a big part of the problem: the public perception of risk is low. Would you really think your Kona coffee grown on the hills of the Big Island of Hawaii could be loaded with a cancer-causing pesticide? Or you hippie-loving Ben and Jerry’s ice cream? It’s really hard to convince people that these seemingly healthy products could be contaminated.

Last year I was at a weekend farmer’s market her in Western North Carolina. There was a nice man selling “farm fresh artisanal” goat cheese. We got to talking, and I casually asked him about what he feeds the goats. He explained to me that he doesn’t have his own goats. Instead, he buys the milk from 2 different local goat farmers. I asked if the farmers used non-GMO feed. He exclaimed, “No way! They can’t afford that, and I couldn’t afford to buy their milk if they did!.” I was in shock. I think it took half a minute for me to say something! What’s even more shocking is that his cheese sells for $12-15 per piece! And for that, you’re getting a GMO product (along with the cancer-causing pesticides)!! Every time I’ve been to that market since, his booth is packed with customers. Sadly, I’m sure they have no idea what they are really getting. (In his defense, I can only say that perhaps he, like many others, just doesn’t know or understand the problem.)

The numbers say it all

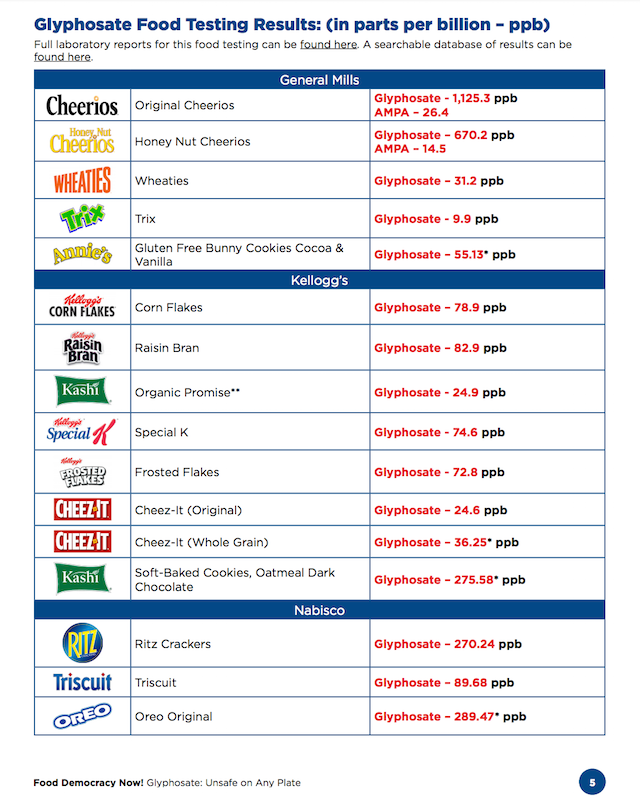
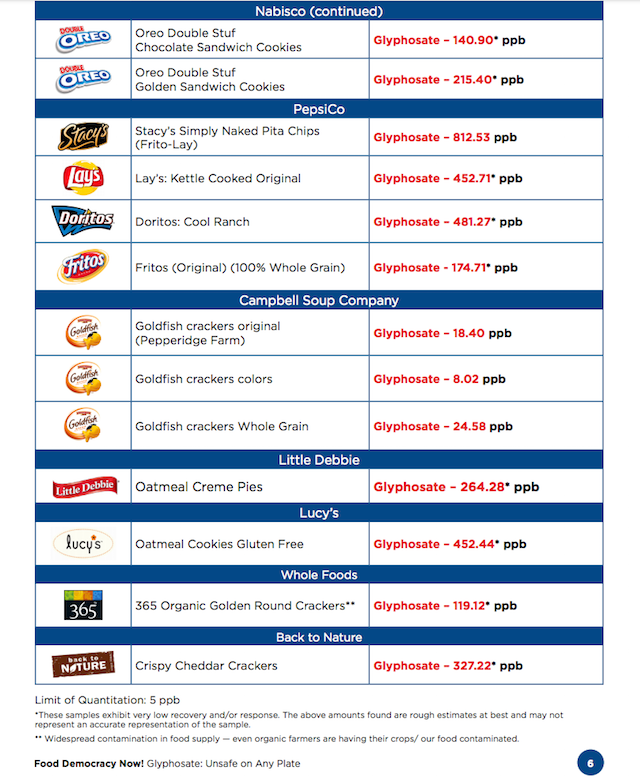
Look at the charts below to get a better understanding of what we are really dealing with. To understand the severity of these findings, remember, research shows that probable harm to human health begins at really low levels of exposure – only 0.1 ppb. And yes, the manufacturer of that chemical is trying desperately hide that number for the general public! Below, you can see for yourself that many foods were found to have over 1,000 times this amount!  Also note that you see organic foods on the list too. This should be on the front page of every newspaper!!

What You can do: 5 Easy Steps

Hopefully by now, you are wondering, what can I do to improve my health and stay away from this chemical?! This is something that I will go into more and more in future posts, to help you navigate through this maze and find better ways to detoxify your body so you don’t have too much accumulation of any chemical or heavy metal. In the meantime, some things you can do now:

  1. Avoid buying organic produce from Mexico. Since we have no idea what’s it the soil, water or otherwise…it’s just a risk not worth taking. Organic produce from USA may not be much better, but at least there is a chance! (And when you see the difference in price between organic from Mexico vs. organic from California, doesn’t it make you wonder??)
  2. Avoid bottled water, unless it’s distilled water. Don’t waste your money on anything other than distilled water…and at least the distilled water can help bind and transport heavy metals out of the body. We drink freshly collected mountain spring water and distilled water in our home.
  3. DON’T BUY or USE R.O.U.N.D.U.P !!! Not for any reason! I cannot emphasize this enough. If people stop buying this crap, the company will suffer. Let your lawn and flowers and bamboo do want they want…which is grow! If you don’t like a particular weed, pull it out of the ground. Would you rather have no weeds and cancer, or no cancer and weeds? It’s a no brainer!
  4. Avoid foods from China. This is easier said than done and takes a bit of learning to figure out what common foods are imported from China. Garlic is a good example. Nearly all conventional fresh garlic sold in supermarkets today comes from China.  An easy upgrade for you and your family is to buy locally grown certified organic garlic (or grow your own, like we do!).
  5. Avoid packaged snack foods. Use only certified organic spices. Use whole organic ingredients (preferably locally grown) and make meals from from scratch whenever possible.

Ready to do even more? Start planting more pollinating flowers outside your home or apartment. And don’t use any chemicals on them! Give the honey bees a chance to survive with some decent clean food. I’ve found that the bees in our area really love organic catnip, lavender, sage and delphinium – all of which are pretty easy to grow.

How to Eat Clean: Start with Green Smoothies!

Green Smoothie for DummiesCheck out my book Green Smoothies for Dummies – I’ve got loads of recipes using dark leafy greens and many delicious combos without any chemical additives, flavorings or refined sugar. It’s so easy!

Clean your body from the inside out and watch your skin improve, your hair and nails get stronger, your eyes look brighter and your waistline slim down….all naturally and effortlessly! It’s simply amazing and your only regret will be that you didn’t start drinking green smoothies sooner.

When you take care of your whole body, you get whole body health.

When you let your food be your medicine, you are always moving towards better health.

Find the book Green Smoothies for Dummies on iTunes or amazon.com!


For more on how to achieve your health goals and actually start feeling great, book a private health consult with me via Skype.

How to Book Your Health & Nutritional Coaching Session:

1. Take photos of your eyes with a smart phone or digital camera.
2. Email the photos to me for approval for Iridology Analysis.
3. We schedule a time to meet via phone or Skype!


More on Food Labels:

More on Food Additives and Food Allergies:

More on Genetically Engineering Foods:

What are the symptoms of Heavy Metal toxicity?

In the last few years, I’ve been working with clients with heavy metal toxicity more than ever before. The soil, air and water are more contaminated all over the world, and it’s only getting worse. Even certified organic fruit and vegetables can contain high levels of heavy metals, because the soil (and water) does not need to be tested in order to obtain organic status (crazy but true). There are several other reasons why heavy metal levels are increasing in our food supply, but I would have to go down the rabbit hole a bit in order to explain and you may or may not be ready to hear that story. In short, the health of our soil will always determine and affect the health of our bodies.

All information in this article is for educational purposes only. 
It is not for the diagnosis, treatment, prescription or cure of any disease or health condition. 

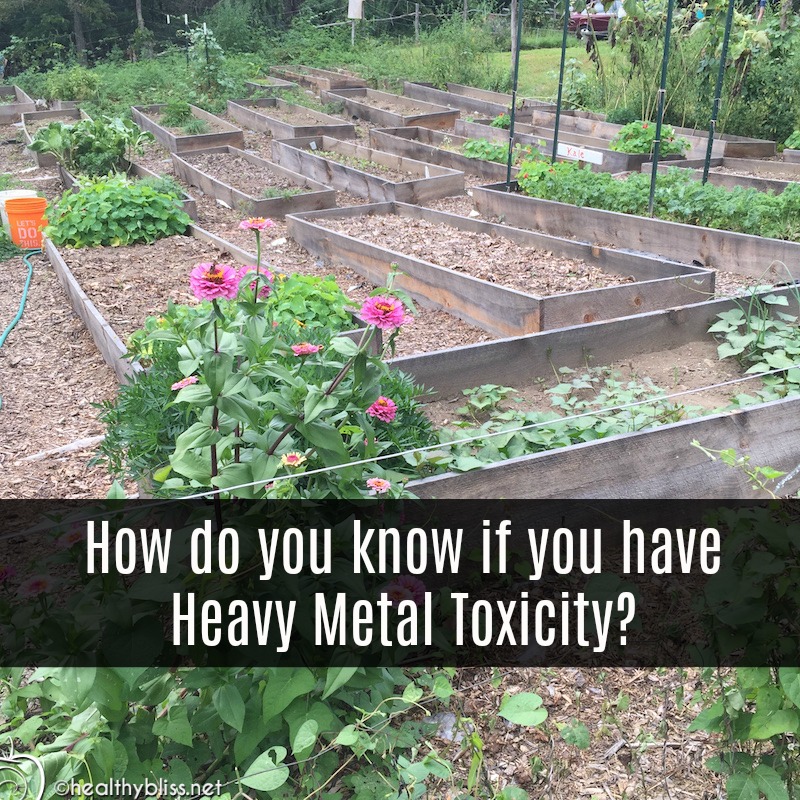
Heavy metals such as lead and arsenic can occur naturally in the soil, even in organic farms

Here’s what’s happening: many healthy eaters and detox/cleansing folks are getting sicker and feeling worse and can’t figure out why. Does that sound familiar to you? It seems to be especially true for that subset of people because once you eliminate the old mucoid plaque from your stomach, small intestine and colon you will absorb everything much more efficiently. That’s a good thing, unless what you are absorbing contains high levels of lead, arsenic, mercury, aluminum, cadmium or thallium..in which case you absorb much more of it than everyone else. Combine that with a diet higher in vegetables grown in toxic soil (unbeknownst to you of course). The person eating more fruit and vegetables will have more toxic exposure than the person not eating a lot of fruit and vegetables, even if they are all organic, that is unless you are growing them yourself at home (and not adding anything bad to the soil. More on this in a future post for those of you already growing your own, like me).

Check out the list of symptoms below and see if maybe you need to look at doing some heavy metal detox as part of your healing journey. It’s an easy thing to miss because many of the symptoms of heavy metal toxicity can mimic other chronic conditions, such as chronic fatigue, fibromyalgia, chronic anxiety, depression, insomnia, hormonal imbalance, adrenal fatigue, histamine intolerance, infertility, foggy brain, weight gain, itchy rashes, hives, urticaria, peripheral neuropathy, thyroid disease, Alzheimer’s disease, Parkinson’s disease, Multiple Sclerosis (MS), auto-immune disease, kidney disease and even certain types of cancer. And if you are eating such a good diet compared to everyone else, you would never think that your food, water or nutritional supplements could be the source of your illness.

Symptoms of Heavy Metal Toxicity

  • Foggy Brain – arsenic, lead
  • Fatigue (extreme and/or chronic) – arsenic, lead
  • Hair loss – thallium
  • Memory loss – lead, aluminum
  • Chronically bloodshot eyes – arsenic
  • Mee’s lines (deep ridges on fingernails and/or toenails) – arsenic
  • Impaired concentration – thallium, lead, aluminum
  • Impaired motor function, sensory function, and cognitive function – aluminum
  • Increased nervousness – thallium, lead
  • Irritability – thallium, lead
  • Dizziness – lead
  • Depression/mood changes, headache – lead
  • Skin discoloration – darkening (hyper pigmentation) – arsenic
  • Hyperkeratosis (most frequently on the palms and soles) – arsenic
  • Throat irritation / difficultly swallowing / chronic sore throat – arsenic
  • Impaired immune system – lead, arsenic
  • Generalized muscle aches, weakness and body pains – lead
  • Muscle cramps or muscle tenderness – arsenic
  • Numbness, tingling and pain (sensory) – arsenic
  • Spontaneous pain – arsenic
  • Localized edema – arsenic
  • Inflammation or pain in the gastrointestinal (GI) tract – thallium, arsenic
  • Decreased libido – lead, arsenic
  • Decreased sperm count – lead, arsenic
  • Infertility – lead, arsenic
  • Peripheral neuropathy (hot or burning feeling in hands and feet) – arsenic
  • Attention deficit hyperactivity disorder (ADHD) – lead
  • Enlarged liver (hepatomegaly) – arsenic
  • Hemolytic anemia – lead
  • Nausea or diarrhea – arsenic
  • Low Vitamin D levels (inability to convert Vitamin D) – lead
  • Severe osteoporosis and osteomalacia – cadmium
  • Proteinuria (too much protein in the urine) – arsenic
  • Cardiac Arrhythmias (abnormal heart rhythms) – arsenic
  • Skin cancer – arsenic
  • Impaired lung function / fibrosis – aluminum
  • Lung cancer – cadmium, arsenic
  • Kidney (renal) failure – arsenic, cadmium, lead
  • Gout – lead
  • Kidney cancer – arsenic
  • Bladder cancer – arsenic
  • Liver cancer – arsenic
  • Prostate cancer – arsenic

-from the Agency for Toxic Substances & Diseases Registry
and the Centers for Disease Control and Prevention (CDC)

How do you know if you have heavy metal toxicity? Heavy metals are not so easy to test for since, upon exposure, your body will push them into 3 “safe” places as fast as possible – your bone, tissue and fat. That keeps the heavy metals from causing too much free radical damage in the essential organs. You can have a buildup of arsenic in the bone, for example, and the blood test can come up clean. In Iridology, I can determine very quickly if someone has a higher likelihood for heavy metal accumulation. Then, I will ask a series of questions about your symptoms vs. the highest potential sources of heavy metals. We then eliminate the suspect sources and re-assess your symptoms. If you are feeling better, then we continue on that track and add in herbal and natural forms of heavy metal detoxification. Getting on a low or no heavy metal diet is essential. You can get hair testing or a 24-hour urine test if you want, or you can put your time and money straight into chelation therapy or detoxification of heavy metals.

Heavy metals can also be added to fruits and vegetables through pesticide use

Three things need to be done in order to remove heavy metals from the body:
1) Eliminate the source (easier said than done, believe me…but possible) then
2) Detox the body from heavy metals in a safe and effective way (also easier said than done but possible) and
3) Support/strengthen the essential organs and immune system with a clean heavy metal-free diet and high anti-oxidants to protect organs from any degeneration

What is the best type of heavy metal detox? This is something that needs to be more individualized, based on the strength and weakness of all the other organs, including the skin, lungs, liver, colon and kidneys. Bio-individuality is the best approach to achieve maximum results. Taking additional zinc, selenium and Vitamin C is important for anyone with high heavy metals. Remember though, the first step is to eliminate the source. If you don’t do that, there is no amount of heavy metal detox that will help.


For more on how to achieve your health goals and actually start feeling great, book a private health consult with me via Skype.

How to Book Your Health & Nutritional Coaching Session:

1. Take photos of your eyes with a smart phone or digital camera.
2. Email the photos to me for approval for Iridology Analysis.
3. We schedule a time to meet via phone or Skype!


More on Detox:

More on Skin Cleansing:

More on Liver Cleansing: