DIY Indoor Grow Light Stands for under $100

Early spring is the time of year to start working on your summer organic veggie garden. In most climates, the actual growing season isn’t as long as you may like due to late frost in the spring and cool weather in the fall. So, how do you maximize your season to get more veggies growing outside once the warm weather finally hits? The secret to to start your seedling indoors, about 6-8 weeks before you transplant them in the ground.

Grow organic food affordably and easily at home

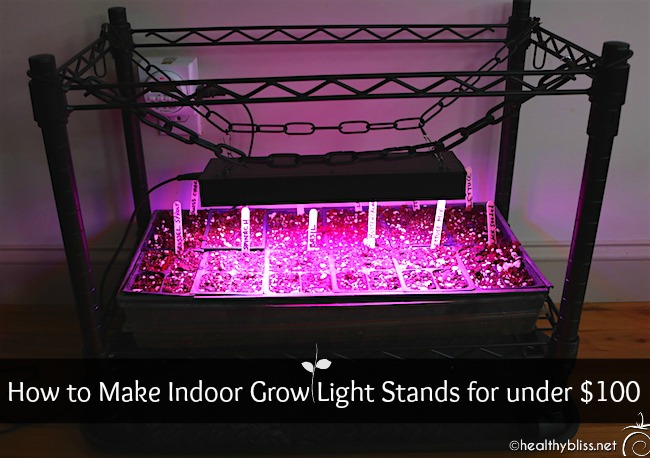
Starting seedlings indoors is relatively easy once you have a shelf, trays and a grow light. However, you would be amazed how much these systems cost. One 3-tier LED grow light stand will set you back a whopping $699 USD! And that doesn’t include any seeds, drip trays, planting trays or a timer!! A one shelf base unit for a standard stack-n-grow system is $199 USD. It’s insane money if you ask me. I knew I could do it myself way cheaper. And I did! For under $100 USD, I have almost the same setup that would cost you $400 retail. Keep reading, I’m going to show you how you can do it too.

All information in this article is for educational purposes only. 
It is not for the diagnosis, treatment, prescription or cure of any disease or health condition. 
There are affiliate links in this post. 

It’s easy to start growing indoors, and you can do it on a budget too

Background: Our Organic Veggie Garden

I should explain that my husband and I are complete amateurs in organic gardening. Between us, we have less than zero gardening experience. But, we are both committed to a healthy lifestyle. Our goal in moving to western North Carolina was to grow our own organic food. We’ve been at it for just 2 years now, and this is the first year that we are actually starting seedlings indoors. Why did it take 2 years? Between work, renovating our house, and working on the land, we’ve just been really busy and are still getting our bearings with living in a totally new place to boot.

The first year, my husband built 8 raised beds. Last year, he built another 7 for a total of 15 raised beds for veggies. We also planted fruit trees, raspberries, blueberries, goji berries, grapes, many herbs and lots of pollinating plants for our future bees. Believe me, that was more than enough to keep us busy from morning ’til night. We barely had time to start seedlings outside! That first year, we had beginner’s luck. The spring was mild, so the outdoor seedlings survived.

Last year, however, was a different situation and a few late frosts killed most of our outdoor seedlings. Then, we had to start all over which wasted valuable time. I had to buy a lot of veggie starts to just get things growing, and that was definitely more expensive. I knew that I had to start collecting parts and equipment to make our indoor seedling grow system so that this year, we could finally start our seeds indoors. Hopefully you will learn from a few of our mistakes there and just start your spring seedlings inside!

Get Started: DIY Indoor Grow Light Stands Materials

You’ve got 2 options in sourcing your materials for making your own indoor seedling station:

  1. Buy everything new and assemble yourself, or
  2. Look for sales, bargains and thrift store/yard sale finds to create a budget masterpiece.

If you know me, then you already know what I did. Yep, confessions of a thrift store shopper..But, I managed to find everything I needed, and it wasn’t that hard! I’ll give you both the yard sale list and buy new list so you can combine from both to make what suits you.  Since the end of last summer, I’ve been keeping my eyes out for anything that might be useful and putting it aside. In total, it took me about 6 months to put together my super bargain setup.

Shelves for your indoor seedlings

How many shelves do you need? You can buy the 3-shelf systems with lights already set up. I’ve also seen homemade versions with 3 shelves which seem to work fine. But, if you have any curious cats in your house (like we do), then I would not recommend a 3-tier or even a 2-tier system. Can you hear the whole unit crashing? I can! With one particularly curious rescue cat, aka Captain Sneakypuss, we knew that we needed to have one-shelf units to prevent feline adventure accidents.

The first thing I found at a local thrift store was three separate one-shelf units with wheels, each for only $5. I really wanted shelves with wheels in case I had to move them, so I was beyond excited to find such a good deal! Each shelf measures 24″ long x 20″ high x 15″ wide. At the time, I didn’t even know that these shelves are for hanging file folders. I just thought, wow…I can hang a grow light on the top frame of this and put a seedling tray on the shelf – perfect! These 3 shelves went straight to the attic where they sat all winter. But they planted the seed (pun intended) for my vision of our indoor grow station. It doesn’t really matter what type of shelf you use, but a 24″ long shelf is pretty ideal for hanging a grow light in terms of the light being able to cover the planting area.

You can find a similar shelf to what I bought with the same dimensions for $39.99 on amazon here.

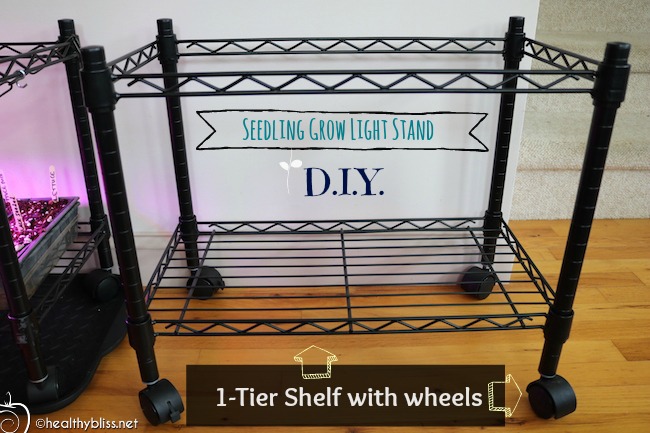
If you’re patient, you can score a good deal. I found 3 of these shelves for $5 each!

Heating Pad for warming seed trays

Certain seeds, like tomato and eggplant, require extra warmth to get started. Most people recommend a grow light AND a heating pad for these. You can buy a fancy seedling heating mat for $40 – $90 USD, depending on the size. Or you can just buy a standard heating pad from CVS. Better yet, check your thrift stores and yard sales. Just make sure that the heating pad has an option for continuous heat, that is, it doesn’t force a automatic shut-off after 1 or 2 hours.

Not all seedlings need heating pads. If you only have 2 shelf units, you probably only need 1 heating pad.

I found a like-new CVS heating pad at Goodwill for $3. Woot woot!

You can find something similar on amazon for under $20 here.

You’ll need a warming or heating pad for tomato and eggplant seedlings

Dual-Outlet Timer

Your heating pad will need to be connected to a timer so you can control the amount of hours of heat applied. You’ll also need a timer for your grow lights (see more on the grow lights below).

I bought a new timer because I wanted a digital one with 2 outlets, and this is not something easy to find used. You’re going to need one outlet for the heating pad and one for the grow light. The beauty of a dual-outlet timer is that you can connect both to one timer with the same on/off program. The model I bought is called the Century 7 Day Heavy Duty Digital Programmable Timer – Dual Outlet (Single Control), available on amazon for $12.99.

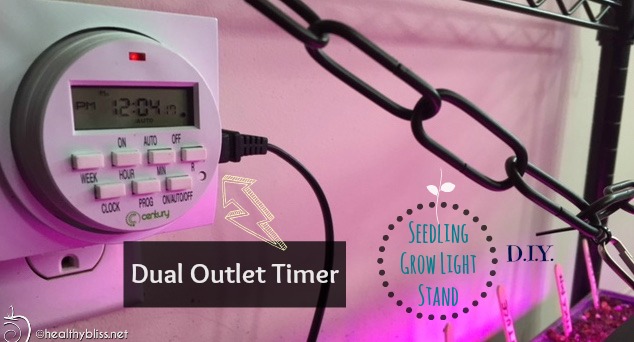
There’s an outlet on each side of the timer so you can program 2 things at the same time, like a light and a warming pad

Boot Trays make the perfect drip trays

Even with a brand new 3-tier seedling setup, you won’t get any drip trays. It won’t take long to realize that you need something to catch any water that leaks through your seedling trays. With hardwood floors, I definitely did not want water dripping! Measure the size of your shelves, that way you’ll know if boot trays will work. In my case, they fit perfectly under each shelf and turned out to be the perfect drip trays. I found 2 brand-new boot trays at Goodwill for $2 each, for a total of $4. I had another one at home that I bought at IKEA (and was actually using it as a boot tray). I added the IKEA tray to my setup and had everything I needed to secure any water from my seedling trays.

You can get 2 boot trays for $22 online here. That’s not a bad deal at all! Remember to check the measurements of your shelf to make sure they will fit.

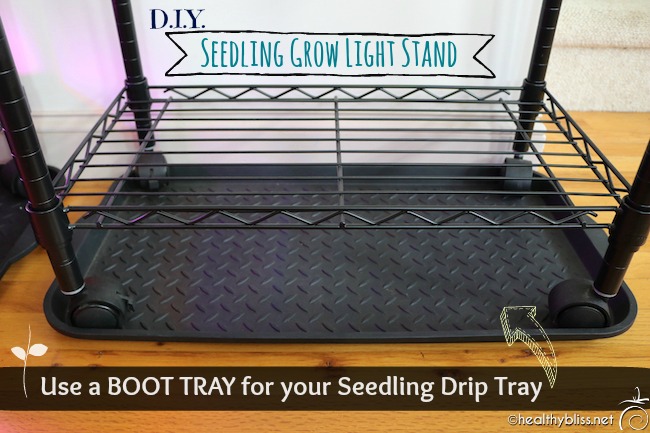
I found these boot trays at Goodwill for 2 bucks each!

LED Grow Light

A grow light is probably the most important part of your indoor setup, because without it, your seedlings are not likely to survive. A window is just not enough light in early spring for seeds to get growing.  They need at least 12 hours per day under grow lights to create the right conditions for sprouting. (And the soil needs to be moist, so don’t forget to check the seedlings twice a day and water accordingly.)

I found an affordable grow light on amazon, and so far it’s working great. I decided to buy one at first and try it, before buying another one for my other shelf. Once I started to see little sprouts pushing out of the soil (yay!), I knew the light was ok so I bought another one. This was the most expensive part of my system, but also the most essential and still very affordable. The one I bought was the Newforshop 30W LED Grow Light for $29.99.

The LED grow light looks like a 70’s dance floor, but it works great and uses less energy

Chains, S Hooks, Zip Ties to attach your light

You’ll also need a few items to help hang your grow light on the shelf. One thing that makes the expensive systems more costly is that they have pully systems to easily move the light up and down as your seedlings grow. But, you can easily move your light up and down manually too. Especially if you want to save a couple hundred bucks. Simple materials like zip ties, S hooks and metal chains are all super useful to hang your grow light at the height you want. Check your grow light for its manufacturer recommendations, but as a general rule, you want to start with your grow light about 6 inches higher than the soil. Having chains makes it easy to adjust the height of your light once your seedlings start to grow.

Last summer, I found a big bag of various chains for $1 at a yard sale, and happily added it to my seedling station materials box. At another yard sale, I bought a jar full of screw and other bits for $1; inside of that were a few metal S hooks. I usually buy my zip ties at the Dollar Store but you can sometimes find those at yard sales too.

You can also buy short pieces of hanging chain with S hooks online here for $5.50.

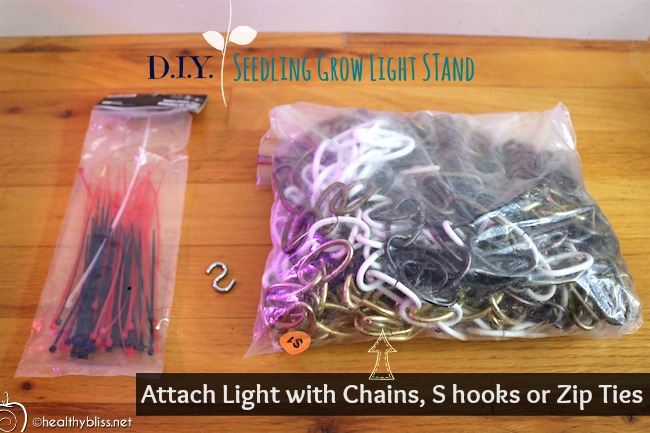
Honey I bought a bag of chains! Huh? It’s for our seedlings! OH!

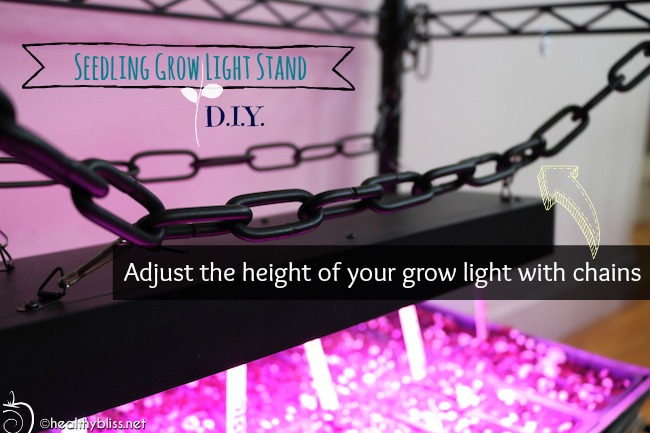
Chains and Zip ties or S hooks make it super easy to adjust the height of your light

Shopping List: DIY indoor seedling Grow Light Stand

It’s easy to start growing indoors, and you can do it on a budget too

Organic good grown at home is the ultimate in health

Cost – Buying New vs. Used

Buying all new materials, you can create ONE grow light shelf unit for $129.01 or TWO shelf units for $198.99.

Even if you buy everything NEW, you can get TWO grow light shelf units for the price of one ($199) at a comparable online garden supply store. That’s 50% less!!

Buying some used materials (like I did), you can create ONE shelf unit for $54.98 or TWO shelf units for $91.97.

Either way, you save money! Simply by starting your own plants from seed, you can save hundreds of dollars EVERY YEAR from not having to buy starter plants. (1 organic start plant costs $4-6, whereas 1 packet of 100 organic seeds costs $3 or $0.03 per plant.) Your investment in starting from seed will quickly pay off after only one season!

Additional Stuff you’ll need

Once you get your grow light shelves set up, you’ll need a few more things to actually start your seedlings:

  • Starter soil (I recommend 3 parts Peat Moss to 1/2 part Perlite 10 1/2 part Vermiculite)
  • Planting trays (I got mine for free on Craigslist; also check gardening stores at the end of the season for freebies)
  • Spray bottle for watering
  • Popsicle sticks for labeling your trays (I scored a huge bag at a yard sale for 50c)
  • And of course….some quality non-GMO organic seeds (I recommend Sow True Seed brand)
  • Fertilizer (use this once the seedlings are growing so they don’t stall in growth)

Have any personal tips on starting seeds indoors to share? Please leave a comment below!

Organic gardening for health, joy and happiness

For more on how to achieve your health goals and actually start feeling great, book a private health consult with me via Skype.

How to Book Your Health & Nutritional Coaching Session:

1. Take photos of your eyes with a digital camera.
2. Email the photos to me for approval.
3. We schedule a time to meet via phone or Skype!

More on Organic Farming:

More on Immune System:

Recipe: Fast & Easy Raw Food Salad…a delicious meal in minutes!

What does a raw foodie eat as a salad for lunch? Check out this easy-to-make option using all fresh, natural, healing foods. It’s a simple salad made from parsley, carrot, zucchini, cucumber and sprouts but it’s the texture, the dressing and combination of flavors that make it taste great.

How to Make a Delicious Raw Food Lunch in Just Minutes

Raw Food Recipe: Modern Israeli Salad

This salad is a modified version of the classic “Israel Salad” or “Arabic Salad” which is traditionally made using finely chopped tomato, cucumber and parsley with a tahini and lemon dressing. In this version, I’ve added more fiber with ground flax seed, a nice texture with shredded zucchini and carrots, additional enzymes from the sunflowers sprouts and some liver cleansing power with the cayenne pepper. You could also add a bit more protein with 2-3 Tbsp. raw organic sunflower seeds.

In total, this salad should take less than 10 minutes to prepare. It’s well worth it to take extra minute or two to shred your carrots and zucchini with a grater because it changes the texture completely and makes the salad much more enjoyable to eat.

Modern Israeli Salad Ingredients & Recipe (2 servings)

In a bowl, combine:

    – 1 Carrot, peeled and grated
    – 1 Medium to large zucchini, peeled and grated
    – 2 Medium cucumbers, peeled and chopped
    – 1 Handful of sunflower sprouts, chopped
    – 2 handfuls of fresh parsley, chopped
    – 2 Tbsp. ground flax seed
    – Dash of cayenne pepper, to taste
    – Dash of Himalayan Salt, to taste

Mix ingredients well. For the dressing, add:

    – Juice of 1 lemon
    – 2-4 Tbsp. organic tahini (sesame seed paste)

You can grind the flax seed in advance and have it stored in the fridge, ready to add to any salad for added fiber and omega proteins. A high-fiber diet helps to reduce constipation and promotes better digestive health and even helps to balance blood sugar levels. Raw tahini can be made at home if you can’t find it at your local health food store. The sesame seeds in tahini are a great vegan source of calcium. With all of these natural, whole and pure healing foods as ingredients, you are creating a real detox meal!

This is a salad that I usually have for lunch, due to the fat content in the tahini. I like to eat my “heaviest” meal in the middle of the day and save a lighter, lower-in-fat meal option for dinner.

As you can see, there is no need for a blender, juicer, food processor or dehydrator in this recipe. All you need is a cutting board, vegetable peeler, knife, and grater.

Yes, raw food recipes can be simple and not require a lot of expensive appliances!

Add chopped tomato to this recipe to make it a more classic Middle Eastern salad, but this version is just to show you other possibilities. There are many variations! Try adding some fresh pomegranate or a small amount (8-10 leaves) of finely chopped fresh mint.

This recipe is all raw, vegan, vegetarian and gluten-free!

More on Raw Food:

Alternative Grains to Wheat that are Gluten-Free

Increasing variety of natural, whole foods gives your body more variety in minerals, enzymes, energy and healing power. Unfortunately, refined, processed wheat has become the staple food in many people’s diets today. Of course, wheat also contains gluten, a protein that can weaken the micro-villi in the small intestine, decrease absorption rates and over time can also weaken the peristalsis function of the colon. Even if you’re not intolerant to wheat or gluten, adding different grains to your diet is a good idea.

All information in this article is for educational purposes only.
It is not for the diagnosis, treatment, prescription or cure of any disease or health condition.

Whether you cook your grains or eat them raw (usually sprouted or soaked) is entirely up to you. Either way, your body will benefit from having less wheat and gluten. Don’t be afraid to add a cooked grain, such as quinoa or brown rice, to a delicious raw vegetable salad for a half-raw, half-cooked meal. Especially when transitioning to a high-raw diet, cooked grains can help you feel full and keep you on the path of natural, whole and pure foods.

Keep in mind that gluten is also found in kamut, spelt, barley and rye. If you are looking for a total gluten-free diet, you should avoid those grains as well.

Gluten-Free Grains

Buckwheat

Technically buckwheat is not a grain. It is actually a fruit seed related the the rhubard family. It has a nutty taste and goes well with root vegetables like carrots or beets, onions and mushrooms. Buckwheat is high in protein (particularly lysine), is a rich source of B vitamins, and is high in manganese and tryptophan. Because of it’s high amounts of flavonoids, particularly rutin, buckwheat helps maintain blood flow, strengthens the blood and protects the low-density lipoprotein (LDL) cholesterol from free radical oxidation into potentially harmful cholesterol oxides. All these actions help to protect against heart disease.

Buckwheat is called ‘groats’ when unroasted (raw) and ‘kasha’ when roasted. In cooked food, buckwheat can be served as an alternative to rice or made into porridge. Buckwheat flour is great for making ‘healthy’ pancakes. As a raw food, buckwheat groats can be used to make a ‘raw’ porridge by soaking the groats overnight and adding cinnamon, dates, raisins and raw honey or agave.

Quinoa

Quinoa is a food from the ancient Incas, and although considered a grain, it’s technically part of the Chenopodium plant family. Quinoa has a light flavor and nice texture when cooked; it’s also easy to sprout. Quinoa is consider a complete protein, meaning that it includes all nine essential amino acids. This makes it a great choice for vegans, vegetarians and raw foodists who are concerned with getting enough protein in their diet.

Quinoa is also a very good source of manganese as well as magnesium, iron, copper and phosphorus. Can you imagine how much nutrition your body will get? You can make a delicious quinoa salad with finely chopped red bell pepper. tomato, cucumber, chopped parsley, raw apple cider vinegar, cayenne pepper and sea salt.

Brown Rice

Brown rice has a much higher nutritional value than white rice because the outer layers of the grain are still intact. The processing and refining of white rice strips the rice of its nutrients. Brown rice is naturally high in B1, B3 and B6 vitamins as well as manganese and selenium. It is also a good source of dietary fiber.

Add some cooked brown rice to a salad of chopped cucumber, tomato and grated carrot. Drizzle with a mixture of tahini, water, squeezed lemon, cayenne pepper, cumin and salt. This makes for a healthy lunch or a great fast dinner. You can also use brown rice as a side dish to a main meal, adding some chopped scallions and minced garlic for flavor. Let your food be your medicine!

Corn

Many people forget about corn as a healthy grain option to add to the diet. Corn is naturally high in magnesium and helps to stimulate bowel function. It’s great for anyone suffering from constipation. Corn is an ancient grain that is high in B vitamins and carotenoid antioxidants and is another good source of dietary fiber.

Corn on the cob can be eaten either cooked or raw. If raw, simply cut the corn off the cob and add it to a salad. You can even eat the raw corn on it’s own with a dash of cayenne pepper and salt for a fantastic afternoon snack. Add raw corn to a fresh homemade salsa for some real raw food bliss!

A great snack for kids as a healthy alternative to potato chips or pretzels is to make homemade popcorn using the real kernels popped on the stove. Transfer the cooked popcorn to a serving bowl and drizzle with organic virgin olive oil. Sprinkle with salt and nutritional yeast for a yummy ‘cheese’ flavored treat.

Corn can be genetically modified which is definitely a concern, but keep in mind that genetically modified wheat will soon be produced for mass consumption too. At least corn is less processed than refined white flour and doesn’t contain gluten. If possible, buy corn from your local farmer and be sure that he is not growing ’roundup ready’ corn (ie, genetically modified and owned by Monsanto).

Millet

Millet is a fantastic gluten-free grain, naturally high in protein, phosphorous, iron and B vitamins. When cooked, millet has a sweet buttery taste. Millet can be sprouted and eaten raw; hulled millet should be used for cooking.

Cooked millet can be served as a breakfast porridge with a variety nuts and chopped fruits. Ground millet can be added to bread and muffin recipes as an alternative to wheat. Sprouted millet can be blended with flax seed, carrot pulp, rosemary and cayenne pepper and then dehydrated for some yummy raw food crackers.

Why is wheat so bad for you? William Davis, author of the book Wheat Belly, explains it well. He says, “Eliminating wheat is the easiest and most effective step you can take to safeguard your health and trim your waistline. An interesting fact: Whole wheat bread (glycemic index 72) increases blood sugar as much as or more than table sugar, or sucrose (glycemic index 59). So, when I was devising a strategy to help my overweight, diabetes-prone patients reduce blood sugar most efficiently, it made sense to me that the quickest and simplest way to get results would be to eliminate the foods that caused their blood sugar to rise most profoundly, in other words, not sugar, but wheat.”

Davis also states,” Whether it’s for convenience, taste, or in the name of “health,” Americans have become helpless wheataholics, with per capita annual consumption of wheat products (white and wheat bread, durum pasta) having increased by 26 pounds since 1970. If national wheat consumption is averaged across all Americans – babies, children, teenagers, adults, the elderly – the average American consumes 133 pounds of wheat per year. (Note that 133 pounds of wheat flour is equal to approximately 200 loaves of bread, a bit more than half a loaf of bread per day). Nobody becomes diabetic by gorging on too much kale. But plenty of people develop diabetes because of too many muffins, bagels, breakfast cereals, pancakes, waffles, pretzels, crackers, cakes, cupcakes, croissants, donuts and pies.”

With rates of diabetes, Irritable Bowel Syndrome (IBS), colitis, celiac and cancer going through the roof and increasing every day, isn’t it time we started to make some serious changes to our diets?

More Healthy Recipes:

More on Gluten-Free:

How to Make Fresh Sprouts at Home

Sprouting your own nuts and seeds is so easy and it’s a great way to really get connected back to the growing power of your food. Sprouts provide an excellent plant-based source of protein year-round and when you make them at home, you can eat them as short or as long as you like. They are also extremely affordable for those of you who are trying to add more raw foods to your diet but have a limited budget to spend on raw food.

Mung Bean and Lentil Sprouts: Raw, Vegan Live Food!

Fresh sprouts only require some water and a nice, mold-free environment to grow. I usually recommend starting with mung beans, lentils, wheat seeds, quinoa, alfalfa seeds or radish seeds for beginnings. These sprouts are all very easy to grow and will build up your confidence to later try things like pumpkin seeds, sunflower seeds, mustard seeds, sesame seeds and garbanzo beans. Keep in mind that when sprouting lentils, you need to buy whole beans (not halves).

Fresh Lentil Sprouts: Full of proteins, enzymes & fiber

You can add sprouts to salads or raw soups for a nice garnish and added ‘crunchy’ texture. You can also make an afternoon snack using a few different types of sprouts and simply sprinkle with cayenne pepper, extra virgin olive oil and some sea salt. They are delicious! Be careful not to eat too many sprouts at one time as they can cause excessive gas, especially if your system is not used to them.

The real benefits of eating sprouts are that they are not only high in protein but they are also a great source of enzymes. All natural, not in any pill or supplement!

Mung Bean Sprouts: Add a small handful to salads for a fresh, crunchy texture

I recommend using 100% cotton bags for sprouting because they allow air-flow into the sprouts and they are designed to not have any standing water, which can often be a problem when using jars or sprouting trays. The bags only require a quick rinse with water 2-3 times per day, and in just a few days, you will see your sprouts happily growing! When I first looked online for cotton sprout bags, I was disappointed to only find nylon bags being sold, so I decided to have my own made! I now have them available for sale at the Healthy Bliss store!

The bags that I sell include a complete set of instructions for both sprouting and for using cotton bags to make your own nut and seed milks.

The instructions for sprouting are:
    Soak overnight (8-10 hours) in a glass jar, using 2/3 beans to 1/3 water.
    Empty beans or seeds in the sprouting bag and rinse well with water. Rinse until the water runs clear.
    Hang moist bag in your kitchen or in a dry place (away from windows and direct sunlight).
    Rinse bag with fresh water 2-3 times per day.
    Check for readiness after 1 day. When at desired length, put entire bag in the refrigerator and continue to rinse one time daily.

The following are some yummy sprout recipes from the book Ann Wigmore’s Recipes for Longer Life. There is so much you can do with fresh sprouts – get creative, have fun and enjoy!

Recipe for Alfalfa & Avocado Salad (For 2 – 4)
    3 Cups Alfalfa Sprouts
    1 Avocado
    1 Tomato
    1 Stalk Celery
    2 – 4 Tablespoons Minced Onion
    1 Teaspoon each : Cayenne Pepper, Kelp

Mash the avocado with folk, and chop tomato. Put both in blender and process for 4 – 5 seconds, just until both are mixed together. Put the other ingredients in a serving bowl and pour the sauce over all.

Variations : Instead of blending, cube the avocado and tomato, and use a different sauce to dress the salad.

Recipe for Complete Protein Salad Snack (For 1)
    1 Cup Wheat Sprouts
    1 Cup Chick Pea Sprouts
    2 Tablespoons Minced Parsley
    1 Teaspoon Vegetable Seasoning (Cayenne Pepper, Cumin and/or Chili Powder)
    1 Teaspoon Kelp
    3 Tablespoons Coconut Oil
    1 Tablespoon Lemon Juice

Mix the sprouts together with the minced parsley and seasoning. Pour the liquids over all.

2 Sprout Nut Seed Milk Cotton Bags + eBook – Raw Food Cooking
$15.99

More on Nut Milk and Healthy Recipes:

Sprouting Safety – Preventing e.coli and Salmonella in your Bean & Seed Sprouts

Bean Sprouts source of E.coli?

We still don’t know for sure what caused the deadly e.coli outbreak that resulted in over 30 deaths in Germany recently, but the most recent evidence is pointing at the sprouts from a German farm. Officials are still warning people not to eat sprouts.

All information in this article is for educational purposes only.
It is not for the diagnosis, treatment, prescription or cure of any disease or health condition.

The University of California’s Division of Agriculture and Natural Resources research on bacteria and sprouts shows that any contamination in the sprout is likely to come from the seed itself:

‘For most outbreaks, the source of contamination appears to have been the seed. Even if the seed is contaminated, pathogen levels are typically very low, so contamination can easily be missed depending on the nature of the seed-testing program. The best conditions for sprouting are also ideal for multiplication of pathogenic bacteria if they happen to be present on the seed. Even if the seed are only lightly contaminated, Salmonella and E. coli O157:H7 levels can increase to millions of cells per serving during the sprouting process.’

Give loving intention to your sprouts too!

My advice: Buy organic seeds and beans and make your own sprouts at home, using 100% cotton sprout bags. The bags reduce the risk of molds and bacteria because there is no standing water as there can be in jars and trays. When you buy organic seeds, you know you are getting the best, and don’t you deserve the very best quality of foods? Yes!

The benefits of eating sprouts is that they are a live food full of enzyme power and are a great source of protein for the body.

Fresh Lentil & Mung Bean Sprouts

Don’t be afraid to eat sprouts as a result of the e.coli outbreak in Germany; instead just be aware of a better choice which is to make your own sprouts at home.

You can sprout alfalfa, mung beans, lentils, garbanzo beans, pumpkin seeds, sunflower seeds and more . Bringing variety into your diet is a great way to increase your natural mineral reserve!

I personally prefer the cotton bags over nylon bags for spouting because the cotton is more natural and can keep the sprouts just moist enough to grow without any extra or standing water for bad bacterias. The air flow through the bags is also perfect for preventing mold.

More on Healthy Living:

How to Eat Raw Food in Winter – Sprouting, Raw Hummus & Recipes

Some people have asked me recently about what to eat during the cold months when transitioning to raw food, especially because the price of fruit and veg goes up and the quality of fresh foods goes down. So what’s a raw foodist to do? Well, in my opinion, winter is the perfect time to start experimenting with sprouting and dehydrating foods. Why not add a new level of excitement and interest to your raw food diet choices!

The sprouting is SO easy and it is super cheap! This is the best way to save money and still have an abundance of raw foods. You can go crazy with sprouting. My favorites (just for ease) are mung beans, chick peas and sunflower. With sprouted chick peas you can make your own raw hummus:

1 c. chick pea sprouts (sprouted overnight)
Juice of 1 lemon or lime (I prefer lime)
2 T. fresh orange juice
1 clove garlic
2 T. raw tahini
Optional seasonings: ground cumin, spike or sea salt to taste, chives, paprika, cayenne pepper

Blend all of the ingredients. Add water to thin to desired consistency.
Very delicious spread on leafy greens or red bell pepper strips or even celery. Enjoy!

Mung bean, lentil & wheat berry sprouts

Mung bean, lentil & wheat berry sprouts

If you are unsure of how to begin sprouting, don’t be afraid – actually it is so easy. You don’t even need sunlight, just a jar, container or sprout bag and water.

I encourage all of you to get your seeds wet and your hands dirty and start sprouting this winter!!

The Sproutman website has some useful info on getting started with sprouts.

His instructions are:


Basic Instructions for Sprouting in a Sprout Bag

1. Soak your seeds in a jar of pure water overnight. (about 8 hours).

2. Moisten the bag and pour the soaked seeds in. Rinse and hang the bag on a hook or knob or lay in dish rack. Dripping stops in about one minute

3. Rinse sprouts by dipping the bag in water for 30 seconds, twice daily, morning and evening.

Commentary: Sprout bags travel well, they never break and since they drain on all sides and breathe throughout, mold and mildew are rare.

Another good site, Sprouting at Home, explains what the benefits of sprouting are:

Buy you own 100% cotton sprout bags, just visit my Healthy Bliss store!

Why Eat Sprouts? quoted from The Wonders of Sprouting by Lucie Desjarlais, RNC

“Lots of reasons! They carry plenty of vitamins, minerals, proteins, and enzymes, all necessary for the body to function optimally. In addition to providing the greatest amount of these nutrients, sprouts deliver them in a form that is easily digested and assimilated. In fact, they improve the efficiency of digestion. Sprouts are also deliciously fresh and colourful!

Sprouts are very inexpensive (even when organic), always fresh (they grow until you chew them) and have the potential to help solve hunger and malnutrition problems in our communities and in developing countries, because they are so rich in nutrients, affordable, and easy to transport before sprouting. Sprouts are precious in winter, when the quality of fresh fruits and vegetables is declining as their price increases.”

“(Sprouts) supply the highest amount of vitamins, minerals, enzymes, etc. of any food per unit of calorie.”

“… sprouts nourish and strengthen the whole body, including the vital immune system.”

So, the dehydrator. Well the best thing about dehydrating in winter is that, although the food is not considered ‘cooked,’ it can still be warm when it comes out of the dehydrator so it is a nice option is you are yearning for something heated for you belly. You can make raw crackers and breads, and again, during winter when you are stuck inside, why not give the dehydrating a try!

Here is an easy recipes for Flax Crackers:

Flax Crackers

4 cups whole flax seeds, soaked 4-6 hours
1/3 to 1/2 cup Braggs Aminos
juice of 2-3 lemons

Soak flax seeds for 4 to 6 hours in purified water. You will then have a gelatinous mixture, be sure to keep moist and loose for spreading. Add Braggs and lemon juice to taste and mix well. Spread mixture as thin as possible on your dehydrator trays with a teflex sheet on top. Keep your hands wet as this will help on spreading the flax seeds (or use a spatula) Dehydrate at 105 degees for 5-6 hours and then flip the mixture and remove the teflex sheet. Continue dehydrating until the mixture completely dry. Approximately 5-6 hours.

Optional:

You could add garlic, onions, carrot juice, taco seasoning, Italian seasoning, chili powder, cumin in any combination. Be creative and make up your own recipe.

Start sprouting today – get your own 100% cotton sprout bags!

<strong>More Healthy Recipes:</strong>

More on Manifestation:

More on Motivation: